Note on Replicating Factory Trailer Wiring (long post)

Anything Triton related

Note on Replicating Factory Trailer Wiring (long post)

Postby antoo on Sun Sep 23, 2012 8:52 pm

This is a note for anyone trying to replicate or make sense of the factory trailer wiring harness.

I know there are easier ways of doing it (than replicating), but there isn't a better way of doing it than with the use of relays and all. However, trying to replicate the factory harness has been doing my head in every time I have looked at it in the last couple of months. So I eventually gave in last week and ordered the factory harness. I picked it up for a pretty penny or two ($320) on friday and noticed at the time that the bag had a large tear in it as if it had been opened but thought nothing of it as a quick look suggested all the bits were there.

Next morning I went out to install it and discovered that the plastic on three of the plugs was completely shatered so that they were unusable, it was like something really heavy had been dropped on it. I was pretty cheesed off as I wanted to get the wiring sorted on the weekend, which is why I went for the factory harness. Before taking it back I thought ... the package was already open so I might take a look at the install manual and see if it solves my questions. Sure enough the mystery was solved (more below). So I took the broken harness back to the dealer, the parts guy took one look at it and when I said I wanted to get it sorted out on the weekend there was no question about a refund. I went from there straight to Jaycar and bought most of the parts, an auto shop a few doors up solved the remaining parts and I made up the harness and installed it over the weekend.

The mystery I had was to do with powering the relays. I could work out what each of the pins controlled on the 8 pin plug at the rear where the factory harness plugs in, and I had established that the smaller 3 pin plug beside it powered the two relays. But for the life of me I couldn't work out how to get power into that 3 pin plug or which pin should have the power in it, was it the red or white wire? I've learnt to never start into something until I fully understand it, in case I'm missing something significant. Experience is a hard teacher. So yes I could have just run power to the rear but I wanted to understand.

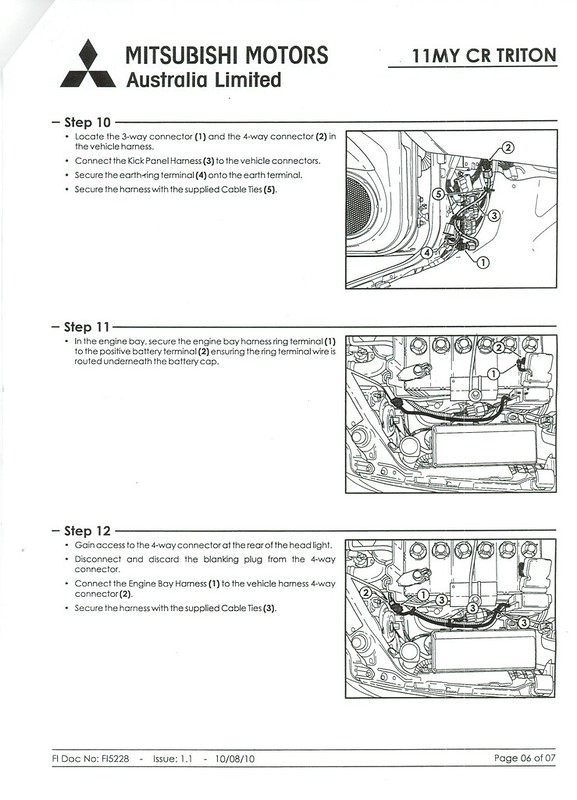
The install manual (scan below) solves the problem, there are actually three harnesses to connect when you get a factory trailer wiring setup. The trailer harness proper at the back, a small harness in the passenger footwell and another short harness in the engine bay. These other two short harnesses make the red cable at the rear in the 3 pin plug go live (presume though I didn't test it). Step 10 below describes connecting a short harness and earth ring in the passenger footwell and step 11 and 12 connecting a short harness between the battery positive terminal and a plug behind the passenger headlight.

Now that I understood what was going on there was no need to frig around with the passenger footwell harness or engine bay harness. I ran a new cable in conduit through the passenger chassis rail that takes power to the rear and returns to an earth point near the back of the passenger headlight. In my slightly better than factory setup this powers 4 relays (better than factory 2 relays): left turn, right turn, stop, number plate (also thinking about a 5th for reversing lights). Each of the relays is switched from me tapping into and soldering wires onto the wires at the rear of the 8 pin plug that the factory harness goes into. All in all happy camper with a quality DIY job for about a third of what the dealer wanted. (parts list below image)

Click to view larger picture

Parts
* 4 SPDT 30amp relays (30a is overkill but jaycar were out of 5a or 10a on the day - ideally I would have got SPST but again not available so I just blanked off the middle pin)
* small waterproof project box
* 16 female spade plugs to fit two sizes of pins on the relays
* 10m of 10mm conduit
* 6 pin waterproof auto connector (not necessary bu handy if I ever need to remove my harness from the ute)
* 12m of single core 18AWG cable (12m=2m x6m there and back, probably could have gone 1 size smaller on the cable but this will allow for reversing lights if I ever get around to it)
* terminal block for various connections in the project box
* 2 medium sized ring terminals
* inline mini blade fuse holder
* 10amp mini blade fuse
* 7 pin flat trailer plug (female) with 1m of 7 wire
* packet of cable ties
* roll of electrical tape
User avatar
antoo
 
Posts: 59
Joined: Sun Dec 11, 2011 5:52 pm


Re: Note on Replicating Factory Trailer Wiring (long post)

Postby Joe on Mon Sep 24, 2012 6:28 am

Nice post antoo. How much did it end up costing you?
Dad
----
Never take life seriously. Nobody gets out alive anyway.
User avatar
Joe
Moderator
 
Posts: 6335
Joined: Thu Nov 12, 2009 7:56 am
Location: Queensland

Re: Note on Replicating Factory Trailer Wiring (long post)

Postby oldplodder on Mon Sep 24, 2012 7:18 am

Thanks
I was wondering how it worked too, and what the differences are.
oldplodder
Platinum Subscriber
 
Posts: 199
Joined: Tue Sep 23, 2008 8:17 am

Re: Note on Replicating Factory Trailer Wiring (long post)

Postby antoo on Tue Sep 25, 2012 5:47 pm

I spent $150 in parts and most of a Saturday working it all out.

Two things to note.

* I went for 4 relays, factory has 2 (stop & tail I think). The relays were $6.50 each and it would have been cheaper again if I had been able to get 5amp or 10amp relays (instead of the 30amp I ended up with). Also if had opted for solder relays rather than spade lug relays it would have been cheaper again as I wouldn't have needed to spend $10 on connectors.

* I also opted for a 6 pin waterproof auto connector ($20 - top of picture below) to connect my box of tricks to the cable I patched in to the factory wiring loom. I did this to make it easy to remove my box housing the relays if I need to work on it (eg. if I decide to a 5th relay to handle reversing lights, reversing camera etc). Instead of the waterproof connector I could have just sent the wires straight into the box and put a terminal block (cheap) just inside the box to make it disconnectable. This would have been cheaper but more hassle down the track.

Photo attached of the finished result
Click to view larger picture

If anyone decides to do this feed the cables through the chasis rail from the engine bay end (I couldn't get it to go from the tray end and wasted about an hour trying to make it go)

Where you patch in to the factory loom just melt a bit of plastic off the factory wires with the soldering iron and tin this bit. Then once you have soldered in your wires coat each connection with clear nail polish to insulate and make it waterproof. I then added a bit of electrical tape to each wire as the nail polish is waterproof but prone to rubbing off, electrical tape isn't waterproof but won't rub thin. Finish it off with a wrap of black electrical tape to make it look neat.
:D
User avatar
antoo
 
Posts: 59
Joined: Sun Dec 11, 2011 5:52 pm

Re: Note on Replicating Factory Trailer Wiring (long post)

Postby Dillbanger on Fri Jun 20, 2014 7:08 pm

Is there a wiring loom from the battery that goes to the connector behind the headlight? Or is that part of the oem kit you have to buy?

I have a new glx-r which didn't come with a tow bar and I am trying to get lights on a rear bar working. The rear bar came with two big relays and a smaller 4 pin relay. It has connectors which fit the factory 8 pin plugs and a triangle plug which connects to the the factory triangle plug next to the 8pin oem plug.

The triangle plug which came with the rear bar has a red and white wire coming out of it which I presume is a positive (red) and negative (white)?
Dillbanger
 
Posts: 8
Joined: Fri Jun 20, 2014 6:10 pm

Re: Note on Replicating Factory Trailer Wiring (long post)

Postby BillMcQuade on Sun Jun 22, 2014 6:39 am

Interesting, considering I bought the whole towbar kit for $550. That either makes the towbar cheap, or the loom expensive :lol:

To answer Dillbanger, yes, there is a small loom that goes behind the battery, as shown in the instructions posted by Antoo.
White 2013 MN GLX+ manual

"Tuned by Doctor Diesel"
User avatar
BillMcQuade
Platinum Subscriber
 
Posts: 2007
Joined: Sun Jun 23, 2013 12:20 pm
Location: The 'Gong

Re: Note on Replicating Factory Trailer Wiring (long post)

Postby Rudy on Wed Nov 26, 2014 9:06 pm

My mate gave me his towbar with relays because he was selling his vehicle. I bought a genuine engine bay and kick trim harness at a cost of $44.55, however, I cannot find the 4-way connector, item 2 in step 10 of the above manual.

I wished I would have found this post earlier. Spent a long time tracing back the supply to the passenger kick trim.

I currrntly cannot decide between persevering with finding the 4-pin connector or running a new supply from the engine bay to relays at the rear of the vehicle. I think I mught have to pull out the glove box to locate the 4-way connector, item 2.
Regards, Rudy.
Rudy
 
Posts: 1
Joined: Wed Oct 09, 2013 6:33 am

Re: Note on Replicating Factory Trailer Wiring (long post)

Postby NowForThe5th on Wed Nov 26, 2014 9:17 pm

Have a look here
Chris

If work is so terrific, why do they have to pay us to do it?
User avatar
NowForThe5th
Moderator
 
Posts: 9227
Joined: Sun Jun 15, 2008 2:00 pm
Location: Holt, ACT

Re: Note on Replicating Factory Trailer Wiring (long post)

Postby Shodown on Fri Apr 01, 2016 3:01 pm

Hi All,

If you are looking for an OEM fit trailer wiring harness, hit up http://www.arandatowbars.com.au/

They also list on eBay - cost for the harness is about $45 which included a plastic flat socket. Be warned though, there is no reverse wire in this harness.

Another option if you want an OEM harness including reverse is BTA Towing - part number UNT263 but the going prices for these is around $120-130 by the looks of it.

Cheers,
Kevin

EDIT: FYI, install involves unplugging rear light socket under tub, plug this inline and running 12v from the battery down the chassis rail. The earth was a little crappy, being a local round loop connector I ended up cutting it off and joining a new earth that goes all the way back into the engine back on a earth nut on the firewall.
Shodown
 
Posts: 5
Joined: Thu Jan 21, 2016 11:01 am


Return to General Discussion

Who is online

Users browsing this forum: No registered users and 11 guests