Installing Double DIN radio (Digoptions) in MN GLX-R

Re: Installing Double DIN radio (Digoptions) in MN GLX-R

Postby Scale on Mon Feb 25, 2013 11:26 am

Cowboy Dave wrote:Maybe the hoods have changed if there are different head units being supplied?

I think Rocko put some part numbers up there somewhere, yours should have the part number embossed on the underside - if they're different numbers that might identify the problem.

Pretty sure there are hoods/fascias on ebay now from memory.

Thanx cowboy I measure the old radio it is 180 mm across the front my new unit is 180 mm on the very front but then exspands out to 182 mm which makes the facia to small, looks like they have changed so will have to improvise will post when I have a solution.
User avatar
Scale
 
Posts: 414
Joined: Sat Feb 02, 2013 6:31 pm
Location: Victoria


Re: Installing Double DIN radio (Digoptions) in MN GLX-R

Postby Scale on Mon Feb 25, 2013 1:59 pm

Scale wrote:
RockoWallaby wrote:
1. Hood and brackets.
You will need to get some parts, to install the radio into. The GLX and GLR already have these bits (Lucky buggers).
The computer hood will NOT fit...so, don't waste your time cutting

Cheers
Scotty

I have 2012 GLX and my radio surround will not fit the new dig unit it is close did anyone have to mod this part or have the new dig units changed?
Thanx
Rick

Ok penny dropped when Rocko said you have to trim the facia I thought it was for some I interference on the glr but you have to trim the hole facia down to make it thinner :roll:
User avatar
Scale
 
Posts: 414
Joined: Sat Feb 02, 2013 6:31 pm
Location: Victoria

Re: Installing Double DIN radio (Digoptions) in MN GLX-R

Postby Scale on Mon Feb 25, 2013 6:44 pm

Shoey wrote:OK help needed
I spoke to mat today re cable connection he told me that the original cable connection from the radio is plugged into another connetor.

Original connector
Click to view larger picture

i have felt in behind and it feels as tho it goes strait into the loom.

connector comparisons
Click to view larger picture

Help needed from the experts please

In the pix above there is a yellow wire anyone know what it does? Do I have to connect it back up?
Why I ask is I had to dig into the dash and fish out the next plug down to be able to connect with Matt's wiring loom and the yellow wire will have to be cut as it doesn't hook up to the next plug and also there was a black wire I had to unplug would this be an earth wire? Sorry for all the dumb questions but a bit challenged when it comes to electrics.
Thanx all for any help.
User avatar
Scale
 
Posts: 414
Joined: Sat Feb 02, 2013 6:31 pm
Location: Victoria

Re: Installing Double DIN radio (Digoptions) in MN GLX-R

Postby Scale on Mon Feb 25, 2013 7:05 pm

Just put a test light on the yellow wire and it has constant power even when the key is turned off still no idea where it goes.
User avatar
Scale
 
Posts: 414
Joined: Sat Feb 02, 2013 6:31 pm
Location: Victoria

Re: Installing Double DIN radio (Digoptions) in MN GLX-R

Postby dan.batto on Mon Feb 25, 2013 7:16 pm

My guess is it helps with radio station memory?
User avatar
dan.batto
 
Posts: 3269
Joined: Wed Apr 06, 2011 10:34 pm
Location: Rowville, Melbourne

Re: Installing Double DIN radio (Digoptions) in MN GLX-R

Postby Scale on Mon Feb 25, 2013 7:34 pm

Just cheched the plug that I had to fish out from deep in the dash and it has a red stripped wire that lines up with the yellow of Matt's loom and this wire has constant power also so I'm thinking that lose yellow wire isn't need at this point.
Wish me luck going to try it.
User avatar
Scale
 
Posts: 414
Joined: Sat Feb 02, 2013 6:31 pm
Location: Victoria

Re: Installing Double DIN radio (Digoptions) in MN GLX-R

Postby Scale on Tue Feb 26, 2013 7:43 pm

Any wire that is not going directly into the second plug is not used so you can safely eliminate them and just plug and play hope this will make it quicker for anyone that has this issue in the future, this is quite an easy install but knowledge is everything given that I've done one now if I had another one to do 3 hours 4 tops not a day and a half :oops:
Cheers hope this helps.
Rick
User avatar
Scale
 
Posts: 414
Joined: Sat Feb 02, 2013 6:31 pm
Location: Victoria

Re: Installing Double DIN radio (Digoptions) in MN GLX-R

Postby tony12 on Tue Mar 12, 2013 8:41 am

Hi Guys im new to this Forum and just picked up my Triton GLR dual Cab on Saturday, and love it.
Im looking at buying a Pioneer 2DIN head unit with reversing camera and not yet decided on buying the model with a SATNAV or not. My question to you all is ( and im sorry if it has been motioned earlier), has anyone installed a Pioneer 2DIN head unit to there truck or similar and if they have what is a decent 2DIN getting around?
Also if it would be worth the extra to pay for the SATNAV head unit, or have my current NAVMAN hard wired into the dash so im not having the cable run from the SATNAV to the 12v outlet?
tony12
 
Posts: 2
Joined: Tue Mar 12, 2013 7:24 am

Re: Installing Double DIN radio (Digoptions) in MN GLX-R

Postby siwren on Wed Apr 24, 2013 6:14 pm

Hi All,

Some quick questions:

1> How long does the unit take to start up?
2> Is the menu fast to respond and easy to use whilst driving?
3> Do you use the factory bluetooth for voice calls or the system built into dig option?
4> Do the phone buttons still work if the bluetooth voice is via the dig options?

This is in reference to a 2012 MN GLXR,

Cheers,

Simon
Simon

See my Triton build: Si's Tri
My Shed
siwren
 
Posts: 138
Joined: Tue Aug 14, 2012 10:08 pm
Location: Croydon, NSW

Re: Installing Double DIN radio (Digoptions) in MN GLX-R

Postby dan.batto on Sun May 12, 2013 11:31 am

RockoWallaby wrote:Heya folks

As promised, I'm posting up the install for my Digoptions Lifestyle Double DIN radio in my MN GLX-R.
Much of this install will also be relevant to other brands of Double DIN radio's.
However, the GLX and GLR models have different hood and bracket systems, so much will be different for them.
Also, unsure how this compares to the ML GLX-R. If the brackets are similar, then it may be identical.
As I only have a MN GLX-R, I can't compare to anything else.

Anyways....

1. Hood and brackets.
You will need to get some parts, to install the radio into. The GLX and GLR already have these bits (Lucky buggers).
The computer hood will NOT fit...so, don't waste your time cutting it down ;)

HOOD:
Part number: 8060A079XA
Part Name: Hood-Console Meter
Cost: Around $76.00

[IMG]http://i830.photobucket.com/albums/zz222/rockowallaby/Triton/Double%20DIN%20Radio%20Install/P4010039.jpg[/IMG
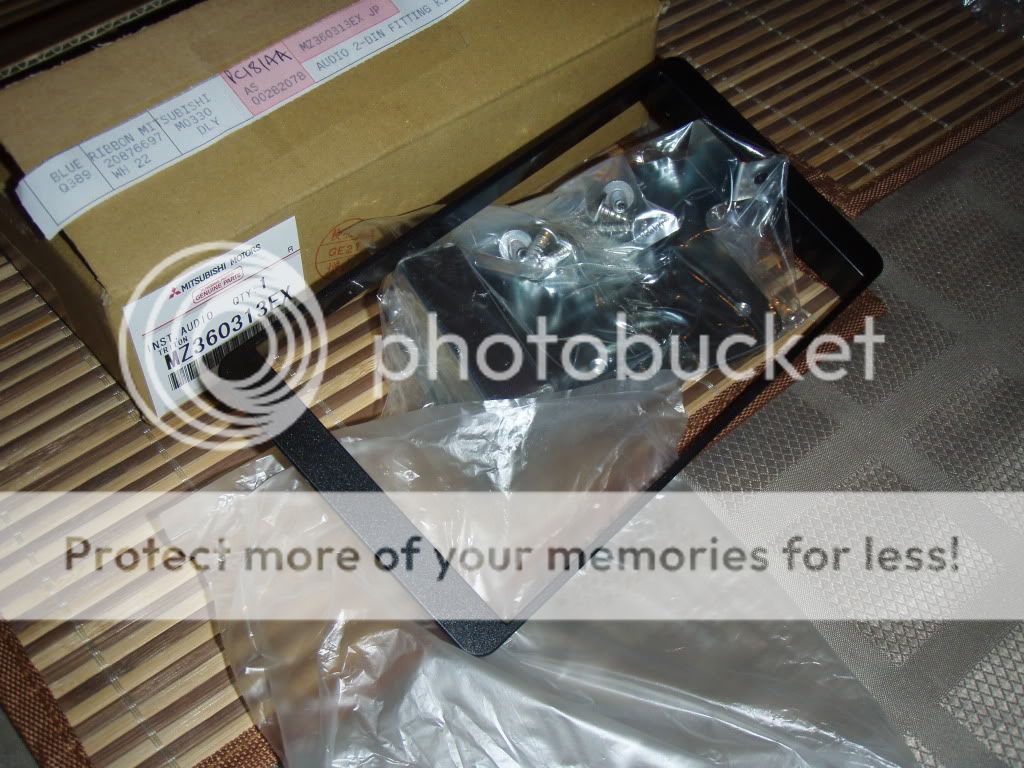
Click to view larger picture

PLATE AND BRACKET:
The bracket and front plate fit the MN GLX and GLR.
They do NOT fit straight on the GLX-R, for the above reasons.
However!! The front plastic plate bit is needed to fill the gap between the hood and radio.
Unfortunately, there is NO GLX-R bracket kit available. It wasn't made to fit a Double DIN radio under the hood, in its standard format.
This kit is your only factory option to fill the gap (apart from making something up yourself out of ABS sheet, or out of another plate for a different vehicle somehow), so if you want a nice pretty trim around your radio, you have to use it.

Plate and Bracket Part Number: MZ360313EX
Part Name: Audio 2-DIN fitting kit
Cost: Around $105.00

Click to view larger picture

Put them together and you get....

Click to view larger picture

2. Remove the original Hood.
Grab it and pull it horizontally towards the rear of the car.
Click to view larger picture

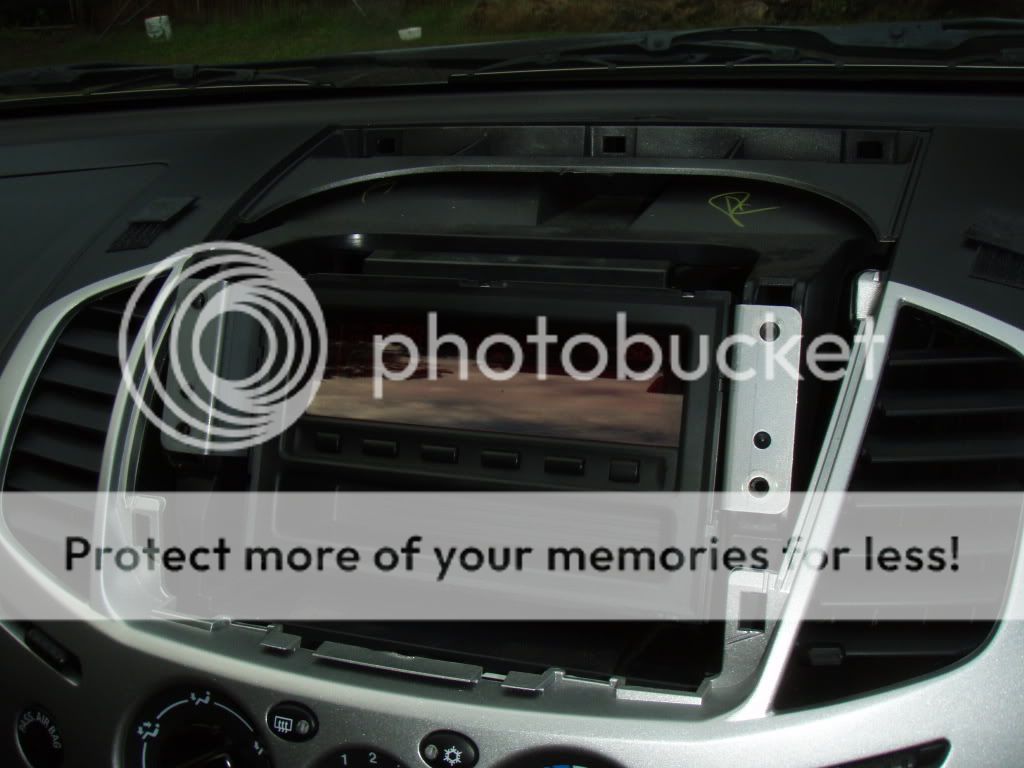
3. Remove the Trip Computer:
Ignore the silver bracket in the pic, from the front fascia kit. That was testing the location, and you can't use it anyway.

Click to view larger picture

4. Cut & trim tabs:
Using a sharp blade or hacksaw blade, remove the tabs that stop the new radio sliding in place.

Click to view larger picture

Repeat on other side...

Then remove side tabs

Click to view larger picture

Click to view larger picture

5. Cut, score and fold base plate:
Cut approx 3-4cm from back of base towards rear of vehicle (see pic).
Score across base from one side to another, not going right through material. You want it cut enough to fold down, BUT still strong enough to support the radio.
WATCH THE WIRES!! Don't cut any!

Click to view larger picture

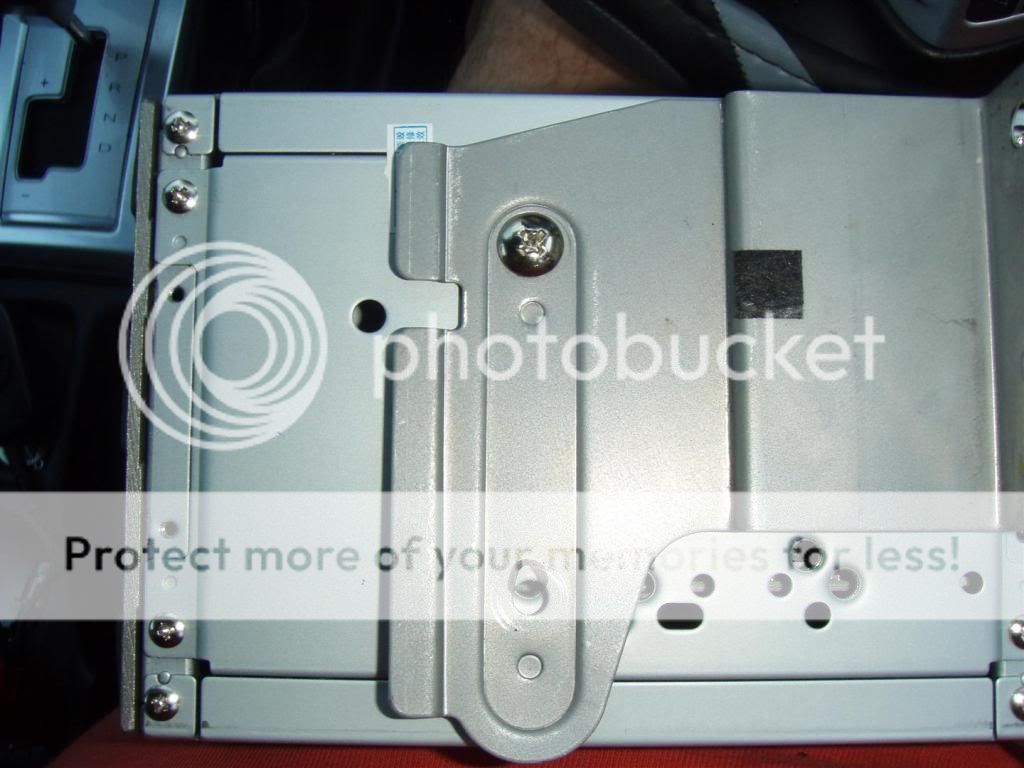
6. Modify original computer brackets to fit new radio and install:
The brackets supplied with the front plate are useless for the GLX-R.
You can readily modify the original trip computer brackets to work perfectly, though.
Firstly, cut the right angle tab off the back of the original bracket with a grinder. You can see it cut off the bracket in this pic.

Click to view larger picture

Then find the holes on the radio to use. The rear most holes are the ones.

Click to view larger picture

Position the bracket with screws in the TOP holes only!! Tighten firm, but so the bracket can be adjusted under pressure.
You'll see the bottom holes don't line up. Mark them, and drill or file them out to an oval shape. Then reinstall brackets with all 4 screws in place.

Click to view larger picture

If you go as pictured with the oval holes, the unit should slide straight in!
If you want to check (which is pretty wise) put only the top 2 in, fit the unit roughly in place, fit the hood, and check clearances with the fascia plate. mine just worked perfectly! Almost dropped from the shock.
HOWEVER, don't do what I did, and scratch your fascia! Put a small towel under the unit to protect the paint.
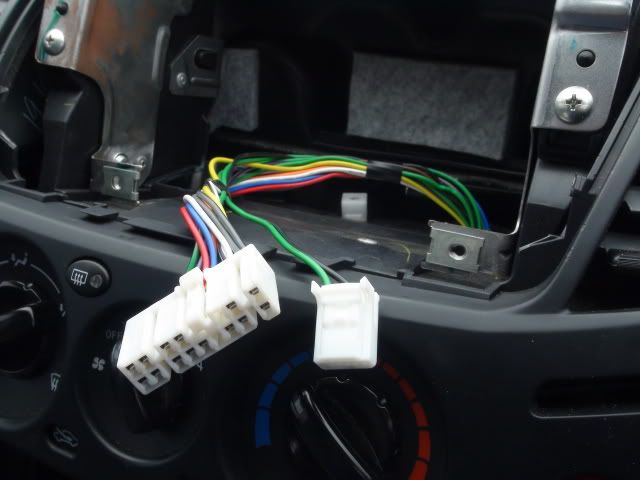
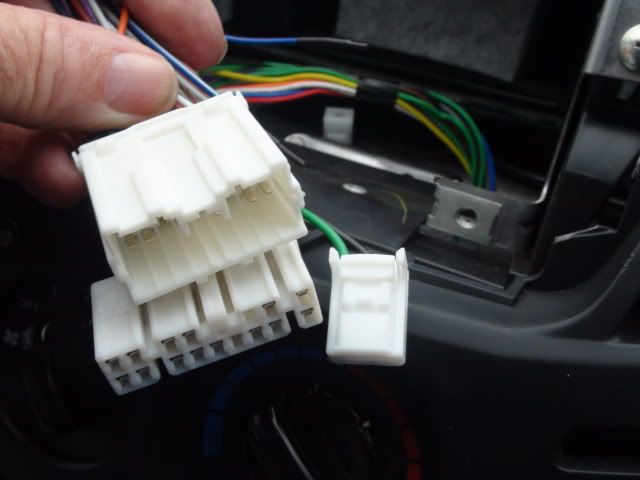
7. Remove old radio:
You need either the proper radio removal tools, as pictured, or try some heavy wire.

Click to view larger picture

Remove the original radio loom from the back of the radio. NOTE that the earth wire doesn't just pull out! It has a button clip, so press down and removes easily.

Click to view larger picture

Welcome to Spaghetti central!
Feed the wires up to the new location, being careful to not bend the aerial wire too much (after removing it from it's holding clip if required)

Next, cut the end off the earth wire from the new radio loom, and put on a male spade bit, to plug into the earth wire above.

Click to view larger picture

Because I'm fitting reverse cameras, I put on a double adapter bit on the earth wire, for the camera earth.

Click to view larger picture

Now, as my reverse cameras are not the ones supplied with the kit, I made a special loom for my install. You'll need to follow the instructions with your cameras. Blue (back) wire to reverse lights, red to power, etc.

8 Install unit:
Add the new cable to the old loom, attach the earth and all the rest of the cables, aerials, usb, iPod, etc, and CAREFULLY slide the unit into place, taking care not to scratch the fascia beneath (remember the towel!!!) as well as not crush or compress the wires behind. Theres a small space above the radio housing, thats perfect for the GPS antenna, so use some double sided tape and secure it there.

Click to view larger picture


Install the screws holding the brackets in place, and TEST it!! Now's the time to see everything works...not once the hood's on!


9. Install hood.
Push on, and clip into place, making sure the back clips (at front of vehicle) are properly in their slots
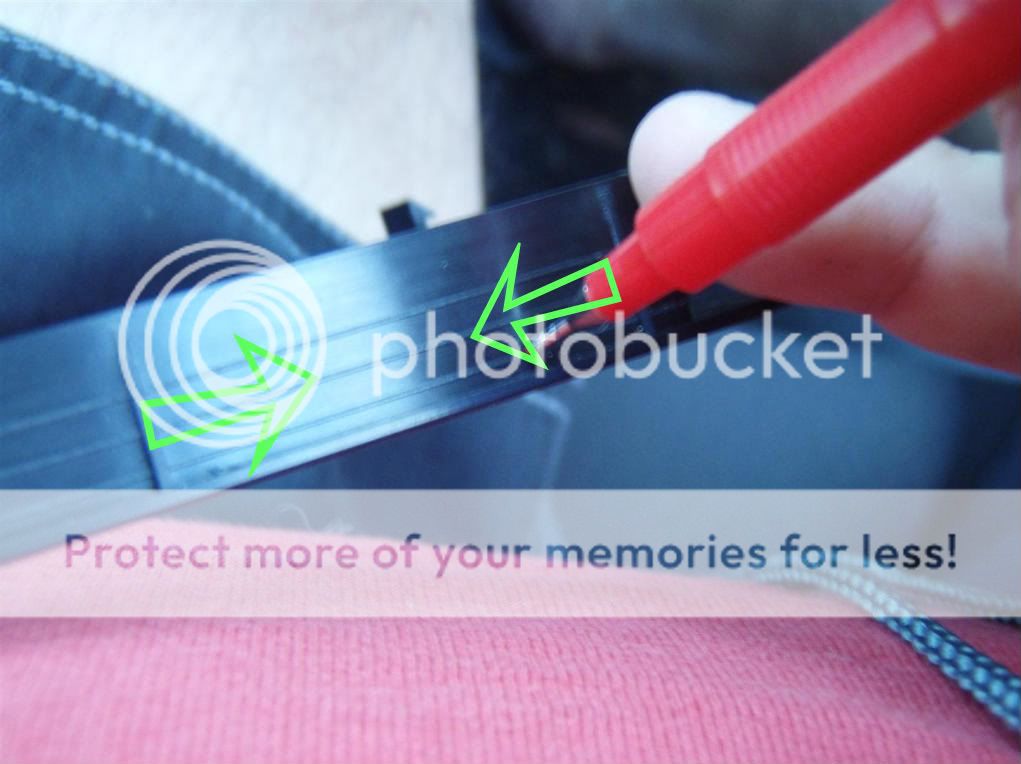

10. Trim fascia plate:
You need to cut around the fascia plate at the line indicated by the green arrows (and NOT the red pen tip). CHECK IT'S THE SAME LINE FOR YOUR INSTALL!! You may need another line to use, depending where the radio sits, although mine worked here...

Click to view larger picture

Install plate around radio.

12. Install GPS SD card:
It don't work without it ;)

13. Sit back and gloat what a friggin' awesome radio you have in your Triton! :lol:

Click to view larger picture

Even space now for a Single DIN UHF Radio!

Click to view larger picture

Hopefully, this info will help people get started on their radio install, and make for what is really an incredibly fast job, all things considered.

It's a bloody awesome unit. For the price, you'd be hard pressed buying better, and the service so far from Matt at Digoptions has been excellent. Radio's clear, iPod works fine (but ONLY on newer iPods, incl Nano Gen 3 or newer), Nav is excellent (although the voices sometimes get a bit patched together), DVD is excellent, and everything else seems to work great. Look, a $2000 unit might be a little more...polished...but I bet it'd be hard to beat this unit for the money.

Few things could be improved. Daylight visibility (which is as much a function of the high position in the Triton as anything else, although still hard to see in the Landcruiser),iPod connectivity (ie. better interface would be nice), the prettiness of the menu's, bit vague at times on the touch sensitive screen, etc. These are trivial, and even the expensive units suffer from this sort of thing. Nothing I can't live with. You could try fitting it further back in the housing, but I prefer it closer to see. We're going to try a matt finish screen protector, from eBay, for an iPad, cut it down, and see how it goes at stopping the glare.

Still have things to check out, including OziExplorer, etc. But I'd recommend this unit to anyone. Housemate and I both bought it, and we're both stoked. Best $500 I've spent on the Triton so far. Admittedly, the extra bits have made it approach $800 installed, but still WAY cheaper than most other options there, which will cost at least $1500-$2000.

Now to install the last one in my old man's Navara :lol:

Cheers
Scotty


Another bump Motoz
User avatar
dan.batto
 
Posts: 3269
Joined: Wed Apr 06, 2011 10:34 pm
Location: Rowville, Melbourne

Re: Installing Double DIN radio (Digoptions) in MN GLX-R

Postby gizdawg on Sun May 12, 2013 1:26 pm

Is anyone running this unit with an aftermarket sound system?

Looking at buying some Alpine splits, wiring them up to an amp and connecting it this this. In theory it should work, but not sure if running a mid range speaker/amp setup and joining it with this would reduce sound quality. :?
gizdawg
 
Posts: 15
Joined: Tue Oct 09, 2012 5:10 pm

Re: Installing Double DIN radio (Digoptions) in MN GLX-R

Postby irwazza on Sun May 12, 2013 1:31 pm

Sounds fine :-)
User avatar
irwazza
 
Posts: 615
Joined: Sun Jul 10, 2011 9:07 pm

Re: Installing Double DIN radio (Digoptions) in MN GLX-R

Postby fez on Wed May 29, 2013 6:55 pm

i have just read through this whole thread and have a couple of questions.

1. for people with a mn glxr do these units come with the steering wheel control loom as standard or do i need to make a loom or do i tell them when i order it.

2. how do you find them

3. does any one live in or near ipswich that i can come have a look at it on the weekend if possible

thanks Ian
QLD & NT Technical manager for Suzuki Marine
fez
 
Posts: 103
Joined: Sat Oct 29, 2011 5:35 am
Location: ipswich

Re: Installing Double DIN radio (Digoptions) in MN GLX-R

Postby t_j_g on Fri May 31, 2013 1:29 pm

Hey Ian;
1 - It comes with the loom, you just have to program it in after you install it
2 - http://www.digoptions.com/ProductDetail ... de=AVN11MT This is the system I got. It's not perfect, but really good for the price, and the reversing camera is invaluable. If you keep and eye on the digoptions facebook page, sometimes he will run discounts as well.
3 - No sorry, I'm in Canberra so if you are down this way you are more than welcome to come and check it out
Tyler
t_j_g
 
Posts: 36
Joined: Tue Jul 17, 2012 11:36 pm
Location: Canberra

Re: Installing Double DIN radio (Digoptions) in MN GLX-R

Postby RockoWallaby on Mon Jun 17, 2013 4:40 pm

I'm down the Goldie, if you ever come down, and want a look. Let me know.
Still happy with it. Again, it's no $2000 unit, but for the price, well worth it.
Arthur Dent: All my life I've had this strange feeling that there's something big and sinister going on in the world.
Slartibartfast: No, that's perfectly normal paranoia. Everyone in the universe gets that.
User avatar
RockoWallaby
 
Posts: 1016
Joined: Fri Dec 25, 2009 4:48 am

Re: Installing Double DIN radio (Digoptions) in MN GLX-R

Postby aardvark on Sun Jul 07, 2013 3:32 pm

I'm looking to order one of these units, but not sure which camera to get. Does anyone have one of the flush mount reversing cameras? Are they easy to fit? Or has everyone order the square camera?
User avatar
aardvark
 
Posts: 110
Joined: Tue May 14, 2013 8:22 pm

Re: Installing Double DIN radio (Digoptions) in MN GLX-R

Postby aardvark on Thu Aug 01, 2013 9:02 pm

The search function is acting quite strangely for me tonight, so at the risk of this already being covered in this thread:

What has everyone done with their USB cable?
User avatar
aardvark
 
Posts: 110
Joined: Tue May 14, 2013 8:22 pm

Re: Installing Double DIN radio (Digoptions) in MN GLX-R

Postby jmos on Thu Aug 01, 2013 9:33 pm

aardvark wrote:The search function is acting quite strangely for me tonight, so at the risk of this already being covered in this thread:

What has everyone done with their USB cable?


Glovebox/compartment or any console using an extension.

I ordered one of these to mount next to my switches
http://www.ebay.com.au/itm/251172057353 ... 1497.l2649
:D
User avatar
jmos
 
Posts: 63
Joined: Tue Feb 12, 2013 8:02 am
Location: Leschenault, WA

Re: Installing Double DIN radio (Digoptions) in MN GLX-R

Postby aardvark on Sat Aug 03, 2013 6:03 pm

....
Last edited by aardvark on Sat Aug 03, 2013 7:21 pm, edited 1 time in total.
User avatar
aardvark
 
Posts: 110
Joined: Tue May 14, 2013 8:22 pm

Re: Installing Double DIN radio (Digoptions) in MN GLX-R

Postby aardvark on Sat Aug 03, 2013 6:05 pm

....
Last edited by aardvark on Sat Aug 03, 2013 7:14 pm, edited 1 time in total.
User avatar
aardvark
 
Posts: 110
Joined: Tue May 14, 2013 8:22 pm

Re: Installing Double DIN radio (Digoptions) in MN GLX-R

Postby Bds2710 on Sat Aug 03, 2013 6:15 pm

Subscribed as I want one , one day and the tpms
Bds2710
 
Posts: 61
Joined: Thu May 09, 2013 10:35 am

Re: Installing Double DIN radio (Digoptions) in MN GLX-R

Postby aardvark on Sat Aug 03, 2013 7:14 pm

Mods... please delete my screw ups. :)
User avatar
aardvark
 
Posts: 110
Joined: Tue May 14, 2013 8:22 pm

Re: Installing Double DIN radio (Digoptions) in MN GLX-R

Postby Scale on Sat Aug 03, 2013 7:24 pm

aardvark wrote:
Scale wrote:Ok penny dropped when Rocko said you have to trim the facia I thought it was for some I interference on the glr but you have to trim the hole facia down to make it thinner :roll:


Hi Scale!

Went to put my unit in today and found the same thing. Did you just file it back? How did you secure it?

Cheers,

Jason

Hey Jason I did take some pix and was going to post them but have since deleted them.
What I did was clamp a 6mm piece of aluminum to the bench then I put my renovator bit on top of the aluminum and pushed the facia (with it face down on the bench) in to the Renavator tool sliceing it in half then used some small bits of blue tack to hold it in place on the unit, asn't moved since I fitted it.
Hope you can follow this.
Cheers
Rick
User avatar
Scale
 
Posts: 414
Joined: Sat Feb 02, 2013 6:31 pm
Location: Victoria

Re: Installing Double DIN radio (Digoptions) in MN GLX-R

Postby Scale on Sat Aug 03, 2013 9:12 pm

Just took some pix to give you an idea of what I did, if you do it this way be careful not to scratch the face of the facia as you push it into the blade.
Click to view larger picture
User avatar
Scale
 
Posts: 414
Joined: Sat Feb 02, 2013 6:31 pm
Location: Victoria

Re: Installing Double DIN radio (Digoptions) in MN GLX-R

Postby aardvark on Sat Aug 03, 2013 10:17 pm

Scale: Thanks for the info. I think I'll just get my Dremel out and cut it really carefully. :)

jmos: Thanks for the tip. Both USB cables now run to the glovebox.

What a nightmare it's been installing this unit. Let me say right not though, it has nothing to do with the DigOptions unit!!! I had to dismantle half of my dash to find the damned connector that the unit plugs into. It was held in behind everything else with more cable ties than you could imagine, then covered with some foam crap.... Ugh!

Anyway, it's in now. Just need to modify the fascia and hook up the reversing camera. But that's a job for Monday.
User avatar
aardvark
 
Posts: 110
Joined: Tue May 14, 2013 8:22 pm

PreviousNext

Return to Electrical

Who is online

Users browsing this forum: No registered users and 31 guests