Triton CV Joints - removal and re-assembly

Engines, Gearboxes, Transfers, Tailshafts, Diffs, axles and CVs

Re: Triton CV Joints - removal and re-assembly

Postby fraz91 on Mon Jan 23, 2012 12:09 pm

As I said before, here's a revised set of instructions as to the removal and replacement of the factory/aftermarket CV's.

CV Removal

Tool List:

Heavy ground sheet/tarp maybe 2 metres square.
Bolt/parts tin
12, 14, 17, 19mm Spanners (preferably ring spanners, ratcheting ring spanners make it a lot easier)
3/8” socket set preferably containing a uni joint or 12, 14, 17, 19mm sockets
1/4" 17, 19, 32mm sockets
1/4" Breaker Bar
3 x 3/8” or 1/4" drive extensions to make up approx 400mm length
Pry bar set
Side Cutters
Needle-nosed Pliers
CRC/WD40
Hammer of any kind.
Small lump of wood (to be used when removing wheel-end of CV).
Small Cold chisel and/or a flat screwdriver (set would be handy).
Large bearing puller (300mm?) recommended but not necessary.
Flat Pin-Punch (2mm-5mm punch)
Loctite (Grade 243)
Vehicle jack plus an extra bottle jack


Care must be taken to not lose any of the nuts or bolts or damage any threads. The original ABS ring must be removed from the broken CV and pressed onto the replacement (unless an OEM replacement with ABS ring attached is being used).

DRIVERS SIDE

1. Remove the lower bump-stop from the Upper Control Arm (UCA) using the 12mm spanner.

2. Securely stabilize the vehicle and use car stands if possible. Place the removed wheel under the sill of the car as a safety measure.

3. Remove the hub cap using a screw driver and hammer as with any normal vehicle.
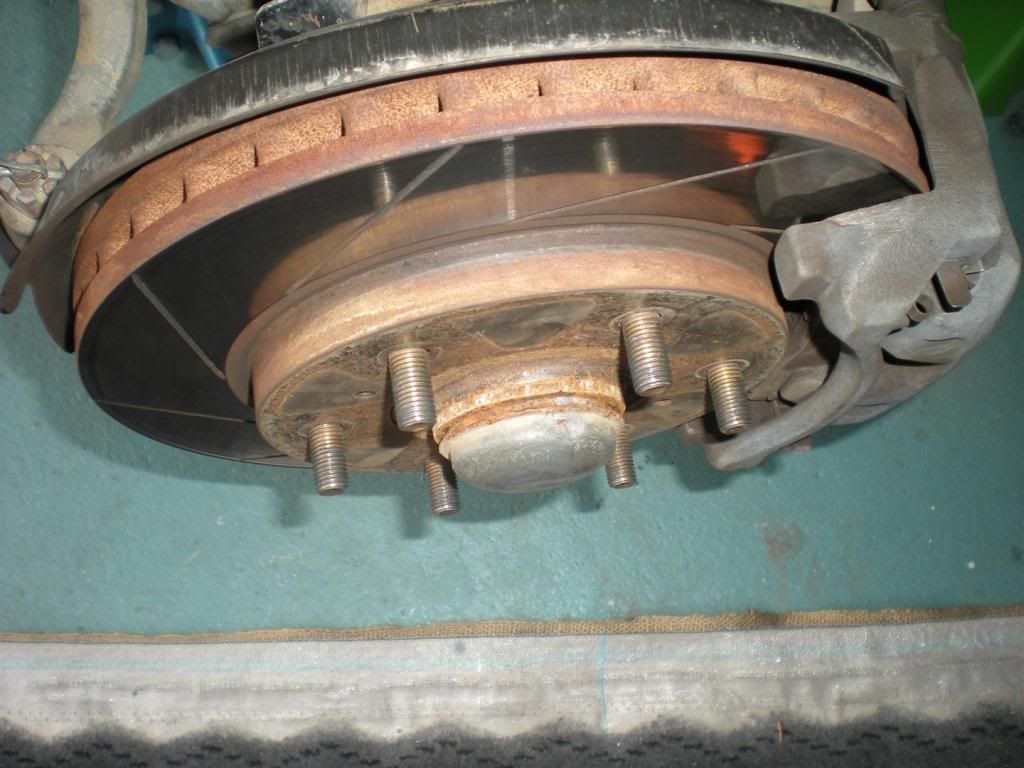
Click to view larger picture

4. Remove the hub nut Split Pin using side cutters or pliers.
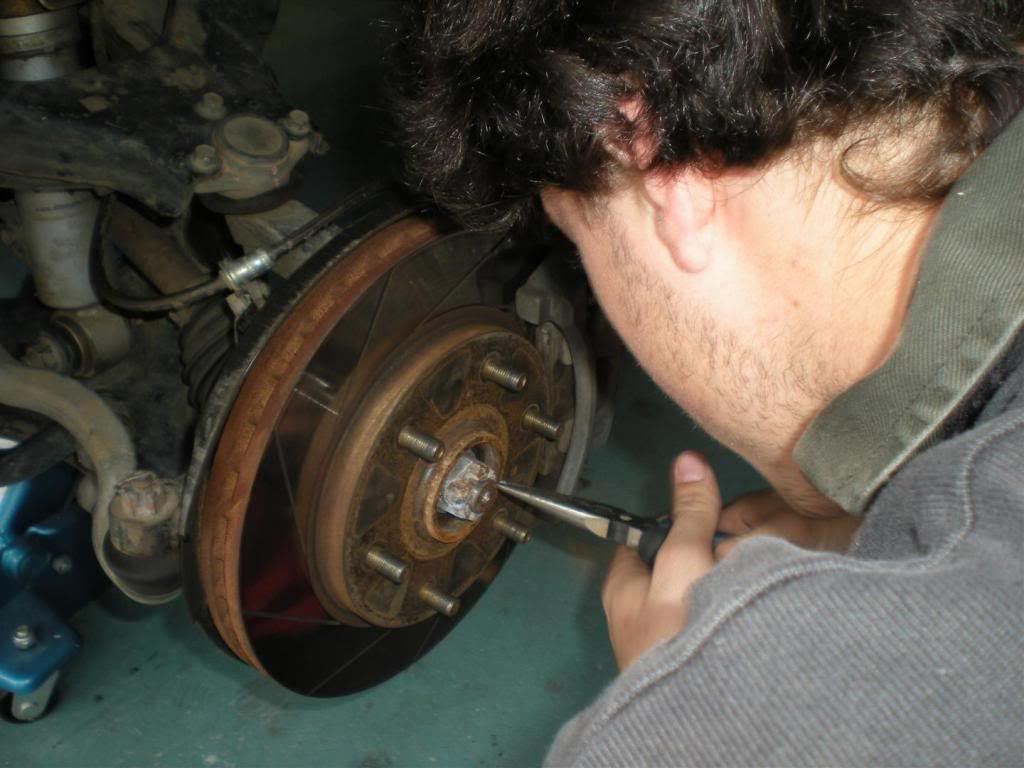
Click to view larger picture

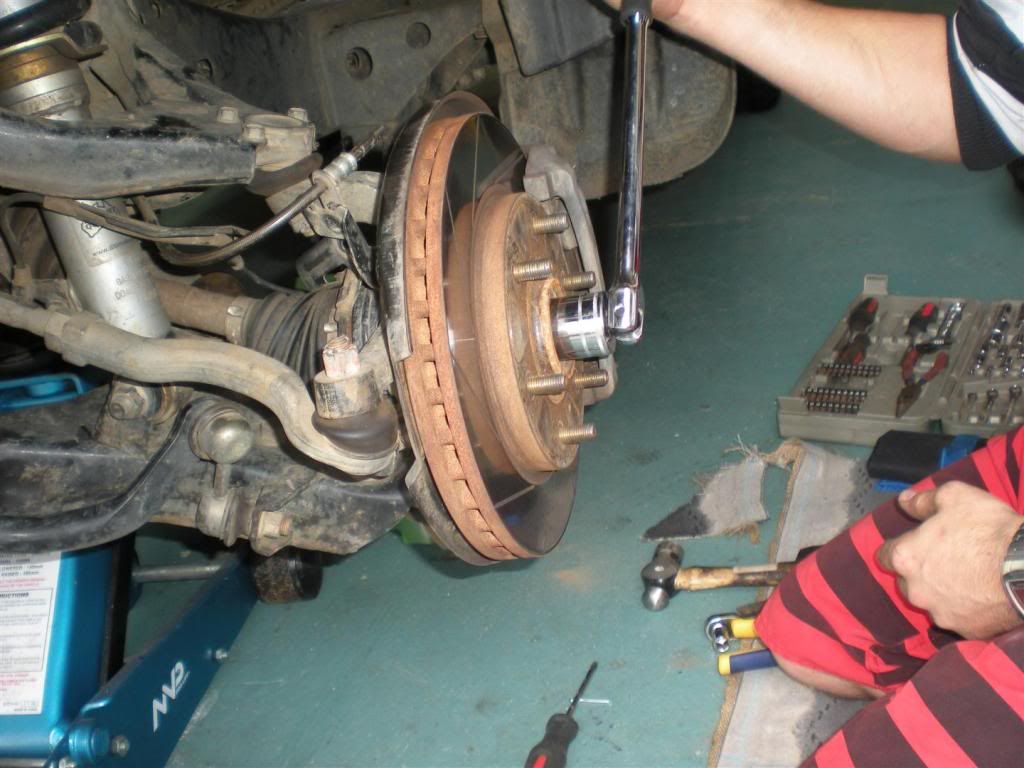
5. Remove the hub nut using the 32mm socket and an extension pipe if it’s very tight. To stop the wheel spinning put the car in 4wd 1st gear or Park…conversely have someone standing on the brakes.Click to view larger picture


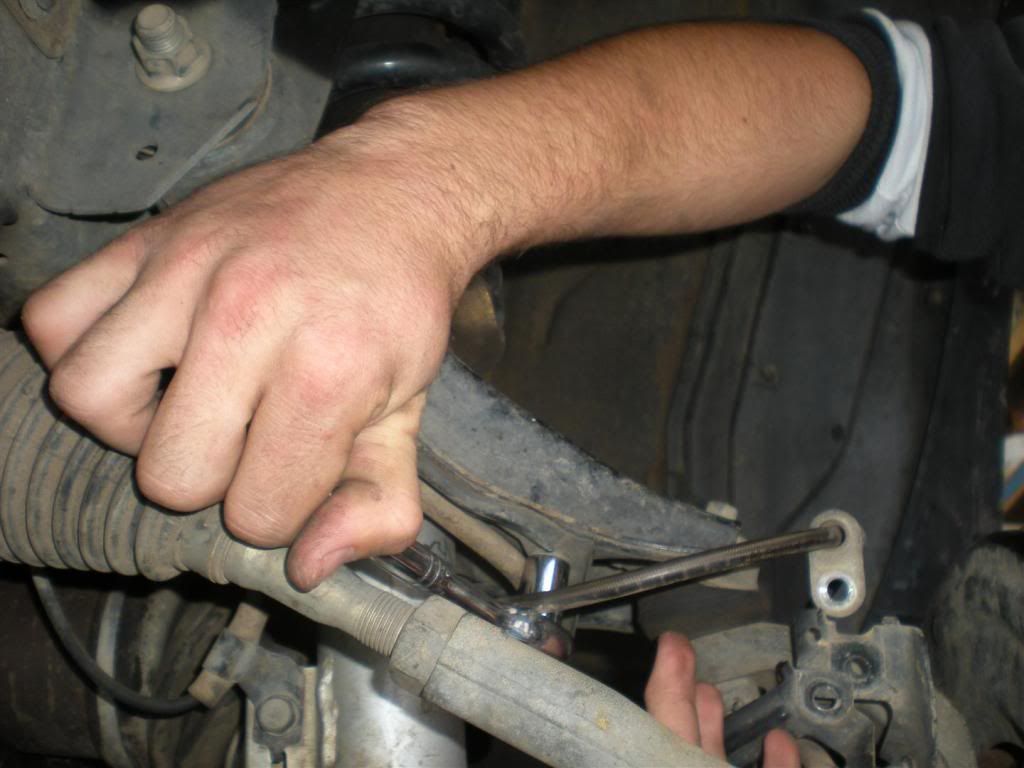
6. Remove the brake line bracket and ABS wire from the hub with the 12mm spanner. Remove the ABS wire from the UCA with the 12mm spanner.
Brake/ABS line from hub:
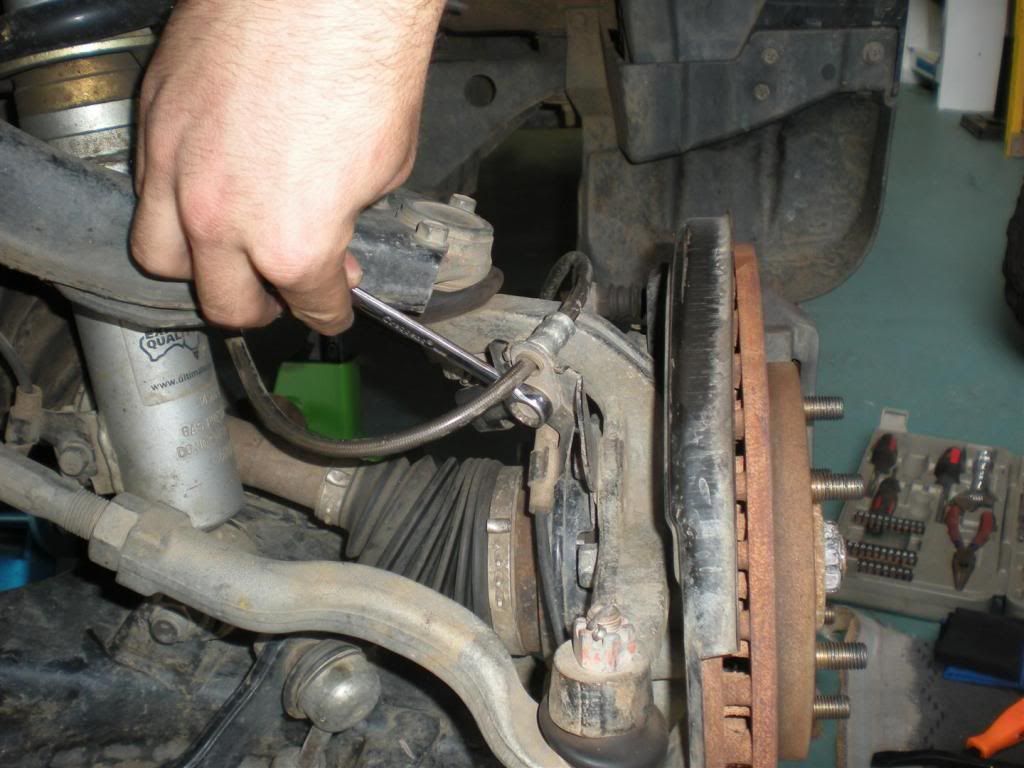
Click to view larger picture
ABS line from UCA:
Click to view larger picture

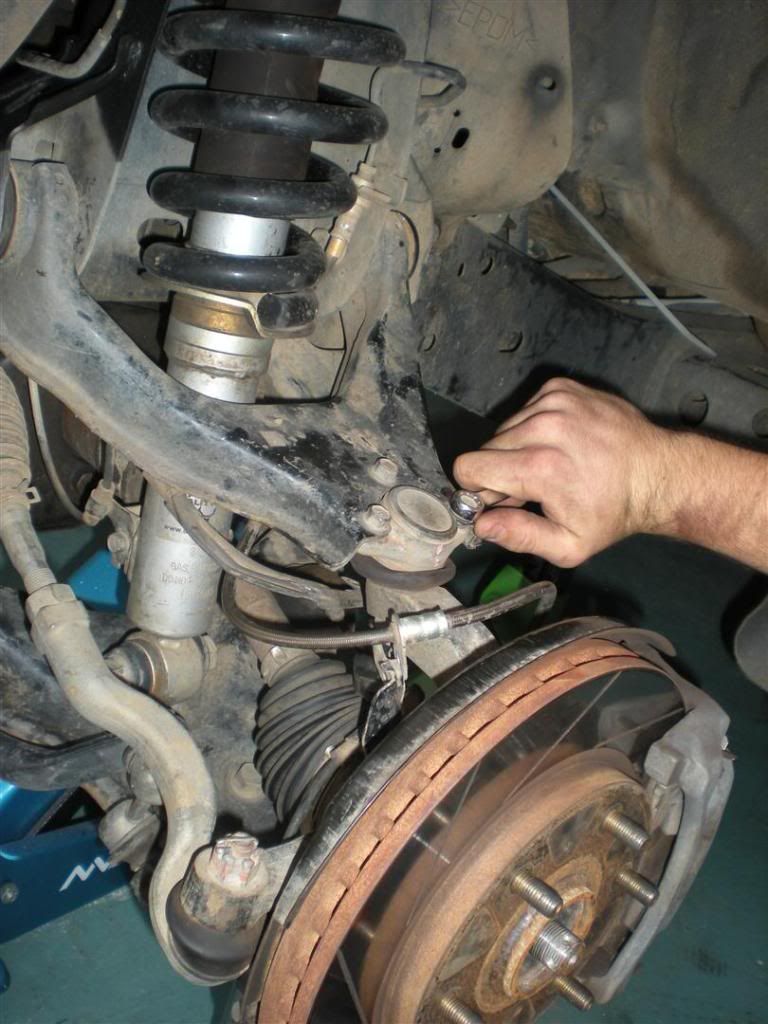
7. Upper Ball Joint Removal - Place a jack under the lower control arm and jack it up until the UCA is no longer hard against the chassis. This takes some of the pressure off the ball joint so that you can safely undo the 3x 12mm bolts that connect the upper ball joint to the UCA. Remove the centre bolt completely. Using a pry bar between chasis and upper control arm to remove tension, loosen the 2 end bolts a turn or two at a time until they are out – this is because they may still have a little spring pressure on them and removing one totally while leaving one in could potentially damage the last bolt/thread. There is not significant or dangerous pressure here, just potential component damage. These (3) 12mm bolts will need to have Loctite Threadlocker applied when they are replaced.

Placement of jack under LCA:
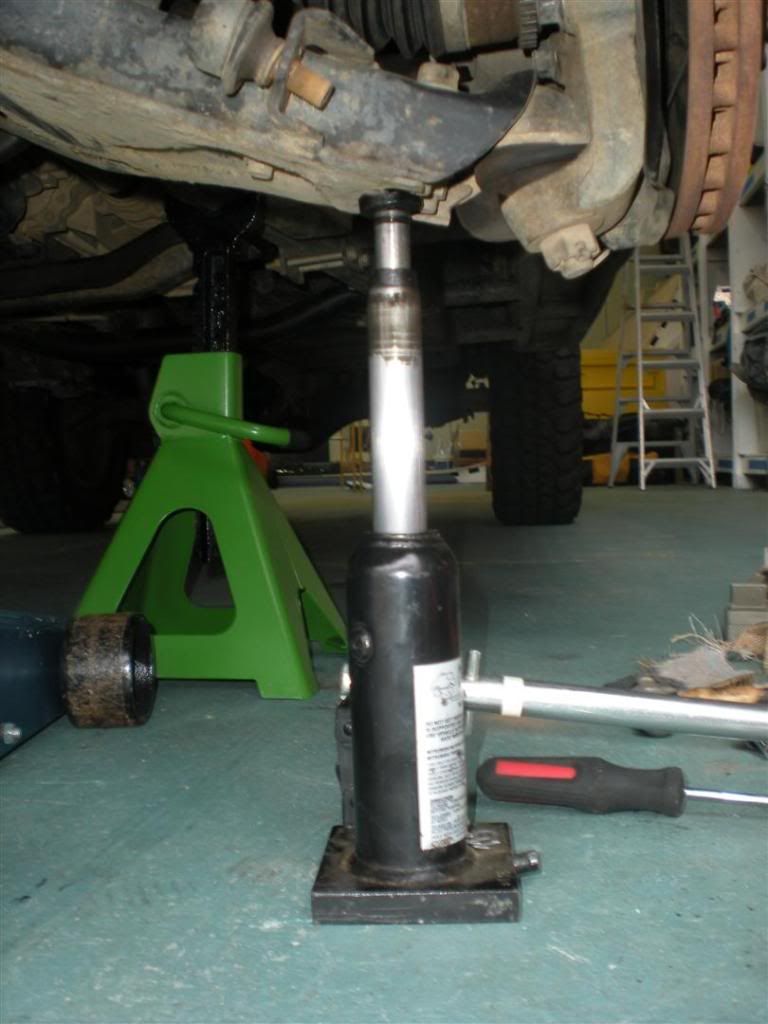
Click to view larger picture
Cracking the (3) 12mm bolts:
Click to view larger picture
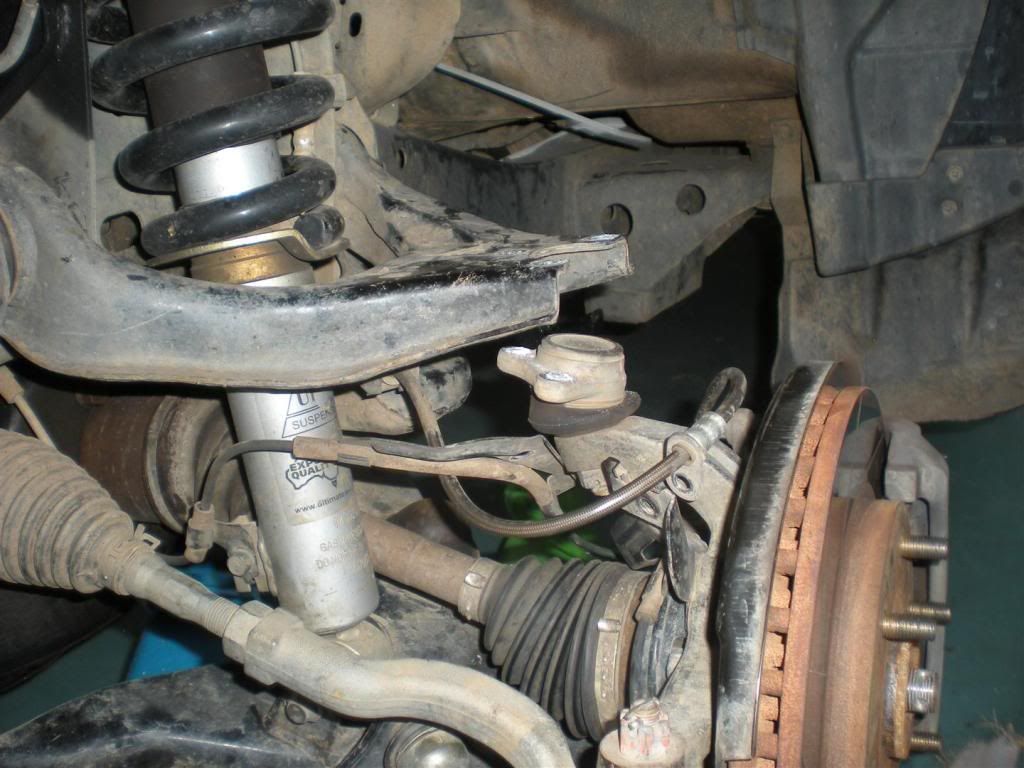
All bolts removed:
Click to view larger picture

8. Lower the control arm down completely to allow the suspension to droop completely. Make sure the brake and ABS lines do not get caught on the upper ball joint as it swings forward.

9. Using a small block of wood on the end of the CV, hit it with a hammer until the CV "pops" from the hub. You'll see it move backwards about 5-10mm, so check that you can freely remove it without needing to tap it out some more.
CV separated from Hub:
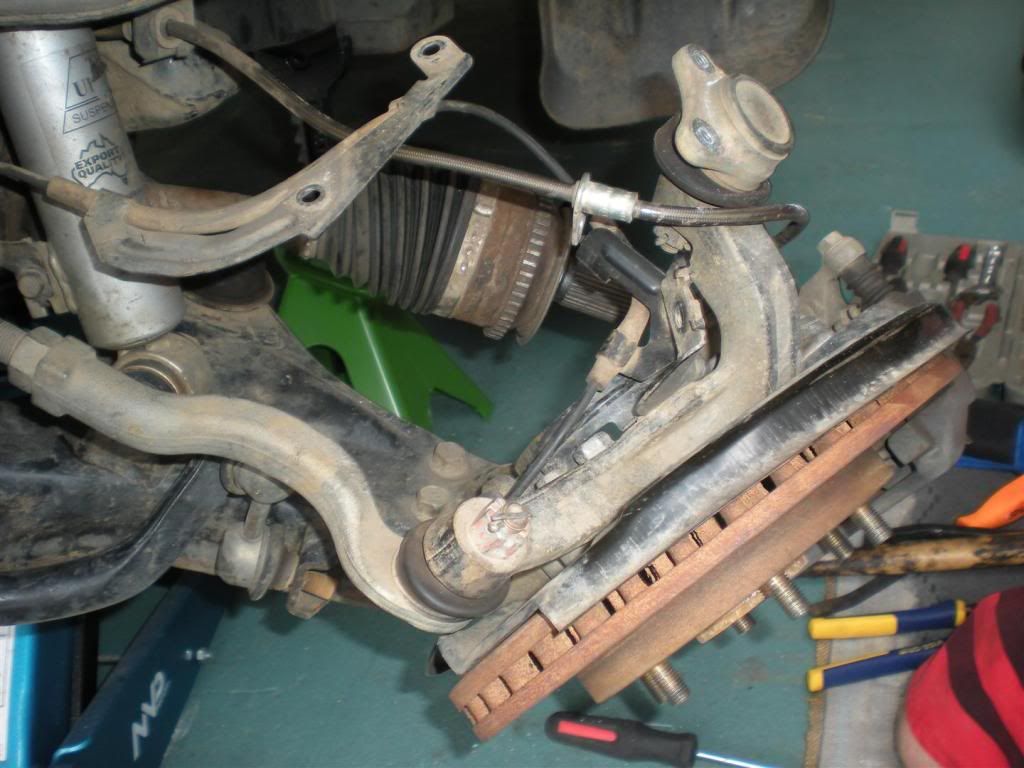
Click to view larger picture

10. Look through to where the CV enters the front axle housing and identify the four bolts on the flange holding the CV to the axle housing. Using a number of extensions to get the reach, undo these bolts with your 14mm socket. If you have access to an air rattle gun or 18volt battery rattle gun use this as it is a nut and bolt and the speed may see the nut come off without spinning the bolt head on the other side (for this reason I would spray the nuts -the side facing you - with WD40 etc and have a beer in the hope they will come off without spinning the whole bolt). If not an angled pry bar or 14mm open-ended spanner is needed to "reach around" and hold the bolt head. Care must be taken not to damage the threads or nuts as the bolts are loose but “trapped” and can’t be fully removed so if a nut does not go back on to secure the bolt, it will slip backwards until it catches on the larger axle bolts behind here (the non rusty ones) and the wheel will not turn or will shear off when the wheel turns.
Removing the (4) 14mm Nuts using an 18V Rattle Gun:
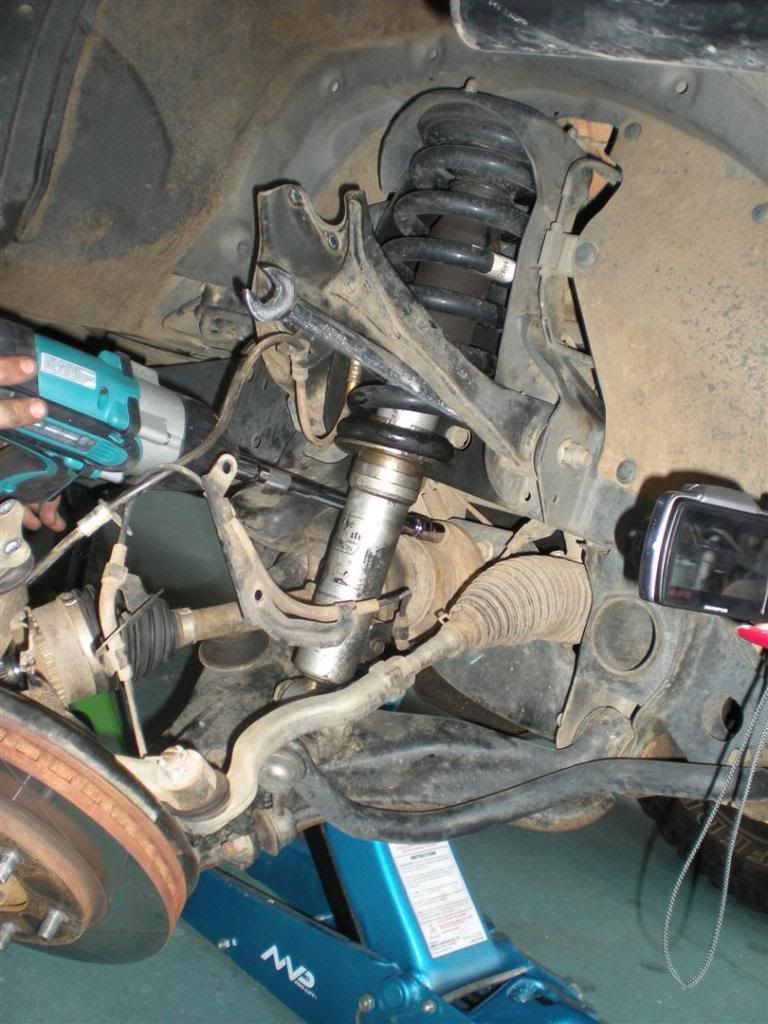
Click to view larger picture
You'll notice that there is a spanner holding the control arm up. I'd actually gotten it stuck there when I adjusted the UCA so it was further out of the way. This isn't necessary, more of a "I had the time and tools to do so easily"

11. Remove the CV from the axle.
Repco CV in place and ready to be re-attached:
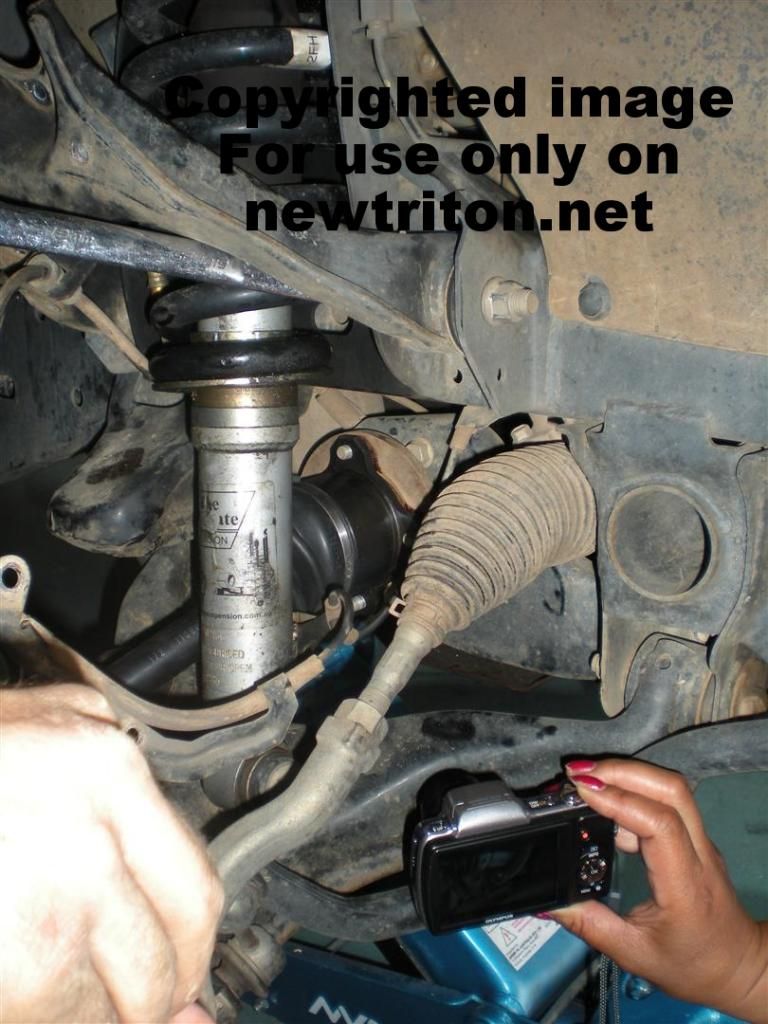
Click to view larger picture
12. Repeat the procedure to replace, but on the passenger side first carefully relocate the CV through the axle housing seal and then the spline into the axle.
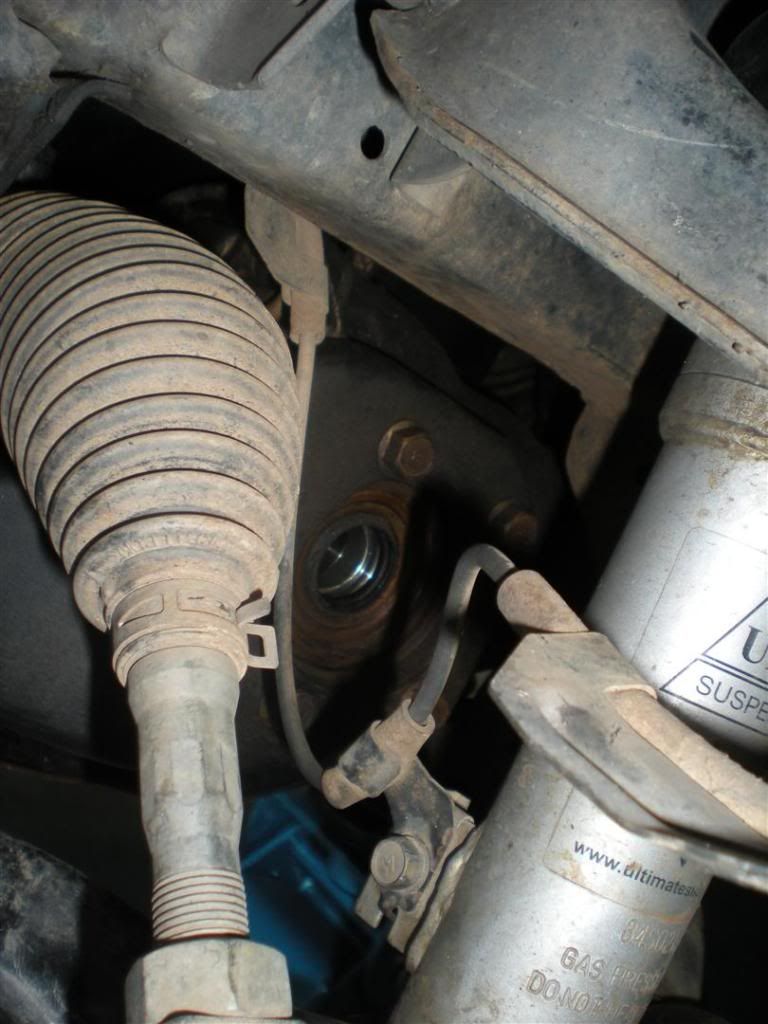
Click to view larger picture


PASSENGER SIDE

The steps are the same until step 9. This is a “double shaft” CV and the spline is further into the axle housing. The flange with 4 bolts is not used on this side; instead a small cir-clip holds the shaft into the diff. To remove a genuine CV, simply grab hold of the shaft and give it a quick yank. This will "pop" the CV out of the diff housing and is perfectly safe. To remove an aftermarket CV, you will need to get a small pry-bar in and lever the cup out, as the Repco CV's use a different bearing style to the original (yet to confirm the style Bursons supplied CV's are). Be careful not to damage the Axle Seal when removing/replacing the passenger side CV. It can be easily replaced using a crow-bar or flat screwdriver, but it's better to not have to worry. When replacing the Passenger Side CV, be sure to smear a small amount of grease onto the axle seal and the corresponding surface on the CV spline. This will help lubricate the seal and ensure it keeps the oil in.

CHANGING THE ABS RING

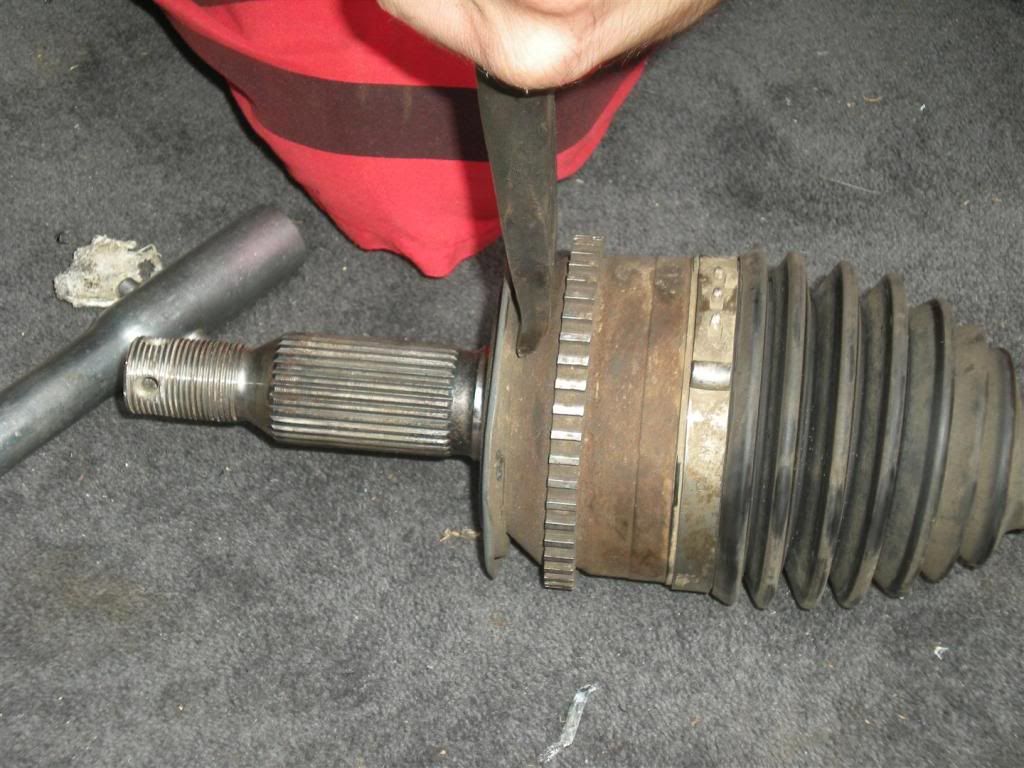
Repco CV's will require the supplied ABS ring to be removed and replaced with the original, and the repco dust-cover must be retained as the genuine will not fit. If you do not have a bearing puller handy, the Repco ABS ring can be removed with a cold-chisel by cutting through it. Be careful not to damage the CV.

Bursons supplied CV's do not have an ABS ring supplied, however the dust-cover is interchangeable.

1. With the CV laying flat on the ground, with a small chisel or flat screwdriver between the CV cup and the dust-cover carefully hammer the cover off, turning the cup as your go to make sure it is removed evenly.
Click to view larger picture

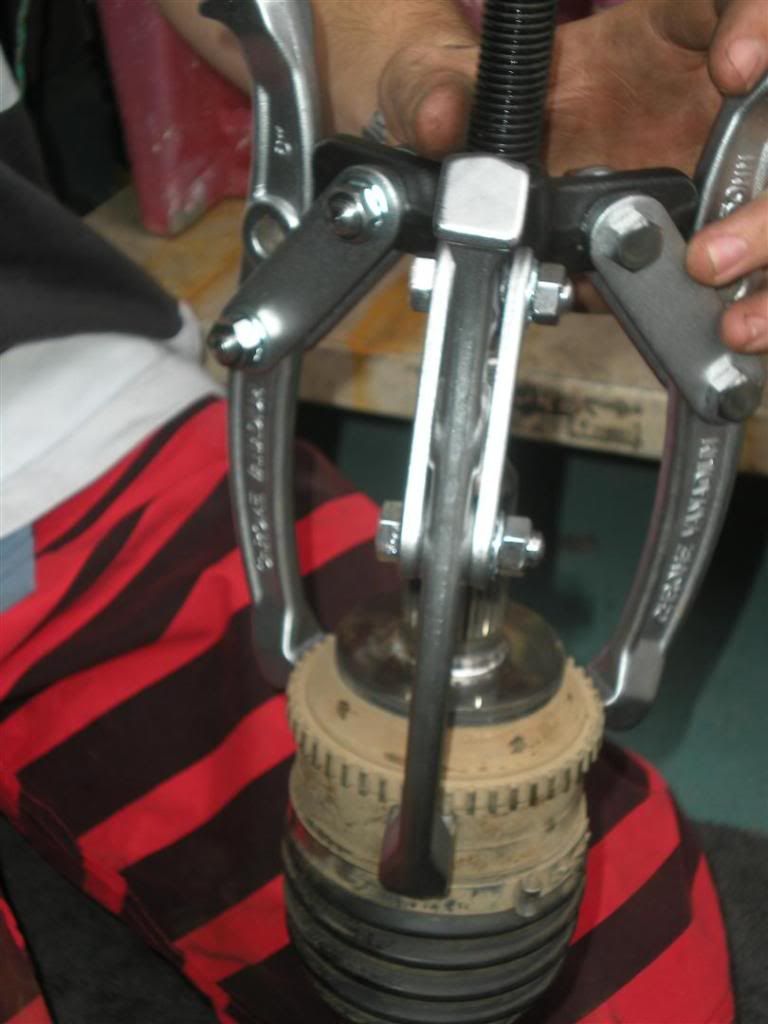
2. Once the dust-cover has been removed, there are two methods of removing the ABS ring:

Bearing Puller - With the help of a friend or passing stranger to hold it all in place, use the bearing puller to gently remove the ABS ring from the original CV.
Click to view larger picture

Flat Pin-Punch - With the help of a trusting friend or passing stranger, carefully hold the CV with the threaded spline facing down. With the punch hard up against the cup, gently tap the ABS ring off the CV, rotating it as you go. Generally tapping in opposites will ensure the ABS ring does not bend or warp.

3. With a hammer and the small lump of wood, carefully knock the ABS ring onto the new CV.
EDIT: You may need to tap it further on using the flat pin-punch. Tap it on the same way you would have gotten it off, and ensure it is down evenly.

4. Replace the dust-cover and fit the CV to the vehicle.
Last edited by fraz91 on Mon Feb 20, 2012 2:31 pm, edited 3 times in total.

See the build up of my old Triton here.
User avatar
fraz91
 
Posts: 2160
Joined: Wed Mar 23, 2011 8:54 am
Location: Sydney, Australia


Re: Triton CV Joints - removal and re-assembly

Postby Storm Trooper on Mon Jan 23, 2012 1:16 pm

Well done guys great write up good job fraz this definity needs to be in PDF format for use for first timers
i vote for a html version of the Gasa strip in between the 2 sites. then the goons who wanna get all parochial about their trucks can chuck rocks and shit at each other. by cyberhonky on Wed Jul 15, 2009 6:37 am
User avatar
Storm Trooper
 
Posts: 760
Joined: Sun Aug 17, 2008 7:09 pm
Location: Sydney

Re: Triton CV Joints - removal and re-assembly

Postby borngeek on Mon Jan 23, 2012 2:20 pm

Brilliant work there Fraz! :D :D

The method Fraz has outlined is quite slick to the older method. Not having to remove all the ABS stuff, brake calliper and rotor etc make it much quicker and easier... Who thought of the bump stop idea? sweet 8-)

Consumables to think about is to have a box of extra split pins, it get's smashed taking it off. I will be also adding a diff seal and bearing cap to my spare parts list. Also brake cleaner, may as well while the wheel is off and your contaminating the area with your greasy paws?
These bits are just cheap 'just in case' stuff. Not show stoppers anyway.

The split pin is 2" long. Once I get the part numbers I will post up & get Fraz to merge into his post. A PDF download is a good idea too...

//Big thanks to Fraz & CD for being instrumental in making this happen! I just supplied the car and workshop and these guys just nailed it. 8-) I give credit to AG9111 too, he had his head in there a fair bit. :mrgreen:

You other jokers were not much help, just ate and drank me out :P :lol:

Good day, we are now learning a fair bit about these cars. 8-)
Don't be a tool, use this: FORUM DIRECTORY

Did you search first?

FL/LSD FTW

Sucks to be you, glad I bought a 3.2 :lol:
User avatar
borngeek
Platinum Subscriber
 
Posts: 9202
Joined: Fri Jul 10, 2009 7:02 am
Location: Somewhere on Earth, at the moment.

Re: Triton CV Joints - removal and re-assembly

Postby daryn on Mon Jan 23, 2012 2:24 pm

This is a huge right up which we can't lose, will look at a way of making it easy to find, preferably on P1.

Was those Garths painted nails ?

Noice :D
User avatar
daryn
Valued Contributor
 
Posts: 7136
Joined: Tue Oct 07, 2008 1:37 pm
Location: Newcastle NSW

Re: Triton CV Joints - removal and re-assembly

Postby Cowboy Dave on Mon Jan 23, 2012 3:45 pm

I wondered who would be first to see the nails. I'll not be telling... :shock:

You'll notice that Fraz buys his shorts the same place as Joe though :o

Fraz has kindly given me the word/pdf versions and I'll look at those tonight and work out where best to put them and if there is anything else to add to make them more useful as a printed guide for use out in the blue yonder. It's a pretty top effort for Fraz to have not only done all the hard labour but to also turn around and do the write up - it will be one of those famous jobs that stays around the forum for a long time to come. :D

I may also edit Homer's first post in this thread to add a link straight through to the new version and where it sits now.
The Hitchhiker's guide to the the Triton universe and NTN.

A how to on finding your own way - search me.

The two threads I wish people would use more: thing 1 and thing 2.
User avatar
Cowboy Dave
Moderator
 
Posts: 18098
Joined: Tue Dec 29, 2009 9:46 am
Location: Sydney

Re: Triton CV Joints - removal and re-assembly

Postby Homer on Mon Jan 23, 2012 5:39 pm

Great job guys and Fraz :twisted:

Yeah good idea Dave, it's just basically a repeat version with no pics so we may as well do a link and be done with it...
I hate to advocate drugs, sex, alcohol, violence, or insanity to anyone, but they’ve always worked for me.

Everything you want to find or know about the Triton - click here
Easy how to search on this site - click here
User avatar
Homer
Valued Contributor
 
Posts: 17128
Joined: Tue Sep 02, 2008 1:22 pm
Location: Brisbane

Re: Triton CV Joints - removal and re-assembly

Postby ag9111 on Mon Jan 23, 2012 5:49 pm

daryn wrote:Was those Garths painted nails ?


Shit, know I forgot to do something before I left Oxford St

Well done Fraz. Top work on the write up and on the grease monkey work.
I love cats, but I couldn't eat a full one!

Mud is like unprotected sex
30 secs of fun for a lifetime of grief
User avatar
ag9111
Platinum Subscriber
 
Posts: 4858
Joined: Sun Mar 30, 2008 2:00 pm
Location: Wollongong, NSW

Re: Triton CV Joints - removal and re-assembly

Postby snowman on Mon Jan 23, 2012 6:01 pm

Storm Trooper wrote:i thought Saturday was bbq, beer and a few war stories... did someone change cv's...


yeah Geek got both his CV's changed for a few snags and a case of bear. He is a genius. :lol: :lol: :lol: :lol:
This car is like a bad drug habit. It is taking all my money and time, my family are concerned, but new mods just feel sooooooo good.
User avatar
snowman
Platinum Subscriber
 
Posts: 12031
Joined: Sat Feb 07, 2009 10:59 pm
Location: Toongabbie, NSW

Re: Triton CV Joints - removal and re-assembly

Postby snowman on Mon Jan 23, 2012 6:05 pm

Cowboy Dave wrote:Fraz has kindly given me the word/pdf versions and I'll look at those tonight and work out where best to put them and if there is anything else to add to make them more useful as a printed guide for use out in the blue yonder. It's a pretty top effort for Fraz to have not only done all the hard labour but to also turn around and do the write up - it will be one of those famous jobs that stays around the forum for a long time to come. :D


Yeah nice work Fraggle, your'e all right. 8-) 8-)

Need a hair cut though.....do you want us to throw in some coin towards it... :P
This car is like a bad drug habit. It is taking all my money and time, my family are concerned, but new mods just feel sooooooo good.
User avatar
snowman
Platinum Subscriber
 
Posts: 12031
Joined: Sat Feb 07, 2009 10:59 pm
Location: Toongabbie, NSW

Triton CV Joints - removal and re-assembly

Postby trouble on Mon Jan 23, 2012 6:11 pm

I will do the hair cut for free!
Btw it will be like mine................... #1
I Love The Mods!
Ban everyone!
User avatar
trouble
 
Posts: 5312
Joined: Wed Jan 21, 2009 6:59 pm
Location: Gilgandra, NSW

Triton CV Joints - removal and re-assembly

Postby mattz on Mon Jan 23, 2012 6:15 pm

Top effort for putting the time and effort it to this...Frazzle Dazzle. ;)
I'm positive many members will apreciated this for years to come.
THE ONLY DIFFERENCE BETWEEN A MAN AND A BOY IS
THE PRICE OF HIS TOYS
User avatar
mattz
 
Posts: 7101
Joined: Thu Mar 11, 2010 6:26 pm
Location: Mornington Peninsula vic

Re: Triton CV Joints - removal and re-assembly

Postby Mattstruck on Mon Jan 23, 2012 7:37 pm

Whats that bum fluff Frazzle? Better stick your head out the window at 60km/h. That'll blow it off ;)

Brendan doesnt want dirty un-kepts working for him. :lol: :lol:
Mod talk:
Sometimes indecipherable to the average Civillian. Example:
Homer:
I clearly remember Joe stating categorically that he prefers it in the bottom
Joe:
I didn't say it was better in the bottom, I just said it was easier and quicker.
User avatar
Mattstruck
 
Posts: 2844
Joined: Fri Nov 19, 2010 7:47 pm
Location: Melbourne

Re: Triton CV Joints - removal and re-assembly

Postby Homer on Mon Jan 23, 2012 7:51 pm

snowman wrote:
Storm Trooper wrote:i thought Saturday was bbq, beer and a few war stories... did someone change cv's...


yeah Geek got both his CV's changed for a few snags and a case of bear. He is a genius. :lol: :lol: :lol: :lol:


Fridgie grabbed everyone..said right I'm changing my CV...get everything out Homer...you guys get the jack, undo the wheel nuts.....then....ohhh...Dave wants us over there for a debriefing of the days training...as you were gents...carry on :lol: and came back to a freshly replaced CV - including swapping the ABS ring...

I'm sure I saw Dave walk off tucking a $50 note into his top pocket....
I hate to advocate drugs, sex, alcohol, violence, or insanity to anyone, but they’ve always worked for me.

Everything you want to find or know about the Triton - click here
Easy how to search on this site - click here
User avatar
Homer
Valued Contributor
 
Posts: 17128
Joined: Tue Sep 02, 2008 1:22 pm
Location: Brisbane

Re: Triton CV Joints - removal and re-assembly

Postby fraz91 on Mon Jan 23, 2012 8:39 pm

Oh god... where to start...

snowman wrote:
Storm Trooper wrote:i thought Saturday was bbq, beer and a few war stories... did someone change cv's...


yeah Geek got both his CV's changed for a few snags and a case of bear. He is a genius. :lol: :lol: :lol: :lol:


TECHNICALLY I was paying geek a favour back considering he's been trying to pull all the crap off my downed external hard drive. I really miss those movies :( :lol:

snowman wrote:Need a hair cut though.....do you want us to throw in some coin towards it... :P


No coin necessary, I can manage.

trouble wrote:I will do the hair cut for free!
Btw it will be like mine................... #1


I am not letting you anywhere NEAR my head if it's going to turn out like yours...

See the build up of my old Triton here.
User avatar
fraz91
 
Posts: 2160
Joined: Wed Mar 23, 2011 8:54 am
Location: Sydney, Australia

Re: Triton CV Joints - removal and re-assembly

Postby ag9111 on Mon Jan 23, 2012 8:55 pm

fraz91 wrote:
trouble wrote:I will do the hair cut for free!
Btw it will be like mine................... #1


I am not letting you anywhere NEAR my head if it's going to turn out like yours...


Classic :lol: :lol: :lol: :lol: :lol:
I love cats, but I couldn't eat a full one!

Mud is like unprotected sex
30 secs of fun for a lifetime of grief
User avatar
ag9111
Platinum Subscriber
 
Posts: 4858
Joined: Sun Mar 30, 2008 2:00 pm
Location: Wollongong, NSW

Re: Triton CV Joints - removal and re-assembly

Postby Cowboy Dave on Tue Jan 24, 2012 8:07 pm

Okay so here is the PDF version of the CV removal process. Authored by Fraz, borrowing in places from Homer's original version. Big ups to Fraz for taking the time not just to write the guide but also to do the work that was photographed. Edited by me - because of that any mistakes/errors are likely to be mine rather than from Fraz.

All care taken but no responsibility. The guide is provided for the assistance of members but should not be taken as gospel or as the only way to perform these tasks. Enter upon these chores at your own risk.

Note that for convenience (and because the photographer started to lose interest when taking shots on the driver's side) images from the passenger side have been used for most (but not all) of the driver's side instructions. So don't let that confuse you too much.

No CVs were hurt in the preparation of this guide. All text is fictional and any resemblance to real events, persons or vehicles is unintentional... blah, blah, blah.

Print it and stick it in your recovery kits as you may not easily find this post again. Those with iPads may wish to consider downloading it to the iPad for future track side use.

CV removal guide final.pdf
You do not have the required permissions to view the files attached to this post.
The Hitchhiker's guide to the the Triton universe and NTN.

A how to on finding your own way - search me.

The two threads I wish people would use more: thing 1 and thing 2.
User avatar
Cowboy Dave
Moderator
 
Posts: 18098
Joined: Tue Dec 29, 2009 9:46 am
Location: Sydney

Re: Triton CV Joints - removal and re-assembly

Postby Mooons on Tue Jan 24, 2012 8:19 pm

Good work Fraz & CD I have stored it & hope to never need or use
But who knows
When you point your finger cos your plan fell through
Theres three more fingers pointing back at you
User avatar
Mooons
Platinum Subscriber
 
Posts: 4678
Joined: Sat Aug 14, 2010 11:53 am
Location: Geelong

Re: Triton CV Joints - removal and re-assembly

Postby Mattstruck on Tue Jan 24, 2012 8:20 pm

Burson CVs have the same cir-clip as original which goes into the diff housing...

Although I agree the lower bump stop removal would be helpful, I never needed to. ;)

Seems to be a lot of reaching around in that description :? You Northerners go about things a little differently dont yas ;) :lol:
Mod talk:
Sometimes indecipherable to the average Civillian. Example:
Homer:
I clearly remember Joe stating categorically that he prefers it in the bottom
Joe:
I didn't say it was better in the bottom, I just said it was easier and quicker.
User avatar
Mattstruck
 
Posts: 2844
Joined: Fri Nov 19, 2010 7:47 pm
Location: Melbourne

Re: Triton CV Joints - removal and re-assembly

Postby Cowboy Dave on Tue Jan 24, 2012 8:23 pm

That bit came from Homer - if you check there is a comment about Blue in the original when the reach around is mentioned.

The comment about checking the cir-clip arose from someone who had theirs go into the diff and get ground up. Might have been Naff from memory. Metal fragments in the diff oil at the next service.
The Hitchhiker's guide to the the Triton universe and NTN.

A how to on finding your own way - search me.

The two threads I wish people would use more: thing 1 and thing 2.
User avatar
Cowboy Dave
Moderator
 
Posts: 18098
Joined: Tue Dec 29, 2009 9:46 am
Location: Sydney

Re: Triton CV Joints - removal and re-assembly

Postby snowman on Tue Jan 24, 2012 9:18 pm

Cowboy Dave wrote:
Print it and stick it in your recovery kits as you may not easily find this post again. Those with iPads may wish to consider downloading it to the iPad for future track side use.


This PDF should go 'straight to the pool room' CD so not sure where it can be referenced but it should be real handy. not lost in a thread somewhere.

well done (in order of appearance) to Homer, Fraggle and CD. Nice work guys. :D :D 8-) 8-) ;)
This car is like a bad drug habit. It is taking all my money and time, my family are concerned, but new mods just feel sooooooo good.
User avatar
snowman
Platinum Subscriber
 
Posts: 12031
Joined: Sat Feb 07, 2009 10:59 pm
Location: Toongabbie, NSW

Re: Triton CV Joints - removal and re-assembly

Postby Storm Trooper on Tue Jan 24, 2012 9:55 pm

well done guys... this is what makes this site great.

now that we have covered cv's... whats next???
i vote for a html version of the Gasa strip in between the 2 sites. then the goons who wanna get all parochial about their trucks can chuck rocks and shit at each other. by cyberhonky on Wed Jul 15, 2009 6:37 am
User avatar
Storm Trooper
 
Posts: 760
Joined: Sun Aug 17, 2008 7:09 pm
Location: Sydney

Re: Triton CV Joints - removal and re-assembly

Postby SecondEye on Wed Jan 25, 2012 6:04 am

Lol yeah it is a supreme effort guys thankyou and yeah nails. Theres a few 'whats next' that anyone could do manual turbo boost install, provent install, intercooler cleanouts, hardlid latch installs, manifold cleanouts, Common electrical fault checks eg scv map inc cleaning, bullbar and snorkel installs Note there will be differences in locations and products but some people just are not safe with a drill in hand.
Might actually reduce the repeat same forum question issue.
User avatar
SecondEye
 
Posts: 313
Joined: Sun Mar 06, 2011 9:23 am
Location: Adelaide

Re: Triton CV Joints - removal and re-assembly

Postby Mooons on Sat Feb 18, 2012 3:02 pm

Correct me if im wrong
From what i understand Fraz has Bursons CV's or were they just put in as a trial
And Geek has repco CV's
If so can we have feed back on which of the two is preferred or are they much of a muchness
Cheers Mooons
When you point your finger cos your plan fell through
Theres three more fingers pointing back at you
User avatar
Mooons
Platinum Subscriber
 
Posts: 4678
Joined: Sat Aug 14, 2010 11:53 am
Location: Geelong

Re: Triton CV Joints - removal and re-assembly

Postby ultimate on Sat Feb 18, 2012 3:21 pm

Yes Fraz has the bursons CV. It fits both the ML and MN where as the Repco one just fits the ML. At the moment I prefer the Bursons one but only time will tell. Genuine is still the best for long term use.
The Team at
Australian Ultimate Suspension Pty. Ltd
Phone: +612 9618 7674
http://www.ultimatesuspension.com.au YouTube Facebook
Designers, Manufacturers and Installers of performance aftermarket suspension for Cars, Trucks and 4wds
User avatar
ultimate
 
Posts: 2380
Joined: Tue Oct 06, 2009 12:43 pm

Re: Triton CV Joints - removal and re-assembly

Postby fraz91 on Sat Feb 18, 2012 3:31 pm

I have a Burson's spare DS, but haven't fitted them as I have genuine ones in place (had to fork out when I got mine as Burson's ones hadn't come out :evil: )

Upon initial impressions, the Burson's are slightly thinner (1mm) than the Repco, but the bearings used replicate the originals a lot closer. The DS shaft appears to be too long, as it pushed the casing in when we tested them at full bump:

Click to view larger picture

Click to view larger picture

Only time will tell how good the Burson's ones are. I'm with Brendan in saying that genuine will be better though.

See the build up of my old Triton here.
User avatar
fraz91
 
Posts: 2160
Joined: Wed Mar 23, 2011 8:54 am
Location: Sydney, Australia

PreviousNext

Return to Drive Train Components

Who is online

Users browsing this forum: No registered users and 26 guests