Carbon build - up its everyone’s problem.
Re: Carbon build - up its everyone’s problem.
![]() by mad992 on Sat Oct 20, 2012 9:06 am
by mad992 on Sat Oct 20, 2012 9:06 am
maybe if you posted a little more about yourself and your location  were pretty much a bunch of good blokes on here we could help a little more or even supervise with the beer economy anything is possible
- mad992
Re: Carbon build - up its everyone’s problem.
![]() by Magoo on Sat Oct 20, 2012 11:23 am
by Magoo on Sat Oct 20, 2012 11:23 am
That would b a good idea to post what to order as in parts to replace before comencing the job , nothin worse than pulling it all apart and not being able to get a gasket ?? Or something that u need to put it back together
- Magoo
- Posts: 46
- Joined: Tue Jun 05, 2012 7:14 pm
- Location: Ocean Grove Victoria
Re: Carbon build - up its everyone’s problem.
![]() by Era2003 on Sun Oct 21, 2012 11:21 pm
by Era2003 on Sun Oct 21, 2012 11:21 pm
No probs mad992.
Jeez how bloody rude am I, So wrapped up in trying fix the car I forgot introductions. OK here I go. I'm from Perth WA but live in the hills so up and down the pass each day. Not that I would call the Perth hills steep. Been here for a few years and originally come from Townsville QLD. Used to go bush bashing a bit but lately work has really taken over and also having two small ankle biters keeps the heartbeat racing every so often. I used to build muscle cars exclusively with Big V8's. I'm talking about GMC 454's with 871 blowers or crower staggered stack injection systems running methanol. I used to have a replica A9x fitted with a 454 as above etc,etc. Pitty it was stolen.
  That was almost 25 years ago.
Generally i use the triton for work and doing up the property. I just throw about anything I can think off in the back. It's been a great car and really haven't had any issues until now. Anyway after the bits of advise from you blokes I went off the deep end and pulled the the whole inlet manifold both upper and lower apart yesterday and finished it off today. Interesting job, my hands are bloody aching from cleaning everything out.. Whilst I was dismantling I have been taking photos of the whole job. Including showing each piece and how to get it off. Also got picks off how bad the build up was and believe me it was horrible everything totally blocked including the inlet ports leading into the head. Cleaned her all up. Put it back together and kicked her over. I'm going to install the can in a couple of weeks so this never happens again. Mind you with 240,000 clicks on the clock I may trade it in before it ever happen again. Now she runs clean and not a sign of surging or smoke. I have question for you all. Is it worth putting all the picks up on the site in their proper order so anyone can see the whole thing coming apart, cleaned and put back together? The reason I ask is that I found it really difficult to get a workshop manual. So I just went on experience, not that experience is really required just some patience and a lot of hand cleaner. If I do put them up what is the best way, similar to what "hicko" did at the beginning of this thread or what? Anyway lets see what the response is like before I put them all up with some words about what is going on. To say at least the carbon was so bad that the inlet manifold upper which I guess is about a 60 mm round hole was total block except for about 5mm at the centre. Thanks for the feedback.
Jeez how bloody rude am I, So wrapped up in trying fix the car I forgot introductions.
Generally i use the triton for work and doing up the property. I just throw about anything I can think off in the back. It's been a great car and really haven't had any issues until now. Anyway after the bits of advise from you blokes I went off the deep end and pulled the the whole inlet manifold both upper and lower apart yesterday and finished it off today. Interesting job, my hands are bloody aching from cleaning everything out.. Whilst I was dismantling I have been taking photos of the whole job. Including showing each piece and how to get it off. Also got picks off how bad the build up was and believe me it was horrible everything totally blocked including the inlet ports leading into the head. Cleaned her all up. Put it back together and kicked her over. I'm going to install the can in a couple of weeks so this never happens again. Mind you with 240,000 clicks on the clock I may trade it in before it ever happen again. Now she runs clean and not a sign of surging or smoke. I have question for you all. Is it worth putting all the picks up on the site in their proper order so anyone can see the whole thing coming apart, cleaned and put back together? The reason I ask is that I found it really difficult to get a workshop manual. So I just went on experience, not that experience is really required just some patience and a lot of hand cleaner. If I do put them up what is the best way, similar to what "hicko" did at the beginning of this thread or what? Anyway lets see what the response is like before I put them all up with some words about what is going on. To say at least the carbon was so bad that the inlet manifold upper which I guess is about a 60 mm round hole was total block except for about 5mm at the centre. Thanks for the feedback.
- Era2003
- Posts: 14
- Joined: Fri Oct 19, 2012 8:45 pm
- Location: Perth WA
Re: Carbon build - up its everyone’s problem.
![]() by Longranger1 on Mon Oct 22, 2012 4:25 am
by Longranger1 on Mon Oct 22, 2012 4:25 am
Era2003 wrote:No probs mad992.
Jeez how bloody rude am I, So wrapped up in trying fix the car I forgot introductions.
Generally i use the triton for work and doing up the property. I just throw about anything I can think off in the back. It's been a great car and really haven't had any issues until now. Anyway after the bits of advise from you blokes I went off the deep end and pulled the the whole inlet manifold both upper and lower apart yesterday and finished it off today. Interesting job, my hands are bloody aching from cleaning everything out.. Whilst I was dismantling I have been taking photos of the whole job. Including showing each piece and how to get it off. Also got picks off how bad the build up was and believe me it was horrible everything totally blocked including the inlet ports leading into the head. Cleaned her all up. Put it back together and kicked her over. I'm going to install the can in a couple of weeks so this never happens again. Mind you with 240,000 clicks on the clock I may trade it in before it ever happen again. Now she runs clean and not a sign of surging or smoke. I have question for you all. Is it worth putting all the picks up on the site in their proper order so anyone can see the whole thing coming apart, cleaned and put back together? The reason I ask is that I found it really difficult to get a workshop manual. So I just went on experience, not that experience is really required just some patience and a lot of hand cleaner. If I do put them up what is the best way, similar to what "hicko" did at the beginning of this thread or what? Anyway lets see what the response is like before I put them all up with some words about what is going on. To say at least the carbon was so bad that the inlet manifold upper which I guess is about a 60 mm round hole was total block except for about 5mm at the centre. Thanks for the feedback.
Re photos, go for it.
Sounds like you had a great result. That carbon crap is messy as hell to clean out.
The voices in my head may not be real, but they do have some damned good ideas.
If it's feral, it's in peril.
MN turbo lag? What lag??
99% of lawyers give the rest a bad name.
If it's feral, it's in peril.
MN turbo lag? What lag??
99% of lawyers give the rest a bad name.
-

Longranger1 - Platinum Subscriber
- Posts: 2254
- Joined: Wed May 26, 2010 7:37 pm
- Location: Townsville NQ
Re: Carbon build - up its everyone’s problem.
![]() by hvac guy on Mon Oct 22, 2012 5:43 am
by hvac guy on Mon Oct 22, 2012 5:43 am
Can't wait for the photos
I AM THE ONE WHO KNOCKS.
-

hvac guy - Platinum Subscriber
- Posts: 2440
- Joined: Mon Jan 03, 2011 3:21 pm
- Location: greenbank,qld
Re: Carbon build - up its everyone’s problem.
![]() by Magoo on Mon Oct 22, 2012 6:02 am
by Magoo on Mon Oct 22, 2012 6:02 am
Did u have to replace any gaskets when putting it back together , or did u reuse them . I have done the top section but haven't been game to do the lower . Pics would be good I think , sounds like a good result and I would think a lot of money saved .
- Magoo
- Posts: 46
- Joined: Tue Jun 05, 2012 7:14 pm
- Location: Ocean Grove Victoria
Re: Carbon build - up its everyone’s problem.
![]() by Era2003 on Mon Oct 22, 2012 7:21 am
by Era2003 on Mon Oct 22, 2012 7:21 am
Didn't need to replace any gaskets just cleaned them up .The lower inlet manifold gasket, the one that seals it to the head stays where it is. I also went into the ports of the head and cleaned the carbon up inside it as we'll. I'll put it all the pics and procedure together and post it. The whole cleanup and fix literally cost ne next to nothing. however all the gaskets werestill in good condition etc. So at worst i guess new gaskets and a bit off time should be all it costs. when i orinally had the car tuned when they told me i had a problem they were indicating it was going to cost heaps and i got the impression well over a grand. Stay tuned.
- Era2003
- Posts: 14
- Joined: Fri Oct 19, 2012 8:45 pm
- Location: Perth WA
Re: Carbon build - up its everyone’s problem.
![]() by Magoo on Mon Oct 22, 2012 7:34 am
by Magoo on Mon Oct 22, 2012 7:34 am
Thanx for that , I may have a go myself only thing I have concerns about r the fuel lines otherwise I am confident with the rest , I found the top section easy . Most of my mechanical skills have been on old stuff like valiants fords etc... Thanx again Magoo
- Magoo
- Posts: 46
- Joined: Tue Jun 05, 2012 7:14 pm
- Location: Ocean Grove Victoria
Re: Carbon build - up its everyone’s problem.
![]() by Era2003 on Mon Oct 22, 2012 12:43 pm
by Era2003 on Mon Oct 22, 2012 12:43 pm
Magoo, when I post up the picks I'll also describe the fuel lines as well. Pretty easy to remove and you dont have to unscew everything to get it all out. There is a small trick to re-installing the lower manifold though that caught me out. I'll try get at least part of the proceedure up tonight.
Cheers ERA
Cheers ERA
- Era2003
- Posts: 14
- Joined: Fri Oct 19, 2012 8:45 pm
- Location: Perth WA
Re: Carbon build - up its everyone’s problem.
![]() by s13tsilvia on Mon Oct 22, 2012 2:15 pm
by s13tsilvia on Mon Oct 22, 2012 2:15 pm
Holy crap! i pulled upper and lower off on mine and jesus what a journey! what i thought was going to be a 4-5 hour job turned into 10 hours, lost 1 manifold nut and i egr pipe bolt into the engines abyss! down to mitsubishi today to order some new ones, but my manifold is now nice and clean 
1/3 of the way through cleaning!
1/3 of the way through cleaning!
- s13tsilvia
- Posts: 126
- Joined: Tue Jan 05, 2010 2:11 pm
- Location: Chirnside Park
Re: Carbon build - up its everyone’s problem.
![]() by Magoo on Mon Oct 22, 2012 4:51 pm
by Magoo on Mon Oct 22, 2012 4:51 pm
Thanx any help and direction would b mostly apreciated, I think I would b serging if I was choking on that crap
Magoo
Magoo
- Magoo
- Posts: 46
- Joined: Tue Jun 05, 2012 7:14 pm
- Location: Ocean Grove Victoria
Re: Carbon build - up its everyone’s problem.
![]() by Era2003 on Mon Oct 22, 2012 5:26 pm
by Era2003 on Mon Oct 22, 2012 5:26 pm
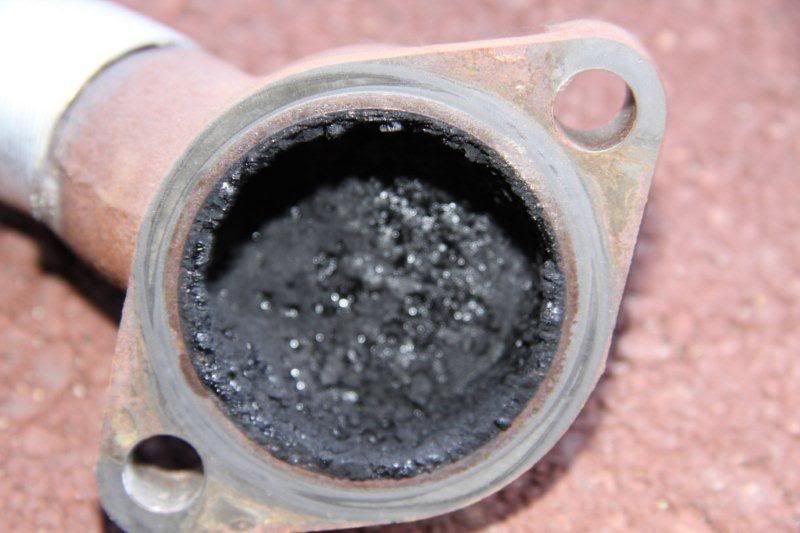
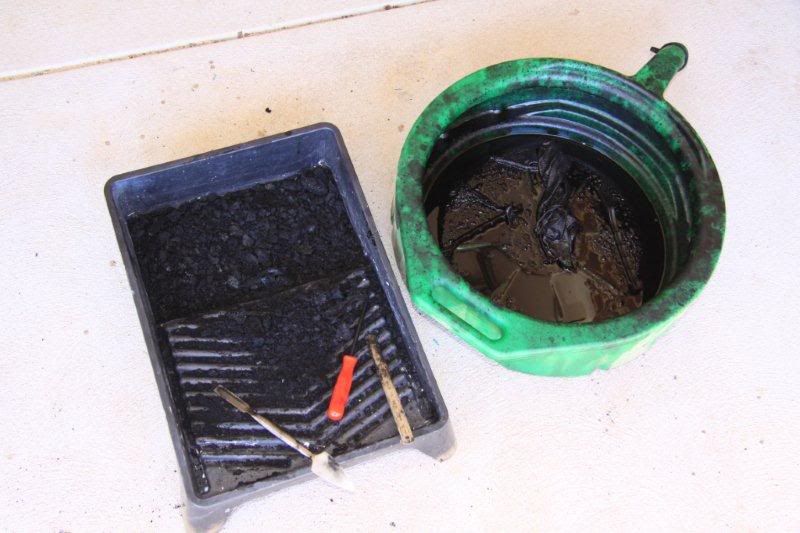
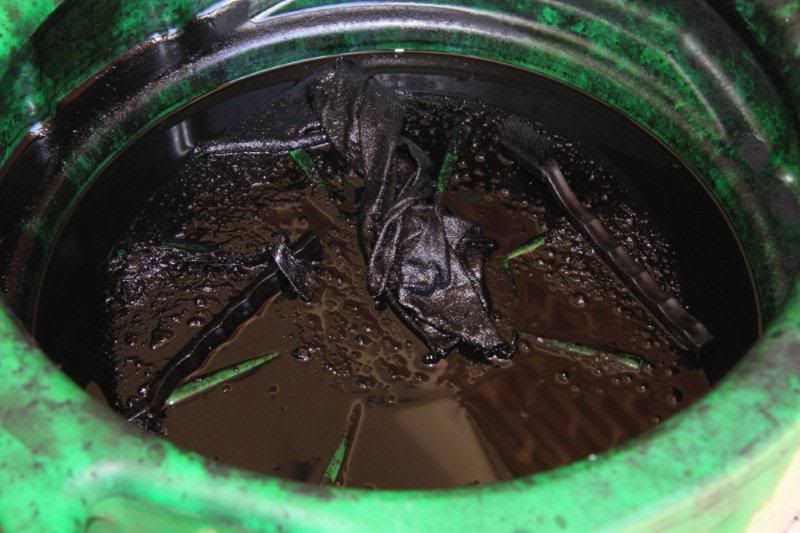
Just as an appertiser here is a pick of my mess
- Era2003
- Posts: 14
- Joined: Fri Oct 19, 2012 8:45 pm
- Location: Perth WA
Re: Carbon build - up its everyone’s problem.
![]() by mad992 on Mon Oct 22, 2012 6:13 pm
by mad992 on Mon Oct 22, 2012 6:13 pm
Era2003 wrote:Just as an appertiser here is a pick of my mess
mate fantastic effort
- mad992
Re: Carbon build - up its everyone’s problem.
![]() by irwazza on Mon Oct 22, 2012 6:34 pm
by irwazza on Mon Oct 22, 2012 6:34 pm
Holy s#*t
Can't wait for the how to!!
Can't wait for the how to!!
-

irwazza - Posts: 615
- Joined: Sun Jul 10, 2011 9:07 pm
Re: Carbon build - up its everyone’s problem.
![]() by Magoo on Mon Oct 22, 2012 6:47 pm
by Magoo on Mon Oct 22, 2012 6:47 pm
I would think that a manifold cleaner may be a waist of time if it was fitted up spraying whilst running?????
- Magoo
- Posts: 46
- Joined: Tue Jun 05, 2012 7:14 pm
- Location: Ocean Grove Victoria
Re: Carbon build - up its everyone’s problem.
![]() by Era2003 on Tue Oct 23, 2012 12:16 am
by Era2003 on Tue Oct 23, 2012 12:16 am
Ok here I go with the post. It may be in parts as I have number of photos and I’ll try and explain the whole job as best as I can. I also won’t take any responsibility for anyone that uses these instructions however I did it and it worked well. Sorry for any spelling mistakes or terms I have used as it is late.
OK to do this job you need mainly size 10, 12 and 14mm sockets and medium length extension bar, size 10,12, 14 and 18mm open end spanners on one side and ring spanner on the opposite side. I had all the sockets in both 1/4inch and 3/8 drives. Just see which is easiest for you to work with. A pair of bull nosed pliers. Two packets of small wire brushes (about twice the size of tooth brush) from your local auto shop, a small scraper and a couple of awls (used to scrape the carbon off in hard to get places. See the picks to see what the scraper etc looked like. Also get some two stroke fuel. This is what you’re going to use to clean the whole mess up with. And lots of rags. Use gloves if you have soft hands as they will be in petrol for a few hours. If you lucky enough to have a cleaning station good otherwise I used an oversized oil pan to do the cleaning with. Note that everything gets filthy black and buckets etc will probably be thrown away. I also used a collapsible table to put all the parts on.
To dismantle.
Remove you’re battery and battery holder put it well aside.
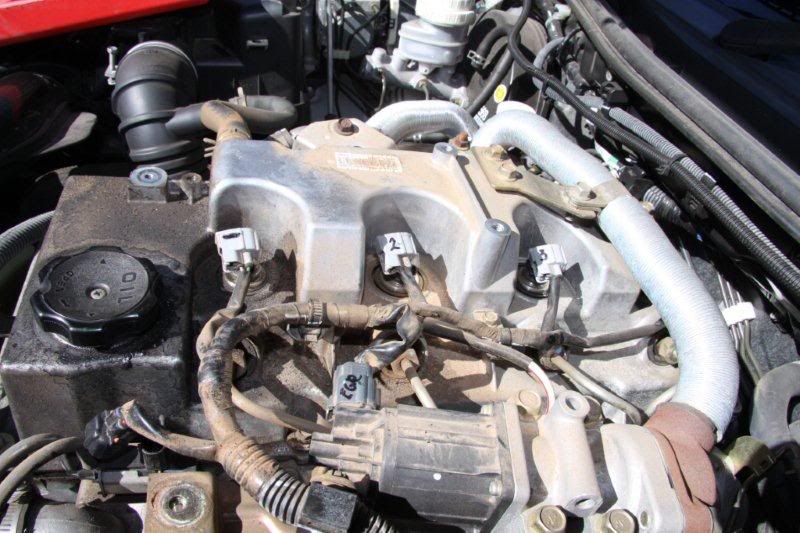
Remove the top plastic engine cover. Its held in place with 4 bolts. I think they are 10mm. Place it aside.
You will see the transfer pipe that comes from the turbo to the back of the EGR valve. Just in front of this is a bright long steel bracket held with 2x 12mm bolts. Remove it.
NOTE: I put all the bolts with their brackets when I put them aside so I didn’t get them confused.
Undo the air intake hose and pull it aside.

Get a marker pen and label all 4 glow plug leads so they go back the same way and un do them follow the wire loom and you see you need to undo a few other plugs such as the EGR etc. If unsure label them so you know where they go back or take some pics.
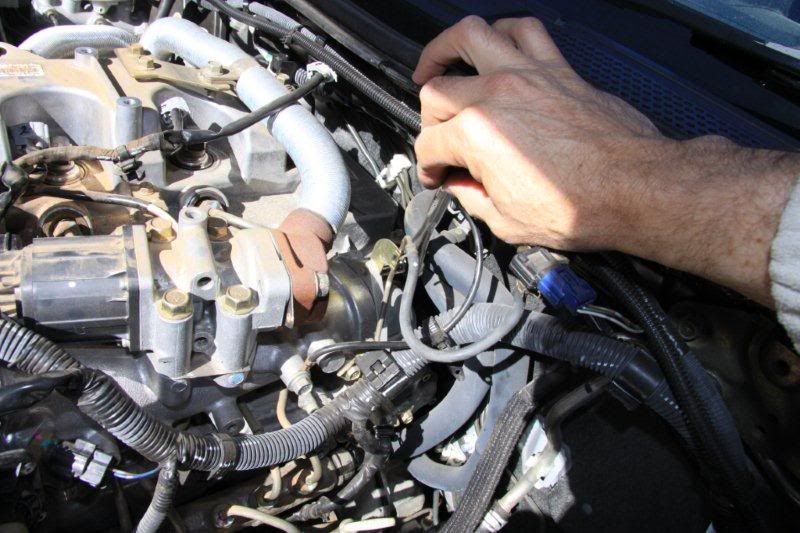
Using a 12mm socket undo the turbo transfer line at the turbo end and the two at the back of the egr valve.
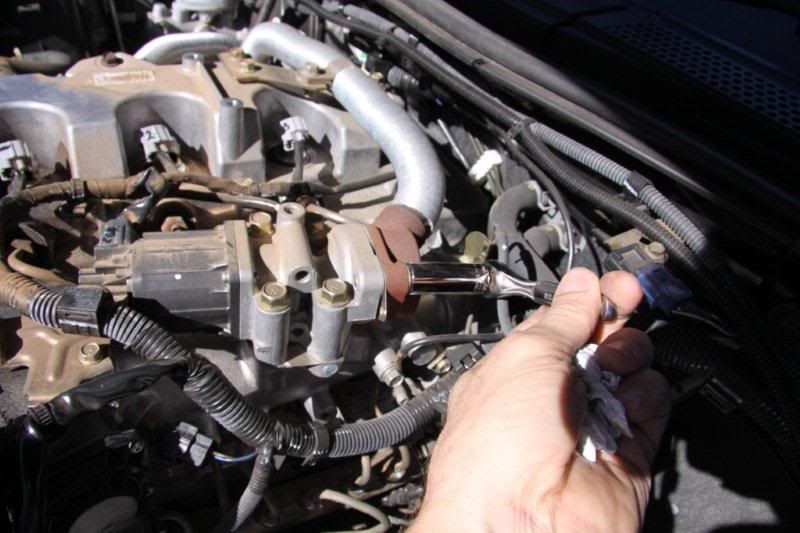
Look down behind the egr valve and undo the red and white lead shown in the picture using a 10mm socket. Sometimes its difficult to undo and you may need to leave it until you get better access don’t bend it as it cannot contact anything else.
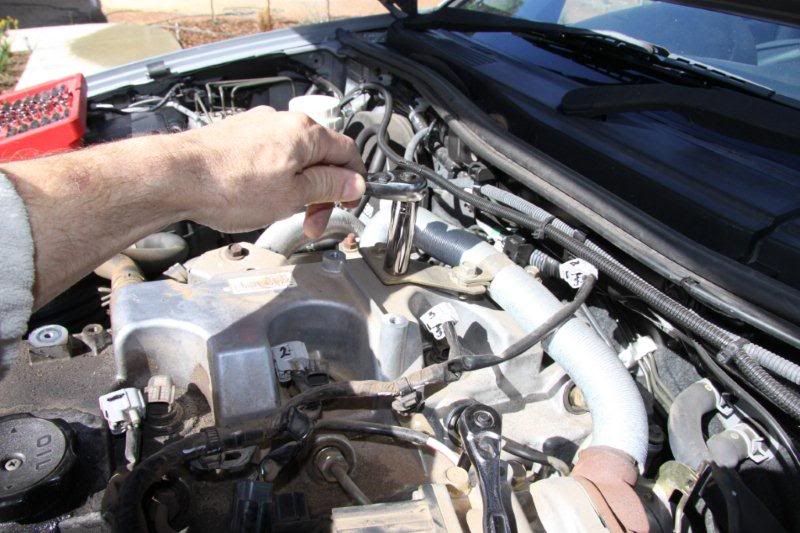
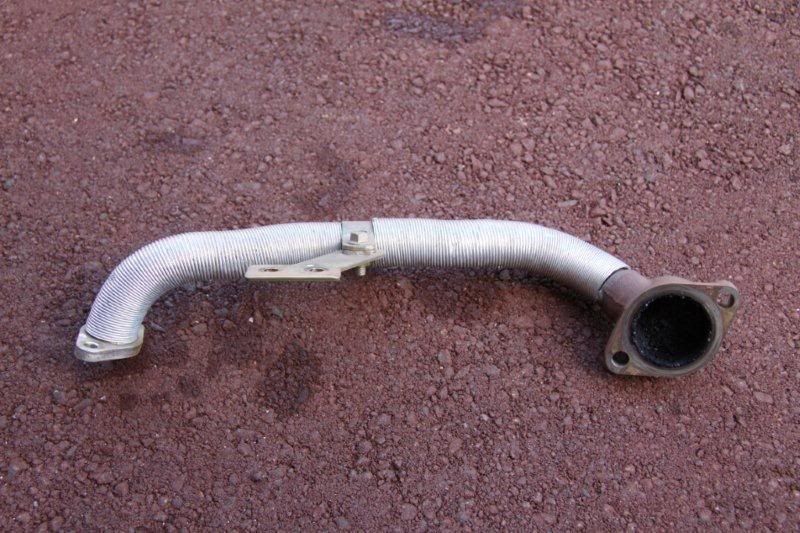
Remove the plate at the top of the engine that is holding the transfer line in place and remove the transfer line. Take a look inside and you’ll see carbon on the egr end.
Now you need to remove the MFC sensor line that is connected to a nipple on the bottom inlet manifold by undoing the two bolts that hold the bracket
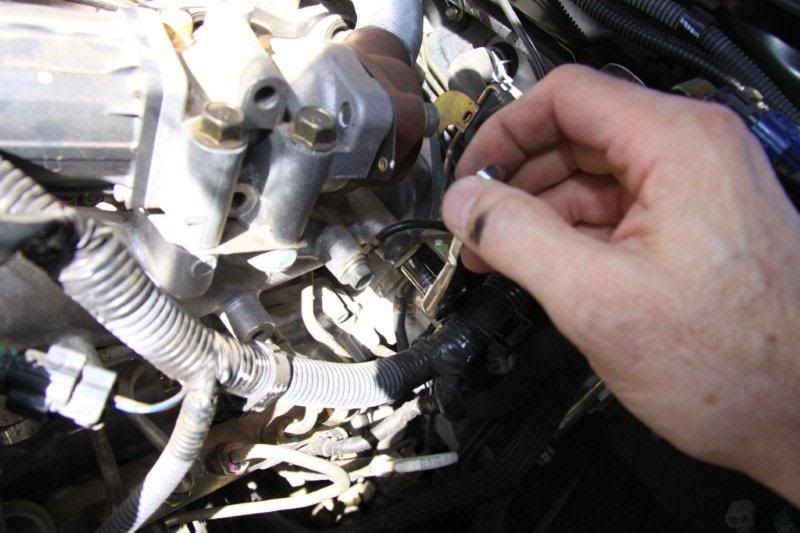
And the earth
disconnect the the tubing from the nipple located on the bottom inlet manifold and from the mfc sensor on the fire wall and remove the steel and tubing assembly with its bracket. NOTE this steel tubing need to be checked for carbon blockages by using a piece of wire to clean it.
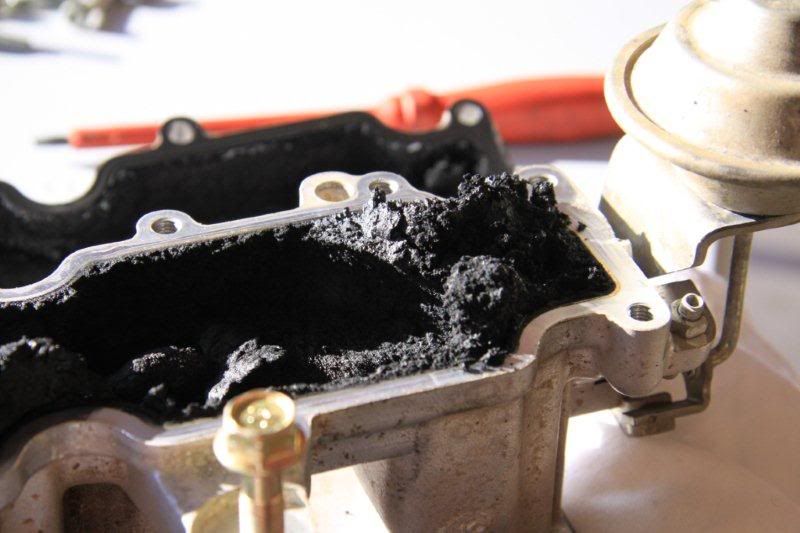
Now remove the egr vale by undoing the four 14mm bolts on the top of the assembly. One you have taken it off you will know straight away the extend of the carbon build up you are dealing with see next series of pics

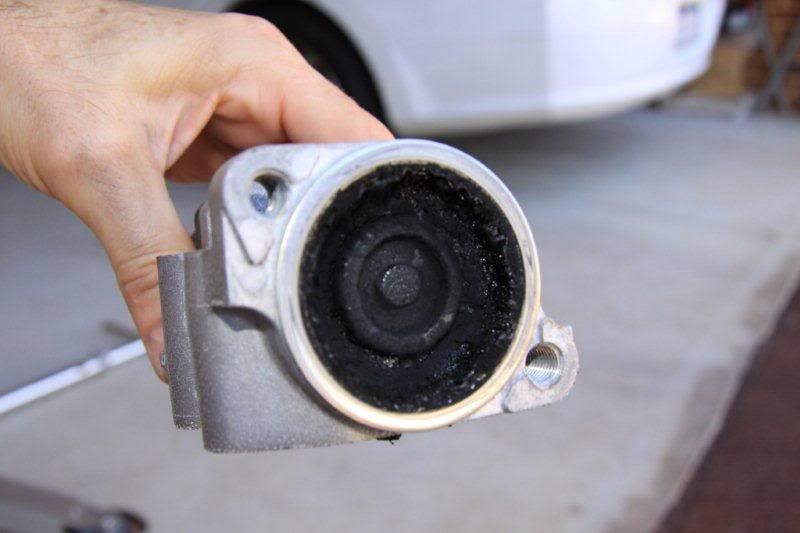
The egr needs to be cleaned out from the underside and side, mine was almost totally blocked.
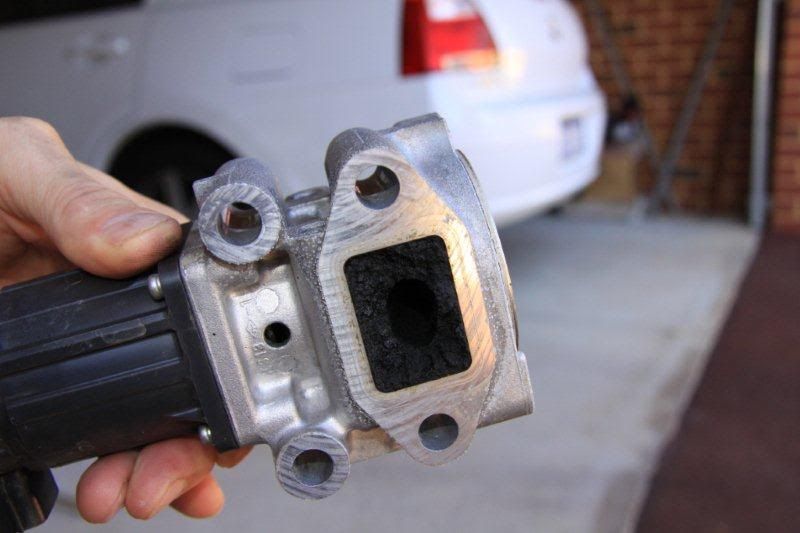
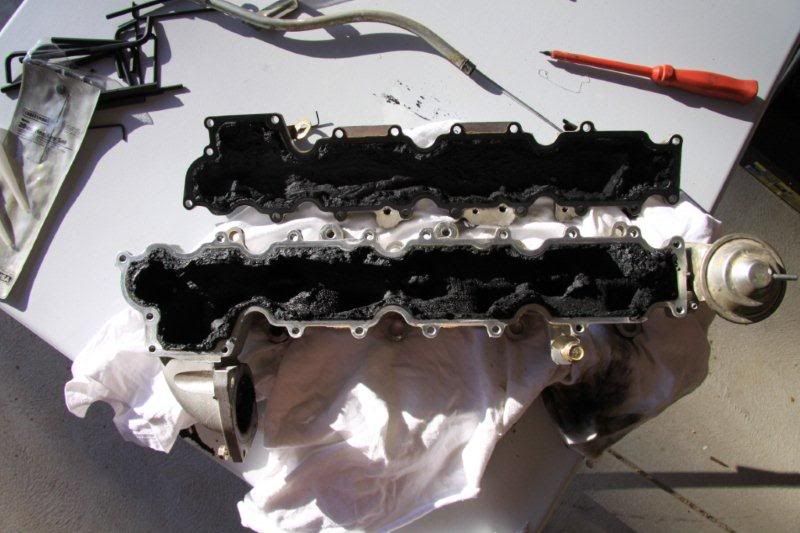
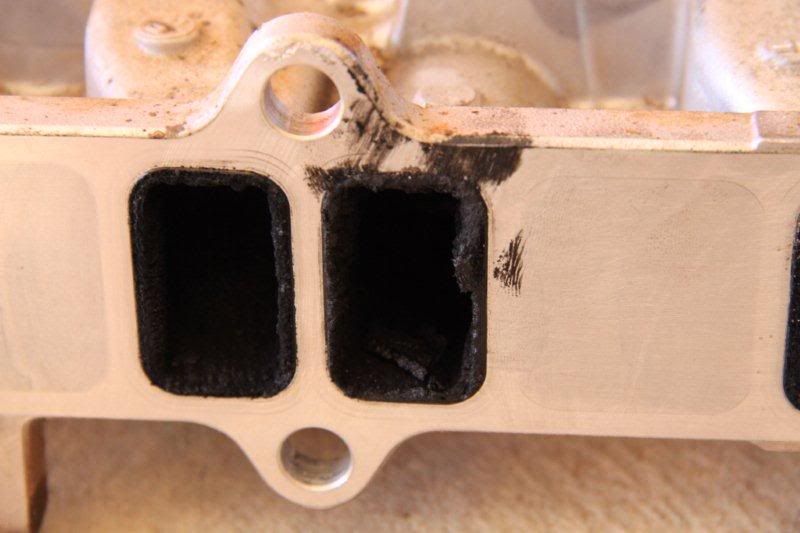
Take a look at the top of the upper inlet manifold, again mine was nearly totally blocked. Remove the gasket and keep it aside. I re-used all my gaskets. Don’t clean anything off yet you don’t want any more carbon accidently falling into the engine.
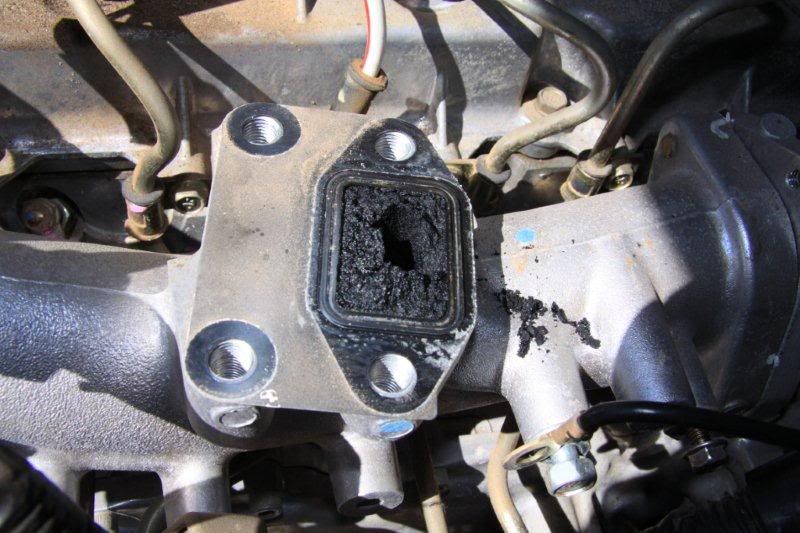
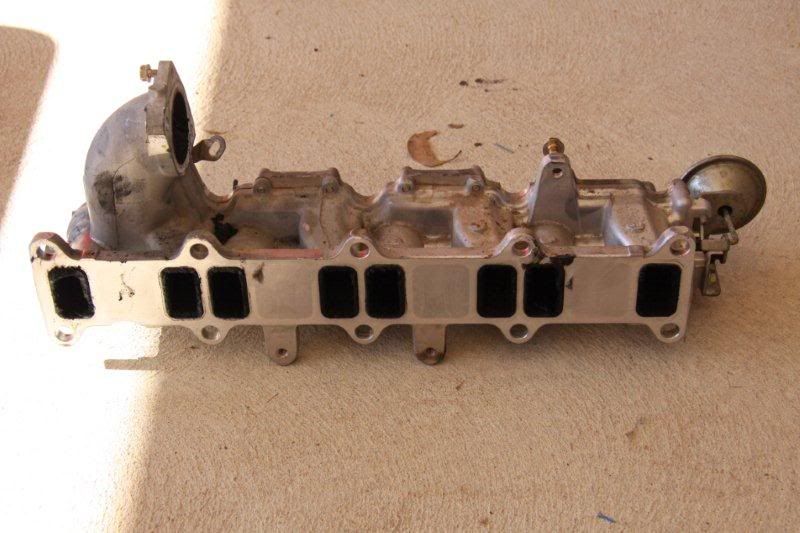
Now three bolts hold on the top inlet manifold the two at the back near the fire wall and one towards the front from below it. The unit should then pull off leave you too see the carbon build up in the top of the lower manifold.
And from the other end of the upper manifold. Again here is mine


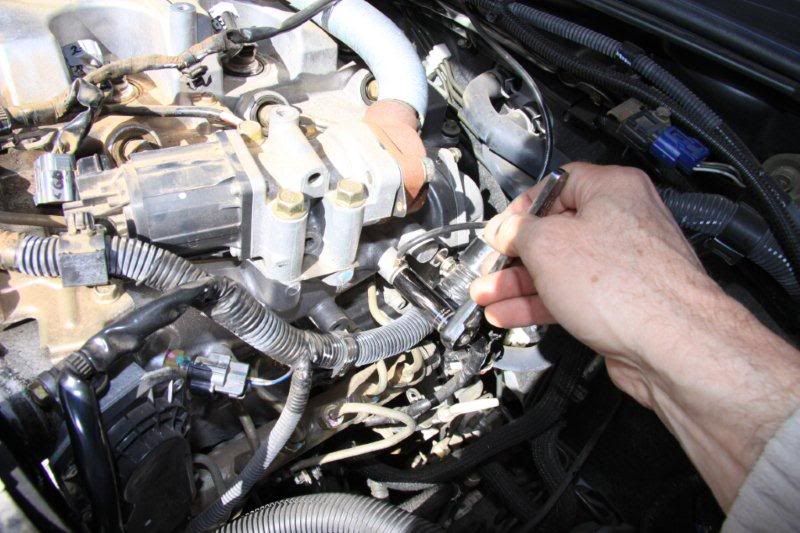
Now comes the tricky bits. You need to remove the fuel injection manifold and pipes. I found it best to undo the injection pipes that sit at the top of the rocker cover using an open ender spanner they should all unscrew easily with your hand once undone. Once they are undone DO NOT bend any pipes leave them sitting there until you undo the lower fuel manifold.
Undo bolts as labelled on the followed photo. Note on the injection manifold only undo the middle one of the 5 lines as indicated do not undo the others. The less you undo here the less sealing problems you will have when you put it back together. I had no sealing issues at all. At the bottom you also need to undo the two bolts that secure the fuel manifold to the engine and the lower bracket plus the main inlet line on the left hand side of the manifold. Take care there is a seal on this last line so make sure you keep it. Once you have these all undone you should be able to wiggle the fuel manifold and all the lines out. Put it aside in a clean position. About a cup full of diesel will come out from it while you are undoing the lines so if you don’t want stains on your garage floor cover it up.
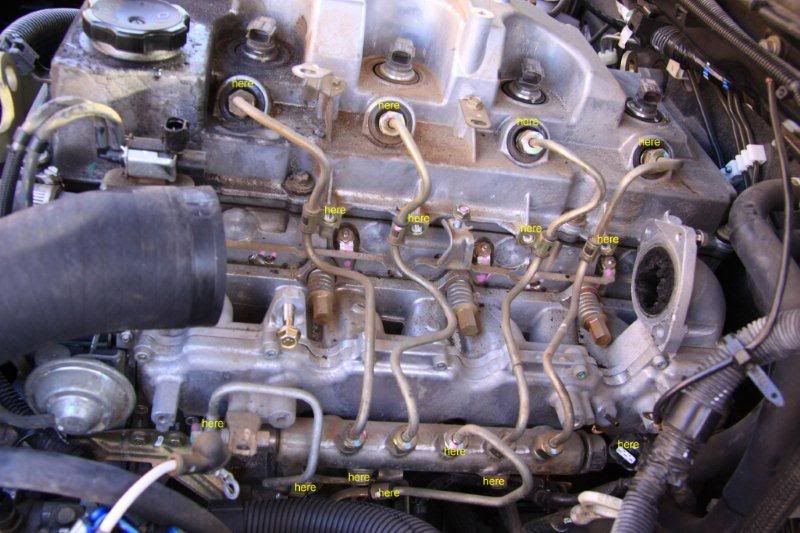
Now I don’t have a pick of the next step because you can’t easily see it. So I’ll try to explain. Under the lower manifold get you hand and feel for another fuel line this is held in place by two more bolts, you can just see them if you look down through the holes in the top of the inlet manifold. You need to undo these two bolts. You will quickly realise that there is a small section of small diameter fuel hose and another larger diameter that also tees off the same steel pipe. Undo the small hose and leave the bigger one where it is. If you (by feel) keep following this fuel line along you will end up at the back of the motor at the back of the head where the other end screws into the head. This also needs to be undone. The bolt that holds it in is like the one that was undone from the left hand side of the fuel manifold earlier with the same type of seal. (DON’T GET THESE TWO MIXED UP) when you put them aside. They look the same but they have different sized inlets. Once you have this pipe cleared away you almost finished
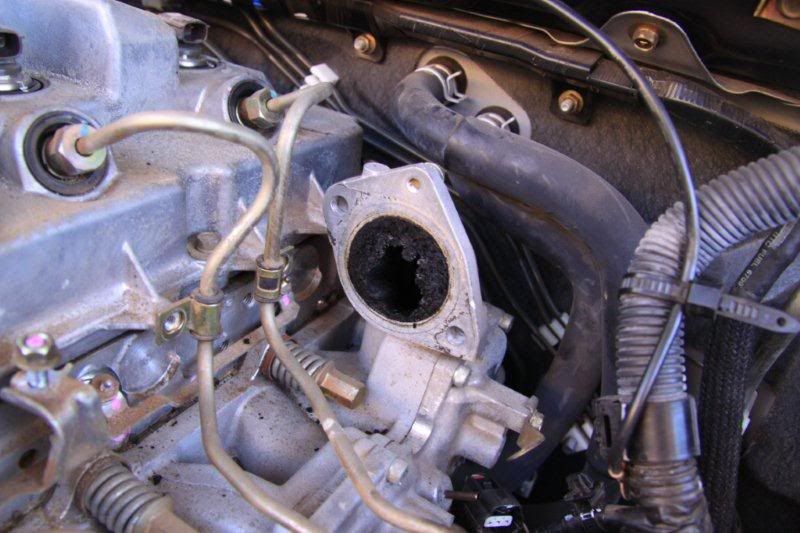
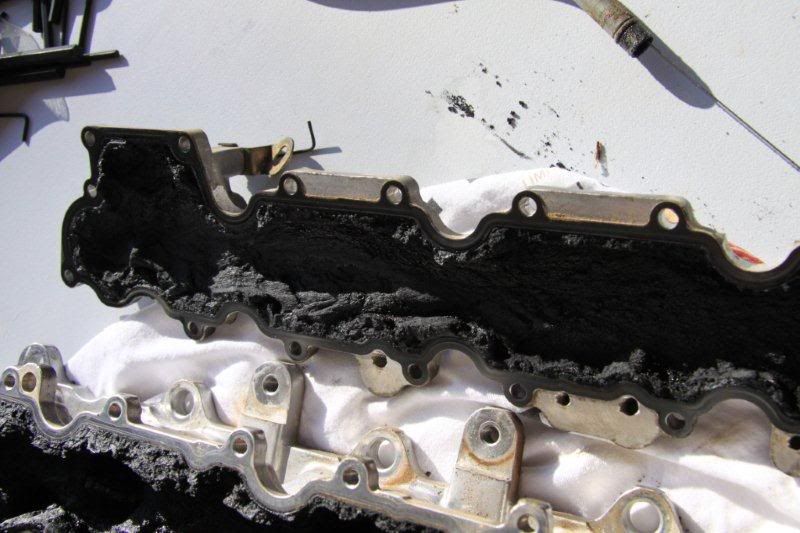
Now remove the 10 spring loaded inlet bolts. Each Bolt has an end nut, a spring and a locating washer. Note the way the washer sits where you’ve undone one. The inlet bolt that sits on the left hand lower side is a real bugger to get out so once undone take the nut off which should be in the socket tool and leave the spring and washer where it is. You may need to convince the manifold to come off by using a rubber hammer (not hard) to break the gasket seal, etc) mine took a little convincing to get it off. Once the seal is broken your biggest obstacle to getting the thing out is to get it past the heater hoses at the fire wall, it’s not too hard however.
*As a side note when you go to put this inlet manifold back on slip it onto all the inlet bolts a little not all the way against the head then take one washer, one spring and the nut and place it on before you put any of the other on and screw the nut on a little. Then once you have the nut started move the inlet manifold to the head. If you don’t do this you will not get that one lower left inlet nut on as it binds against the alloy body of the manifold. I spent 2 bloody hours trying to get this one nut on after I did the others up only to have to undo all the other sand start again. Just take it easy and try not to drop the nuts into the abyss.
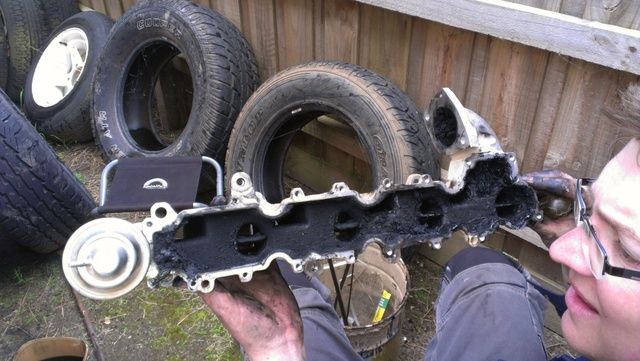
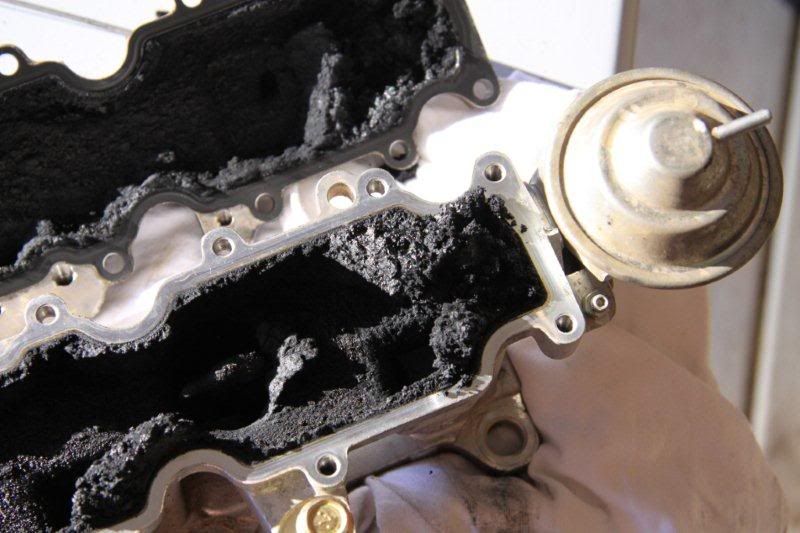
Beauty you have it removed see pick below of mine removed and the carbon/oil build up all the way into the cylinder head.
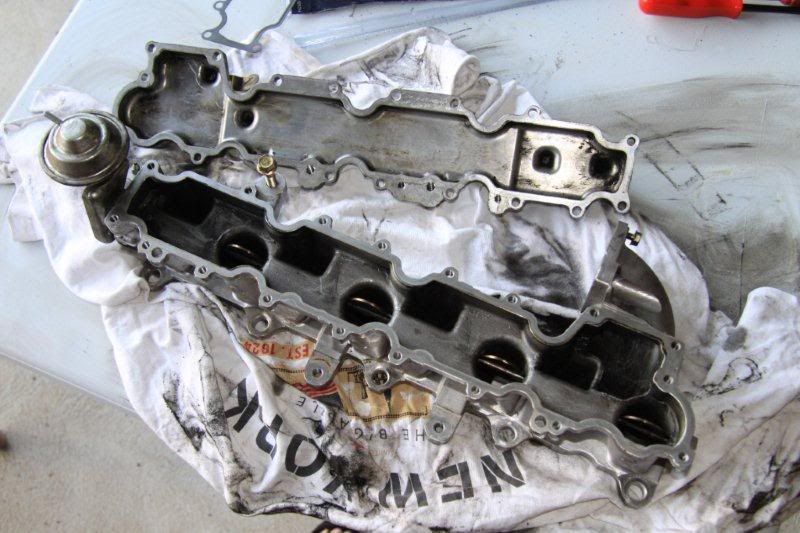
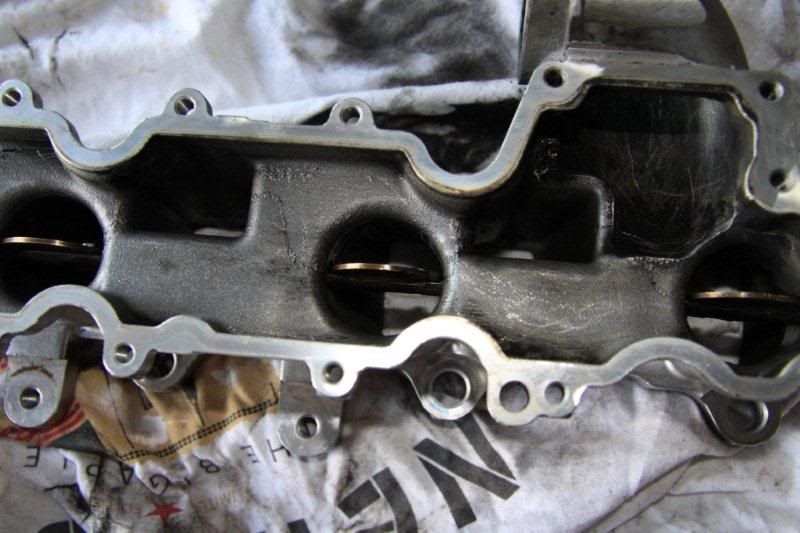
I cleaned the ports on the cylinder head as well as best as possible, when you clean it you use a small scraper and wipe towards you don’t let too much go down into the head. Be careful of the gasket and leave it there if you intend to keep it. Mine cleaned up ok and after scrapping it I really got into each port with a very wet rag full of petrol and wiped it clean. Also wipe the gasket surface to make sure no crap is left on it.

Undo the 20 or so hex key bolts and open the manifold up. This is what you find. There are actually butterflies supposed to be operating under all that gunk. What a mess how did the damn thing ever run. Clean it all up using a variety of small scrapers rags soaked in two stroke fuel etc and operate the butterflies to make sure they work smooth.
All clean make sure you also clean the MFC nipple etc. When cleaning try not to mark the gasket sufaces.
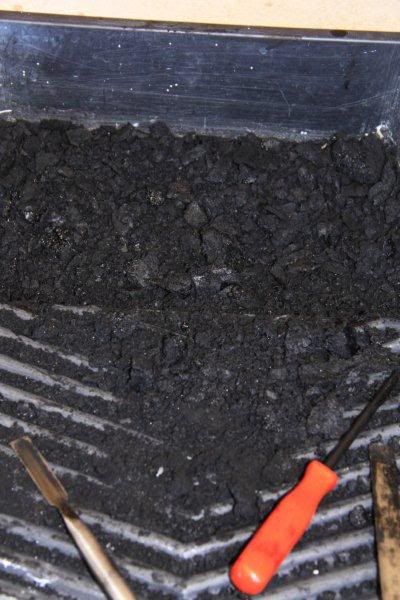
This is all the gunk and you can see the type of scrapers I used. Yes that is a small stainless steel 100ml ruler used as one of the scrapers. If you look in the oil pan you will see the small wire brushes used. I used no sand paper only scrapers and rags soaked in two stroke fuel. Took me about three hours to clean. Get most of it out using scrapers and an awl then start using the fuel and rags.
As they say in the manuals installation is the reverse of dismantle. Just take it easy putting it back together and on tightening it all up especially the fuel lines. Remember to add all the right gaskets, etc. In this digital age take some photos of all before dismantling so you are sure how it all goes back together. If you get stuck ask me as it is still all fresh in my mind. I may have missed one or two small disconnections by you will quickly see your way through.
Sorry for the huge post but hopefully someone will get some benefit from it and save themselves a heap of dough. The whole thing cost me a weekend and about $50. The car now runs like new, fuel consumption has dropped from above 11L/100km to about 9L/100km and revs beautifully all the way through. No sign of surging or exhaust smoke. Be good for another 100k’s
ERA2003
OK to do this job you need mainly size 10, 12 and 14mm sockets and medium length extension bar, size 10,12, 14 and 18mm open end spanners on one side and ring spanner on the opposite side. I had all the sockets in both 1/4inch and 3/8 drives. Just see which is easiest for you to work with. A pair of bull nosed pliers. Two packets of small wire brushes (about twice the size of tooth brush) from your local auto shop, a small scraper and a couple of awls (used to scrape the carbon off in hard to get places. See the picks to see what the scraper etc looked like. Also get some two stroke fuel. This is what you’re going to use to clean the whole mess up with. And lots of rags. Use gloves if you have soft hands as they will be in petrol for a few hours. If you lucky enough to have a cleaning station good otherwise I used an oversized oil pan to do the cleaning with. Note that everything gets filthy black and buckets etc will probably be thrown away. I also used a collapsible table to put all the parts on.
To dismantle.
Remove you’re battery and battery holder put it well aside.
Remove the top plastic engine cover. Its held in place with 4 bolts. I think they are 10mm. Place it aside.
You will see the transfer pipe that comes from the turbo to the back of the EGR valve. Just in front of this is a bright long steel bracket held with 2x 12mm bolts. Remove it.
NOTE: I put all the bolts with their brackets when I put them aside so I didn’t get them confused.
Undo the air intake hose and pull it aside.
Get a marker pen and label all 4 glow plug leads so they go back the same way and un do them follow the wire loom and you see you need to undo a few other plugs such as the EGR etc. If unsure label them so you know where they go back or take some pics.
Using a 12mm socket undo the turbo transfer line at the turbo end and the two at the back of the egr valve.
Look down behind the egr valve and undo the red and white lead shown in the picture using a 10mm socket. Sometimes its difficult to undo and you may need to leave it until you get better access don’t bend it as it cannot contact anything else.
Remove the plate at the top of the engine that is holding the transfer line in place and remove the transfer line. Take a look inside and you’ll see carbon on the egr end.
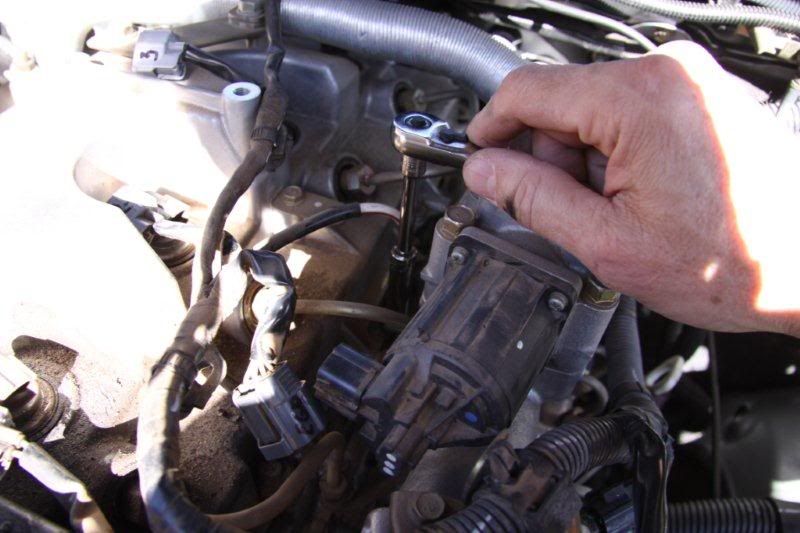
Now you need to remove the MFC sensor line that is connected to a nipple on the bottom inlet manifold by undoing the two bolts that hold the bracket
And the earth
disconnect the the tubing from the nipple located on the bottom inlet manifold and from the mfc sensor on the fire wall and remove the steel and tubing assembly with its bracket. NOTE this steel tubing need to be checked for carbon blockages by using a piece of wire to clean it.
Now remove the egr vale by undoing the four 14mm bolts on the top of the assembly. One you have taken it off you will know straight away the extend of the carbon build up you are dealing with see next series of pics
The egr needs to be cleaned out from the underside and side, mine was almost totally blocked.
Take a look at the top of the upper inlet manifold, again mine was nearly totally blocked. Remove the gasket and keep it aside. I re-used all my gaskets. Don’t clean anything off yet you don’t want any more carbon accidently falling into the engine.
Now three bolts hold on the top inlet manifold the two at the back near the fire wall and one towards the front from below it. The unit should then pull off leave you too see the carbon build up in the top of the lower manifold.
And from the other end of the upper manifold. Again here is mine
Now comes the tricky bits. You need to remove the fuel injection manifold and pipes. I found it best to undo the injection pipes that sit at the top of the rocker cover using an open ender spanner they should all unscrew easily with your hand once undone. Once they are undone DO NOT bend any pipes leave them sitting there until you undo the lower fuel manifold.
Undo bolts as labelled on the followed photo. Note on the injection manifold only undo the middle one of the 5 lines as indicated do not undo the others. The less you undo here the less sealing problems you will have when you put it back together. I had no sealing issues at all. At the bottom you also need to undo the two bolts that secure the fuel manifold to the engine and the lower bracket plus the main inlet line on the left hand side of the manifold. Take care there is a seal on this last line so make sure you keep it. Once you have these all undone you should be able to wiggle the fuel manifold and all the lines out. Put it aside in a clean position. About a cup full of diesel will come out from it while you are undoing the lines so if you don’t want stains on your garage floor cover it up.
Now I don’t have a pick of the next step because you can’t easily see it. So I’ll try to explain. Under the lower manifold get you hand and feel for another fuel line this is held in place by two more bolts, you can just see them if you look down through the holes in the top of the inlet manifold. You need to undo these two bolts. You will quickly realise that there is a small section of small diameter fuel hose and another larger diameter that also tees off the same steel pipe. Undo the small hose and leave the bigger one where it is. If you (by feel) keep following this fuel line along you will end up at the back of the motor at the back of the head where the other end screws into the head. This also needs to be undone. The bolt that holds it in is like the one that was undone from the left hand side of the fuel manifold earlier with the same type of seal. (DON’T GET THESE TWO MIXED UP) when you put them aside. They look the same but they have different sized inlets. Once you have this pipe cleared away you almost finished
Now remove the 10 spring loaded inlet bolts. Each Bolt has an end nut, a spring and a locating washer. Note the way the washer sits where you’ve undone one. The inlet bolt that sits on the left hand lower side is a real bugger to get out so once undone take the nut off which should be in the socket tool and leave the spring and washer where it is. You may need to convince the manifold to come off by using a rubber hammer (not hard) to break the gasket seal, etc) mine took a little convincing to get it off. Once the seal is broken your biggest obstacle to getting the thing out is to get it past the heater hoses at the fire wall, it’s not too hard however.
*As a side note when you go to put this inlet manifold back on slip it onto all the inlet bolts a little not all the way against the head then take one washer, one spring and the nut and place it on before you put any of the other on and screw the nut on a little. Then once you have the nut started move the inlet manifold to the head. If you don’t do this you will not get that one lower left inlet nut on as it binds against the alloy body of the manifold. I spent 2 bloody hours trying to get this one nut on after I did the others up only to have to undo all the other sand start again. Just take it easy and try not to drop the nuts into the abyss.
Beauty you have it removed see pick below of mine removed and the carbon/oil build up all the way into the cylinder head.
I cleaned the ports on the cylinder head as well as best as possible, when you clean it you use a small scraper and wipe towards you don’t let too much go down into the head. Be careful of the gasket and leave it there if you intend to keep it. Mine cleaned up ok and after scrapping it I really got into each port with a very wet rag full of petrol and wiped it clean. Also wipe the gasket surface to make sure no crap is left on it.
Undo the 20 or so hex key bolts and open the manifold up. This is what you find. There are actually butterflies supposed to be operating under all that gunk. What a mess how did the damn thing ever run. Clean it all up using a variety of small scrapers rags soaked in two stroke fuel etc and operate the butterflies to make sure they work smooth.
All clean make sure you also clean the MFC nipple etc. When cleaning try not to mark the gasket sufaces.
This is all the gunk and you can see the type of scrapers I used. Yes that is a small stainless steel 100ml ruler used as one of the scrapers. If you look in the oil pan you will see the small wire brushes used. I used no sand paper only scrapers and rags soaked in two stroke fuel. Took me about three hours to clean. Get most of it out using scrapers and an awl then start using the fuel and rags.
As they say in the manuals installation is the reverse of dismantle. Just take it easy putting it back together and on tightening it all up especially the fuel lines. Remember to add all the right gaskets, etc. In this digital age take some photos of all before dismantling so you are sure how it all goes back together. If you get stuck ask me as it is still all fresh in my mind. I may have missed one or two small disconnections by you will quickly see your way through.
Sorry for the huge post but hopefully someone will get some benefit from it and save themselves a heap of dough. The whole thing cost me a weekend and about $50. The car now runs like new, fuel consumption has dropped from above 11L/100km to about 9L/100km and revs beautifully all the way through. No sign of surging or exhaust smoke. Be good for another 100k’s
ERA2003
- Era2003
- Posts: 14
- Joined: Fri Oct 19, 2012 8:45 pm
- Location: Perth WA
Re: Carbon build - up its everyone’s problem.
![]() by stefanos on Tue Oct 23, 2012 2:39 am
by stefanos on Tue Oct 23, 2012 2:39 am
Nice post Era!!!
-

stefanos - Posts: 471
- Joined: Wed Apr 21, 2010 4:56 am
- Location: Greece
Re: Carbon build - up its everyone’s problem.
![]() by Longranger1 on Tue Oct 23, 2012 4:24 am
by Longranger1 on Tue Oct 23, 2012 4:24 am
Great post. Very informative and if anything justifies blanking the egr then your pictures do that with authority.
No wonder the old girl was getting tired.
I have a similar job to do on another vehicle and I will use corn cob media to blast the inlet ports on the head to remove the black crap. Very messy, but works well. You just have to turn the crank to ensure the intake valves are closed so you aren't blowing crap into the cylinders. The media is relatively soft so if a little gets into the cylinders it'll blow out without harm - with care, it is easy to clean the head without removing it.
The voices in my head may not be real, but they do have some damned good ideas.
If it's feral, it's in peril.
MN turbo lag? What lag??
99% of lawyers give the rest a bad name.
If it's feral, it's in peril.
MN turbo lag? What lag??
99% of lawyers give the rest a bad name.
-
Longranger1 - Platinum Subscriber
- Posts: 2254
- Joined: Wed May 26, 2010 7:37 pm
- Location: Townsville NQ
Re: Carbon build - up its everyone’s problem.
![]() by mattz on Tue Oct 23, 2012 6:01 am
by mattz on Tue Oct 23, 2012 6:01 am
Nice post ERA. 
I bet she's running a lot better now.
I bet she's running a lot better now.
THE ONLY DIFFERENCE BETWEEN A MAN AND A BOY IS
THE PRICE OF HIS TOYS
THE PRICE OF HIS TOYS
-

mattz - Posts: 7101
- Joined: Thu Mar 11, 2010 6:26 pm
- Location: Mornington Peninsula vic
Re: Carbon build - up its everyone’s problem.
![]() by Magoo on Tue Oct 23, 2012 6:08 am
by Magoo on Tue Oct 23, 2012 6:08 am
Good job , very helpfull Thanx for that it will make life a bit easier for when I do mine
- Magoo
- Posts: 46
- Joined: Tue Jun 05, 2012 7:14 pm
- Location: Ocean Grove Victoria
Re: Carbon build - up its everyone’s problem.
![]() by ratstriton on Tue Oct 23, 2012 7:06 am
by ratstriton on Tue Oct 23, 2012 7:06 am
Great post mate the only thing about the job that concerns me is disconnecting the fuel lines.
-

ratstriton - Platinum Subscriber
- Posts: 1525
- Joined: Sun Nov 18, 2007 3:00 pm
- Location: wantirna, VIC
Re: Carbon build - up its everyone’s problem.
![]() by hvac guy on Tue Oct 23, 2012 7:21 am
by hvac guy on Tue Oct 23, 2012 7:21 am
This site should charge Mitsubishi for technical support.
I AM THE ONE WHO KNOCKS.
-
hvac guy - Platinum Subscriber
- Posts: 2440
- Joined: Mon Jan 03, 2011 3:21 pm
- Location: greenbank,qld
Re: Carbon build - up its everyone’s problem.
![]() by Cowboy Dave on Tue Oct 23, 2012 11:28 am
by Cowboy Dave on Tue Oct 23, 2012 11:28 am
Mate that may well be the post of the year. Did you prepare it in word or something first? If so maybe we can turn it into a PDF and host it somewhere in its own thread. Would be well worth printing out for anyone about to tackle the task and the formatting might work better from a PDF than it will from the forum.
-

Cowboy Dave - Moderator
- Posts: 18098
- Joined: Tue Dec 29, 2009 9:46 am
- Location: Sydney
Re: Carbon build - up its everyone’s problem.
![]() by Era2003 on Tue Oct 23, 2012 11:34 am
by Era2003 on Tue Oct 23, 2012 11:34 am
Hi Cowboy Dave, funny you ask because yes it is in word and I also have quite a few extra pic's I didn't post because of the length. I could easily turn it into a PDF. And store it somewhere for anyone to access and print out. Any ideas about how to et it out there would be welcomed if you all think it's worth it.
ERA2003
ERA2003
- Era2003
- Posts: 14
- Joined: Fri Oct 19, 2012 8:45 pm
- Location: Perth WA
Who is online
Users browsing this forum: No registered users and 40 guests
![]()