Ok attempt number 3. Tried to post this twice last night but for some reason it didn't show up..
So I will try again.
apologies if this is answered elsewhere, i did search the site as well.
So I am looking at looking to replace my stock GLX headunit with something a bit better. I have a mate that has a Joying android headunit. I have contacted them asking if they are compatible with the triton and they have come back and said its not compatible with the CANBUS.
Can someone explain what CANBUS is. I did a google search and i have found out it is something to do with communication within the car but I don't know how it affects the stereo.
I have looked at the DIGoptions website and there is no mention of CANBUS
Patchymon
Installing Double DIN radio (Digoptions) in MN GLX-R
Re: Can't find it? Ask here FIRST, before you start a new th
![]() by patchymon on Thu Apr 07, 2016 7:42 pm
by patchymon on Thu Apr 07, 2016 7:42 pm
- patchymon
- Posts: 12
- Joined: Tue Jul 21, 2015 6:57 pm
- Location: Darwin
Re: Can't find it? Ask here FIRST, before you start a new th
![]() by coughy on Thu Apr 07, 2016 7:51 pm
by coughy on Thu Apr 07, 2016 7:51 pm
you need to talk to digoptions they are a sponsor and have a lot of options
and theres connects to the can bus if needed
the can bus will give you the fuel usage and stats like that from the car and the steering wheel controls if you have any can work to so i would give them a call...
viewtopic.php?f=110&t=19034
and theres connects to the can bus if needed
the can bus will give you the fuel usage and stats like that from the car and the steering wheel controls if you have any can work to so i would give them a call...
viewtopic.php?f=110&t=19034
Read this First  Then still cant find what you are after
Use this Second Then still no Joy Go Here
Look in this thread
Use this Second
Look in this thread
-
coughy - Platinum Subscriber
- Posts: 1587
- Joined: Fri Jun 20, 2014 3:18 pm
- Location: Bayside ,Brisbane ,QLD
new fascia or hood needed for MN GLX stereo upgrade?
![]() by AussieAnth on Fri Apr 08, 2016 4:41 pm
by AussieAnth on Fri Apr 08, 2016 4:41 pm
I've searched high and low for an answer to this. There is a 3 year old thread here that didn't result in an answer, so I'm asking again.
I've got a 2013 GLX with the factory standard, double DIN stereo. Just ordered a Kenwood DDX5015DAB that does proper screen mirroring so I can display any app.
I'm trying to figure out if I need to order a new fascia plate surround, or an entire hood to replace the factory one, or nothing at all.
The Aerpro.com site suggests an entire hood. Ebay has a mixed bag of products, and I'm still not sure how a standard stereo will fit up with the factory hood.
Also keen to hear if anyone had had issues with the factory brackets matching up with an after market stereo or any fitting advice. Cheers!
MY13 GLX Plus pack dual cab Triton.
My MN & ML Triton WORKSHOP MANUAL page on DropBox. Take a look.
https://www.dropbox.com/sh/mmyqr05gb8c8hgv/eKE4W216Dj
FORUM DIRECTORY
http://www.newtriton.net/phpbb/viewtopic.php?f=3&t=8230
My MN & ML Triton WORKSHOP MANUAL page on DropBox. Take a look.
https://www.dropbox.com/sh/mmyqr05gb8c8hgv/eKE4W216Dj
FORUM DIRECTORY
http://www.newtriton.net/phpbb/viewtopic.php?f=3&t=8230
-
AussieAnth - Platinum Subscriber
- Posts: 265
- Joined: Mon Nov 11, 2013 8:44 pm
- Location: Melbourne, VIC
Re: new fascia or hood needed for MN GLX stereo upgrade?
![]() by Cowboy Dave on Fri Apr 08, 2016 5:18 pm
by Cowboy Dave on Fri Apr 08, 2016 5:18 pm
Okay so I don't know the answer, but I reckon I have some clues for you that might help. Actually come to think of it I might have put a double din digoptions into a GLX? If only my memory was completely shit... Anyway...
So mine is a GLXR and has the double din MMCS. The thing about the MMCS is that it is wider than a standard double din. There is a fair chance your standard unit will be too.
Your new device has these measurements 178mm x 100mm x 159mm
You'll likely find that your existing unit is really close to the 100mm high figure, which is pretty standard, it's the width where you'll run into a difference. The MMCS is maybe 180mm or a little bigger off the top of my head. When I'm talking width and height this is all the very front face of the unit - the actual body of it will almost inevitably be exactly the same size as the existing unit.
So - if you grab a ruler or tape measure and measure the current one, and it's wider than 178mm, you're going to need something to fill the gap. On the one that I did (that wasn't mine) there was a factory surround piece, like a double din rectangular sized piece of black plastic which came off the existing unit and then got trimmed down and re-installed with the new unit to operate as a spacer for the gaps at the sides.
There's a thread about this which I'll go and find, because I used it to work that bit out. It also talks a lot about the hood part numbers.
I reckon your existing hood will be big enough, in the sense that the opening will permit the new unit, but as I've said will need fillers. The other hoods you can get do have slightly different profiles though. The one for the MMCS sits slightly more forward in the outer frame and the piece than overhangs the screen at the top, presumably to keep the sun glare off the touchscreen, which is less of an issue with your factory unit if memory serves.
Consider also this (but check the measurements) http://r.ebay.com/FElxKx
-

Cowboy Dave - Moderator
- Posts: 18098
- Joined: Tue Dec 29, 2009 9:46 am
- Location: Sydney
Re: new fascia or hood needed for MN GLX stereo upgrade?
![]() by Cowboy Dave on Fri Apr 08, 2016 5:28 pm
by Cowboy Dave on Fri Apr 08, 2016 5:28 pm
Actually I even found the answer for you in that thread I went looking for 
Read this http://www.newtriton.net/phpbb/viewtopic.php?f=21&t=8224&p=157470&hilit=trim#p157470
Right near the top he makes the comment that the GLX and GLR? don't need to stuff around with new hoods as they already have it.
If you run all the way through to point 10 of his description you'll see how he modified the surround/fascia - basically by making it less deep, if that makes sense. He had to purchase one whereas I reckon you'll have one already. Or there's the one I've linked to which clips into the fascia quite neatly, assuming it will fit the head unit itself.
Worst case is you get the unit in and have to add a little filler/surround later. The little gaps either side will remind you.
I'm pretty sure you'll find the factory brackets will fit fine, but the post above will show you how to modify them a bit if you need to.
Read this http://www.newtriton.net/phpbb/viewtopic.php?f=21&t=8224&p=157470&hilit=trim#p157470
Right near the top he makes the comment that the GLX and GLR? don't need to stuff around with new hoods as they already have it.
1. Hood and brackets.
You will need to get some parts, to install the radio into. The GLX and GLR already have these bits (Lucky buggers).
The computer hood will NOT fit...so, don't waste your time cutting it down
If you run all the way through to point 10 of his description you'll see how he modified the surround/fascia - basically by making it less deep, if that makes sense. He had to purchase one whereas I reckon you'll have one already. Or there's the one I've linked to which clips into the fascia quite neatly, assuming it will fit the head unit itself.
Worst case is you get the unit in and have to add a little filler/surround later. The little gaps either side will remind you.
I'm pretty sure you'll find the factory brackets will fit fine, but the post above will show you how to modify them a bit if you need to.
-
Cowboy Dave - Moderator
- Posts: 18098
- Joined: Tue Dec 29, 2009 9:46 am
- Location: Sydney
Re: Installing Double DIN radio (Digoptions) in MN GLX-R
![]() by scagz on Sun Apr 24, 2016 3:28 pm
by scagz on Sun Apr 24, 2016 3:28 pm
Hey guys,
First post for me, and have been reading through this thread regarding which double din to get for my 2010 GLXR. Which I love.
After contacting Matt from DigOptionson which model would suit, he has recommended the AVN-M02S, which seems to be the model that ticks all the boxes for me. I already have a reverse camera, rear-view mirror mounted.
Just wondering what member's opinions are on above mentioned model?
&
Are there any installers that you guys would recommend, even if it is one of the listed Digoption installers?
I know lot of you have installed them yourself but due to lack of time and more so lack of confidence I would prefer a professional to install the unit.
I'm located in Sydney and any suggestions would be very much appreciated.
Cheers
- scagz
- Posts: 1
- Joined: Fri Feb 07, 2014 1:46 pm
Re: Installing Double DIN radio (Digoptions) in MN GLX-R
![]() by amyh4n on Tue May 17, 2016 1:25 pm
by amyh4n on Tue May 17, 2016 1:25 pm
Hi Guys wish to Install a double din in my triton GLr and replace my OEM double din just wondering would Sony XAV 65 55w fill fit my current facia ? and how should I connect it to the OEM wiring ? Hope it will fit without any issues
http://www.supercheapauto.com.au/online ... mendations
http://www.supercheapauto.com.au/online ... mendations
-

amyh4n - Posts: 243
- Joined: Wed Mar 09, 2016 9:36 pm
Re: Installing Double DIN radio (Digoptions) in MN GLX-R
![]() by amyh4n on Wed May 18, 2016 10:53 am
by amyh4n on Wed May 18, 2016 10:53 am
@anyone ?
-
amyh4n - Posts: 243
- Joined: Wed Mar 09, 2016 9:36 pm
Re: Installing Double DIN radio (Digoptions) in MN GLX-R
![]() by ag9111 on Wed May 18, 2016 11:51 am
by ag9111 on Wed May 18, 2016 11:51 am
Amyh4n
There are a heap of threads on here about how to hook up units to the OEM connectors and cowboy dave has posted above a heap of info regarding sizing and making units fit.
Help yourself to all the info available on this site.
I sure you can learn to search for yourself instead of just asking questions.
I love cats, but I couldn't eat a full one!
Mud is like unprotected sex
30 secs of fun for a lifetime of grief
Mud is like unprotected sex
30 secs of fun for a lifetime of grief
-

ag9111 - Platinum Subscriber
- Posts: 4858
- Joined: Sun Mar 30, 2008 2:00 pm
- Location: Wollongong, NSW
Re: Installing Double DIN radio (Digoptions) in MN GLX-R
![]() by amyh4n on Wed May 18, 2016 11:53 am
by amyh4n on Wed May 18, 2016 11:53 am
ag9111, ok  sorry
sorry
-
amyh4n - Posts: 243
- Joined: Wed Mar 09, 2016 9:36 pm
Re: Installing Double DIN radio (Digoptions) in MN GLX-R
![]() by Cowboy Dave on Wed May 18, 2016 12:25 pm
by Cowboy Dave on Wed May 18, 2016 12:25 pm
I would have used a ruler or a tape measure for that one I think. It will fit in the car, the only real questions will be whether it fits within the existing fascia and whether you need an infill around the sides to fill and gaps.
If you previously had a factory double din unit in that spot then the hood will fit. If you had an info display or something else in there then it won't. Part numbers for replacements are in this thread or you can buy aftermarket on eBay these days.
As the Sony has a screen less than 7 inches (I didn't search out the full specs) I would be confident you'll need a spacer or filler around the outside of the headunit. In some cases you can make this from the factory item so don't buy anything just yet.
-
Cowboy Dave - Moderator
- Posts: 18098
- Joined: Tue Dec 29, 2009 9:46 am
- Location: Sydney
Re: Installing Double DIN radio (Digoptions) in MN GLX-R
![]() by ag9111 on Wed May 18, 2016 1:20 pm
by ag9111 on Wed May 18, 2016 1:20 pm
amyh4n
We are more than willing to help those who help themselves and still cant find an answer.
A lot of the people who have been here a long time are more than accommodating to help others navigate around the forum but it wears a bit thin at times when people don't even try.
We are more than willing to help those who help themselves and still cant find an answer.
A lot of the people who have been here a long time are more than accommodating to help others navigate around the forum but it wears a bit thin at times when people don't even try.
I love cats, but I couldn't eat a full one!
Mud is like unprotected sex
30 secs of fun for a lifetime of grief
Mud is like unprotected sex
30 secs of fun for a lifetime of grief
-
ag9111 - Platinum Subscriber
- Posts: 4858
- Joined: Sun Mar 30, 2008 2:00 pm
- Location: Wollongong, NSW
Re: Installing Double DIN radio (Digoptions) in MN GLX-R
![]() by ag9111 on Wed May 18, 2016 1:26 pm
by ag9111 on Wed May 18, 2016 1:26 pm
The facia from your GL-R will fit over the new radio and you will need a spacer to fill in the gaps if it worries you.
When I did my GL-R I fitted up the new radio using the existing brackets. Just drilled a few new holes.
I didn't bother filling the gaps as it didn't worry me overly. Lots more important things on the to do list.
When I did my GL-R I fitted up the new radio using the existing brackets. Just drilled a few new holes.
I didn't bother filling the gaps as it didn't worry me overly. Lots more important things on the to do list.
I love cats, but I couldn't eat a full one!
Mud is like unprotected sex
30 secs of fun for a lifetime of grief
Mud is like unprotected sex
30 secs of fun for a lifetime of grief
-
ag9111 - Platinum Subscriber
- Posts: 4858
- Joined: Sun Mar 30, 2008 2:00 pm
- Location: Wollongong, NSW
Re: Installing Double DIN radio (Digoptions) in MN GLX-R
![]() by amyh4n on Wed May 18, 2016 11:10 pm
by amyh4n on Wed May 18, 2016 11:10 pm
ag9111, thank you my current stock mitsi stereo is 18cm x 10 cm can you advise what stereo will fit perfect so i dont have to fiddle with gaps ?
i mean in terms of inches what should i look for ? or what stereo will fit perfectly without any issues ?
just need an example of double din that will fit
I have a triton glr that comes with facia so just want to put something in
i mean in terms of inches what should i look for ? or what stereo will fit perfectly without any issues ?
just need an example of double din that will fit
I have a triton glr that comes with facia so just want to put something in
-
amyh4n - Posts: 243
- Joined: Wed Mar 09, 2016 9:36 pm
Re: Installing Double DIN radio (Digoptions) in MN GLX-R
![]() by Cowboy Dave on Wed May 18, 2016 11:27 pm
by Cowboy Dave on Wed May 18, 2016 11:27 pm
18x10 is the very definition of double din. It's close enough to 7" x 4".
Does the stock headunit have any black plastic surrounding it?
Does the stock headunit have any black plastic surrounding it?
-
Cowboy Dave - Moderator
- Posts: 18098
- Joined: Tue Dec 29, 2009 9:46 am
- Location: Sydney
Re: Installing Double DIN radio (Digoptions) in MN GLX-R
![]() by ag9111 on Thu May 19, 2016 7:36 am
by ag9111 on Thu May 19, 2016 7:36 am
amyh4n
I cant advise on what will fit as I don't know.
Your best bet would be to go look at a store that sells car stereo's. They will have the expertise, you would hope, to advise on what will fit and what wont.
Things change so fast, that what is current today is gone tomorrow.
Supercheap have a sale on oil and stereo's that started recently. I think their sales usually run for 2 weeks
I love cats, but I couldn't eat a full one!
Mud is like unprotected sex
30 secs of fun for a lifetime of grief
Mud is like unprotected sex
30 secs of fun for a lifetime of grief
-
ag9111 - Platinum Subscriber
- Posts: 4858
- Joined: Sun Mar 30, 2008 2:00 pm
- Location: Wollongong, NSW
Re: Installing Double DIN radio (Digoptions) in MN GLX-R
![]() by amyh4n on Thu May 19, 2016 10:57 am
by amyh4n on Thu May 19, 2016 10:57 am
Cowboy Dave, Yes Dave it has plastic around it but I only measured the unit itself not with the plastic bit.
looks like this below two links
https://www.google.com.au/search?q=trit ... TwiJh7M%3A
https://www.google.com.au/search?q=trit ... TwiJh7M%3A
looks like this below two links
https://www.google.com.au/search?q=trit ... TwiJh7M%3A
https://www.google.com.au/search?q=trit ... TwiJh7M%3A
-
amyh4n - Posts: 243
- Joined: Wed Mar 09, 2016 9:36 pm
Re: Installing Double DIN radio (Digoptions) in MN GLX-R
![]() by Carl6390 on Sun Aug 28, 2016 9:13 pm
by Carl6390 on Sun Aug 28, 2016 9:13 pm
salt36 wrote:I found a pic, as you can see I had to cut away all the area to the bottom of the unit so I could still use the buttons.
The white plastic thing that illuminates with the dash lights is gone to make room for the RV unit.
Hey been looking all day for this answer and you almost have.
Have the same triton ad you had in your pic. I don't need to relocate the multi function display but I am replacing the head unit.
Please tell me, by changing to an after market single din stereo will the multi function still work? Don't care if it doesn't show the radio controls. But will it still show compas fuel, trip etc?? Thanks.
- Carl6390
- Posts: 2
- Joined: Thu Aug 25, 2016 10:49 am
Re: Installing Double DIN radio (Digoptions) in MN GLX-R
![]() by Carl6390 on Sun Aug 28, 2016 9:16 pm
by Carl6390 on Sun Aug 28, 2016 9:16 pm
Hey been looking all day for this answer . I don't need to relocate the multi function display but I am replacing the head unit. Single din.
Please tell me, by changing to an after market single din stereo will the multi function still work? Don't care if it doesn't show the radio controls. But will it still show compas fuel, trip etc?? Thanks.
Please tell me, by changing to an after market single din stereo will the multi function still work? Don't care if it doesn't show the radio controls. But will it still show compas fuel, trip etc?? Thanks.
- Carl6390
- Posts: 2
- Joined: Thu Aug 25, 2016 10:49 am
Re: Installing Double DIN radio (Digoptions) in MN GLX-R
![]() by har05l on Sun Aug 28, 2016 10:42 pm
by har05l on Sun Aug 28, 2016 10:42 pm
Carl6390 wrote:Hey been looking all day for this answer . I don't need to relocate the multi function display but I am replacing the head unit. Single din.
Please tell me, by changing to an after market single din stereo will the multi function still work? Don't care if it doesn't show the radio controls. But will it still show compas fuel, trip etc?? Thanks.
Yes the multifunction will operate as it should with only the loss of the stereo controls. Did mine about a month ago

Sent from my iPad using Tapatalk
[censored]
-
har05l - Platinum Subscriber
- Posts: 5575
- Joined: Wed Sep 08, 2010 5:01 pm
- Location: Cambridge Park
Re: Installing Double DIN radio (Digoptions) in MN GLX-R
![]() by tritonliz on Mon Aug 29, 2016 8:05 pm
by tritonliz on Mon Aug 29, 2016 8:05 pm
RockoWallaby wrote:Heya folks
As promised, I'm posting up the install for my Digoptions Lifestyle Double DIN radio in my MN GLX-R.
Much of this install will also be relevant to other brands of Double DIN radio's.
However, the GLX and GLR models have different hood and bracket systems, so much will be different for them.
Also, unsure how this compares to the ML GLX-R. If the brackets are similar, then it may be identical.
As I only have a MN GLX-R, I can't compare to anything else.
Anyways....
1. Hood and brackets.
You will need to get some parts, to install the radio into. The GLX and GLR already have these bits (Lucky buggers).
The computer hood will NOT fit...so, don't waste your time cutting it down
HOOD:
Part number: 8060A079XA
Part Name: Hood-Console Meter
Cost: Around $76.00
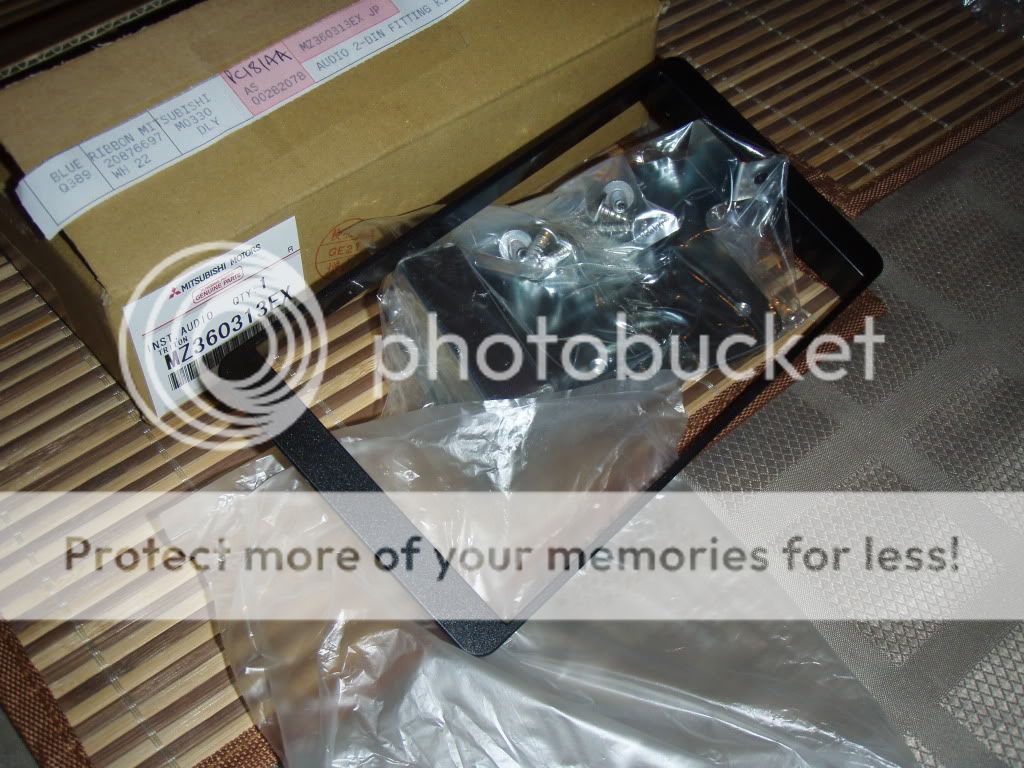
[IMG]http://i830.photobucket.com/albums/zz222/rockowallaby/Triton/Double%20DIN%20Radio%20Install/P4010039.jpg[/IMG
PLATE AND BRACKET:
The bracket and front plate fit the MN GLX and GLR.
They do NOT fit straight on the GLX-R, for the above reasons.
However!! The front plastic plate bit is needed to fill the gap between the hood and radio.
Unfortunately, there is NO GLX-R bracket kit available. It wasn't made to fit a Double DIN radio under the hood, in its standard format.
This kit is your only factory option to fill the gap (apart from making something up yourself out of ABS sheet, or out of another plate for a different vehicle somehow), so if you want a nice pretty trim around your radio, you have to use it.
Plate and Bracket Part Number: MZ360313EX
Part Name: Audio 2-DIN fitting kit
Cost: Around $105.00
Put them together and you get....
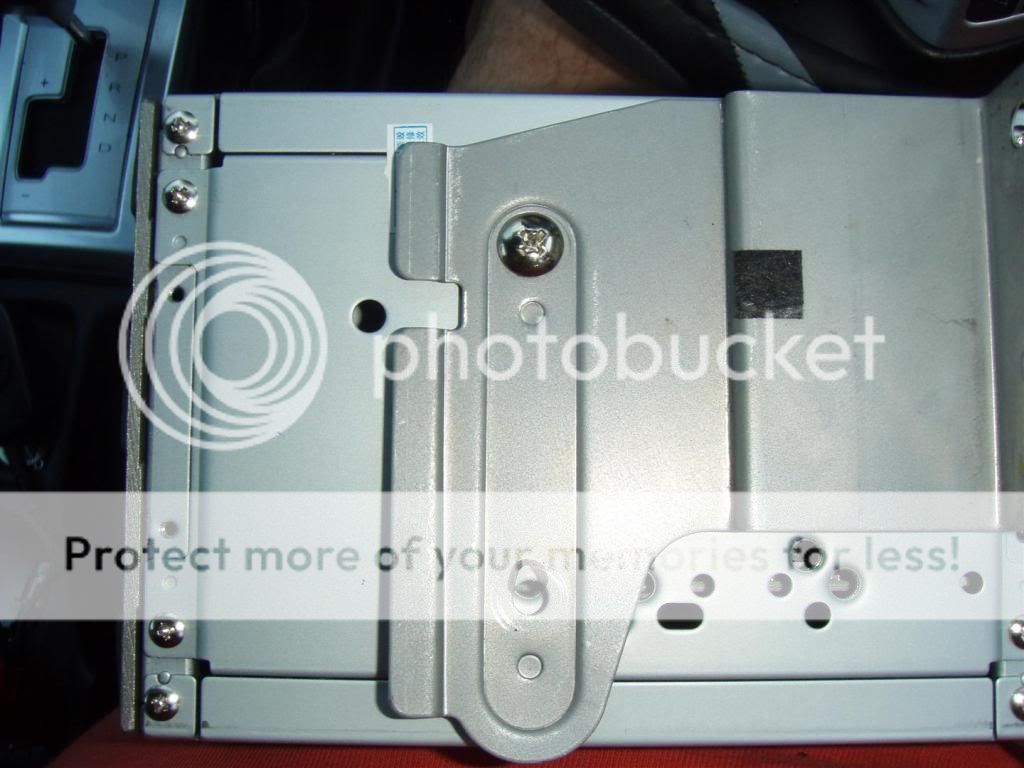
2. Remove the original Hood.
Grab it and pull it horizontally towards the rear of the car.
3. Remove the Trip Computer:
Ignore the silver bracket in the pic, from the front fascia kit. That was testing the location, and you can't use it anyway.
4. Cut & trim tabs:
Using a sharp blade or hacksaw blade, remove the tabs that stop the new radio sliding in place.
Repeat on other side...
Then remove side tabs
5. Cut, score and fold base plate:
Cut approx 3-4cm from back of base towards rear of vehicle (see pic).
Score across base from one side to another, not going right through material. You want it cut enough to fold down, BUT still strong enough to support the radio.
WATCH THE WIRES!! Don't cut any!
6. Modify original computer brackets to fit new radio and install:
The brackets supplied with the front plate are useless for the GLX-R.
You can readily modify the original trip computer brackets to work perfectly, though.
Firstly, cut the right angle tab off the back of the original bracket with a grinder. You can see it cut off the bracket in this pic.
Then find the holes on the radio to use. The rear most holes are the ones.
Position the bracket with screws in the TOP holes only!! Tighten firm, but so the bracket can be adjusted under pressure.
You'll see the bottom holes don't line up. Mark them, and drill or file them out to an oval shape. Then reinstall brackets with all 4 screws in place.
If you go as pictured with the oval holes, the unit should slide straight in!
If you want to check (which is pretty wise) put only the top 2 in, fit the unit roughly in place, fit the hood, and check clearances with the fascia plate. mine just worked perfectly! Almost dropped from the shock.
HOWEVER, don't do what I did, and scratch your fascia! Put a small towel under the unit to protect the paint.
7. Remove old radio:
You need either the proper radio removal tools, as pictured, or try some heavy wire.
Remove the original radio loom from the back of the radio. NOTE that the earth wire doesn't just pull out! It has a button clip, so press down and removes easily.
Welcome to Spaghetti central!
Feed the wires up to the new location, being careful to not bend the aerial wire too much (after removing it from it's holding clip if required)
Next, cut the end off the earth wire from the new radio loom, and put on a male spade bit, to plug into the earth wire above.
Because I'm fitting reverse cameras, I put on a double adapter bit on the earth wire, for the camera earth.
Now, as my reverse cameras are not the ones supplied with the kit, I made a special loom for my install. You'll need to follow the instructions with your cameras. Blue (back) wire to reverse lights, red to power, etc.
8 Install unit:
Add the new cable to the old loom, attach the earth and all the rest of the cables, aerials, usb, iPod, etc, and CAREFULLY slide the unit into place, taking care not to scratch the fascia beneath (remember the towel!!!) as well as not crush or compress the wires behind. Theres a small space above the radio housing, thats perfect for the GPS antenna, so use some double sided tape and secure it there.
Install the screws holding the brackets in place, and TEST it!! Now's the time to see everything works...not once the hood's on!
9. Install hood.
Push on, and clip into place, making sure the back clips (at front of vehicle) are properly in their slots
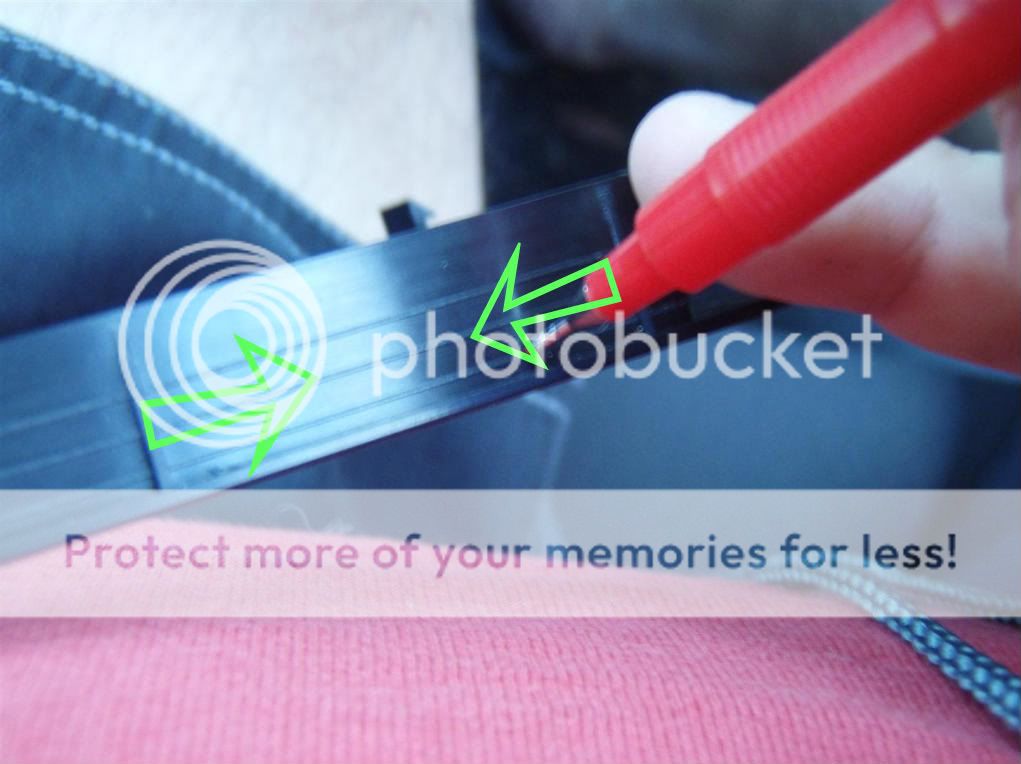
10. Trim fascia plate:
You need to cut around the fascia plate at the line indicated by the green arrows (and NOT the red pen tip). CHECK IT'S THE SAME LINE FOR YOUR INSTALL!! You may need another line to use, depending where the radio sits, although mine worked here...
Install plate around radio.
12. Install GPS SD card:
It don't work without it
13. Sit back and gloat what a friggin' awesome radio you have in your Triton!
Even space now for a Single DIN UHF Radio!
Hopefully, this info will help people get started on their radio install, and make for what is really an incredibly fast job, all things considered.
It's a bloody awesome unit. For the price, you'd be hard pressed buying better, and the service so far from Matt at Digoptions has been excellent. Radio's clear, iPod works fine (but ONLY on newer iPods, incl Nano Gen 3 or newer), Nav is excellent (although the voices sometimes get a bit patched together), DVD is excellent, and everything else seems to work great. Look, a $2000 unit might be a little more...polished...but I bet it'd be hard to beat this unit for the money.
Few things could be improved. Daylight visibility (which is as much a function of the high position in the Triton as anything else, although still hard to see in the Landcruiser),iPod connectivity (ie. better interface would be nice), the prettiness of the menu's, bit vague at times on the touch sensitive screen, etc. These are trivial, and even the expensive units suffer from this sort of thing. Nothing I can't live with. You could try fitting it further back in the housing, but I prefer it closer to see. We're going to try a matt finish screen protector, from eBay, for an iPad, cut it down, and see how it goes at stopping the glare.
Still have things to check out, including OziExplorer, etc. But I'd recommend this unit to anyone. Housemate and I both bought it, and we're both stoked. Best $500 I've spent on the Triton so far. Admittedly, the extra bits have made it approach $800 installed, but still WAY cheaper than most other options there, which will cost at least $1500-$2000.
Now to install the last one in my old man's Navara
Cheers
Scotty


Hi mate,
Have you had any GPS issues with this? I have had mine for 18 months and it has started to freeze when on road maps, I have to switch it on and off to get it to work again..
Thanks. Liz
- tritonliz
- Posts: 246
- Joined: Sun Feb 03, 2013 7:00 pm
Re: Installing Double DIN radio (Digoptions) in MN GLX-R
![]() by Pearcie45 on Sun Jan 01, 2017 6:26 pm
by Pearcie45 on Sun Jan 01, 2017 6:26 pm
So I'm looking at putting one of these in my mn my13 glxr and have just a few questions! After reading all 31 pages I've sort of lost track which models need extra parts. Will the original post suit my needs? Just the hood and metal brackets along with the dig options unit?
MN MY13 GLX-R - Silver - Rear Diff Lock - Rhino Lining Tub Liner - GME TX3100 UHF - Tinted Bonnet Protector - Basha 3mm Bash Plates
- Pearcie45
- Posts: 126
- Joined: Mon Mar 26, 2012 6:00 pm
Re: Installing Double DIN radio (Digoptions) in MN GLX-R
![]() by Edibled on Thu Apr 27, 2017 8:13 am
by Edibled on Thu Apr 27, 2017 8:13 am
I'm in a similar situation to Pearcie, looking to replace the head unit in my MN MY11 GL-R, and got lost as to what hoods, or fascias might be needed. From the looks of it, and a quick measure, my guess is that it is already a standard DDIN hole, just wanting some clirification.
- Edibled
- Posts: 2
- Joined: Tue Apr 04, 2017 4:11 pm
- Location: Corinda, Brisbane
Re: Installing Double DIN radio (Digoptions) in MN GLX-R
![]() by pb4x2 on Sat Dec 02, 2017 10:37 am
by pb4x2 on Sat Dec 02, 2017 10:37 am
I have a 2011 MN GLX diesel auto 4x2 Triton cab chassis ute and this week fitted a Sony XAV-AX100 head unit which is presently on special at Supercheap and Autobarn for $499. You will also require a couple of interconnecting wiring harnesses available from whichever store you select. Also purchased a second unit for my 2012 PB Challenger to be installed once the hardware turns up.
Darryl
Darryl
- pb4x2
- Posts: 12
- Joined: Sat Mar 28, 2015 5:45 am
Re: Installing Double DIN radio (Digoptions) in MN GLX-R
![]() by Lost1 on Sat Apr 27, 2019 11:03 am
by Lost1 on Sat Apr 27, 2019 11:03 am
I have fitted a Joying android head unit in my ML GLX-R and struck a bit of a problem. The head unit powers up, the settings I have saved on the head unit are retained on start up, but I don't have sound. After searching this forum I worked out I need to tap into the amp power feed. Tapped into what I think is the power feed (white and green wire) still no sound. The pic below shows which wire I tapped into. Have I tapped into the correct wire?
First time posting an image lets see how it goes, Link is below
https://imghostr.net/image/JQcBy
First time posting an image lets see how it goes, Link is below
https://imghostr.net/image/JQcBy
- Lost1
- Posts: 18
- Joined: Thu Dec 14, 2017 6:20 pm
Who is online
Users browsing this forum: No registered users and 20 guests
![]()