Rig Jnr's Build
Re: Rig Jnr, She's Back!!
![]() by dan.batto on Sat Dec 24, 2011 6:14 pm
by dan.batto on Sat Dec 24, 2011 6:14 pm
i like those stickers there!!!! oh and the sliders look great too 
Find my build thread here: viewtopic.php?f=51&t=8930
My Shed Here: http://www.newtriton.net/myshed.php?vie ... =dan.batto[/b]
My Shed Here: http://www.newtriton.net/myshed.php?vie ... =dan.batto[/b]
-

dan.batto - Posts: 3269
- Joined: Wed Apr 06, 2011 10:34 pm
- Location: Rowville, Melbourne
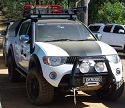
Rig Jnr's New Addition
![]() by c-dale on Thu Feb 16, 2012 9:01 pm
by c-dale on Thu Feb 16, 2012 9:01 pm
Hey all, this is the latest addition to Rig Jnr.

And this is who will be sitting in it.

His names Bruce, 1 week old tomorrow still in Special care nursery as he was 5 weeks premmy but doing well, as is mum. 6pound 2ounces, so would have been a big boofa if he made full term.
Very happy though, just vant wait to get him home
And this is who will be sitting in it.
His names Bruce, 1 week old tomorrow
Very happy though, just vant wait to get him home
My Build Thread: http://www.newtriton.net/phpbb/viewtopic.php?f=51&t=8715
-
c-dale - Platinum Subscriber
- Posts: 1119
- Joined: Wed Dec 30, 2009 3:29 pm
- Location: Bracken Ridge, Brisbane, QLD
Re: Rig Jnr's New Addition
![]() by fridgie on Thu Feb 16, 2012 9:04 pm
by fridgie on Thu Feb 16, 2012 9:04 pm
Congrats mate that's absolutely awesome 
And the baby's cool too, glad all are well....
//but dear god don't let Joe hear you called him Bruce
And the baby's cool too, glad all are well....
//but dear god don't let Joe hear you called him Bruce
I'm not so good with the advice  ... Can I interest you in a sarcastic comment???
FORUM DIRECTORY - Click here
SEARCH TUTORIAL - Click here
MY TRITON - SEE IT HERE
FORUM DIRECTORY - Click here
SEARCH TUTORIAL - Click here
MY TRITON - SEE IT HERE
-
fridgie - Posts: 10485
- Joined: Sat Mar 15, 2008 2:00 pm
- Location: Caboolture, QLD
Re: Rig Jnr's New Addition
![]() by Mooons on Thu Feb 16, 2012 9:12 pm
by Mooons on Thu Feb 16, 2012 9:12 pm
Congratulations mate looks like you've got someone to go wheeling with when there a little older
When you point your finger cos your plan fell through
Theres three more fingers pointing back at you
Theres three more fingers pointing back at you
-

Mooons - Platinum Subscriber
- Posts: 4678
- Joined: Sat Aug 14, 2010 11:53 am
- Location: Geelong
Rig Jnr's New Addition
![]() by mattz on Fri Feb 17, 2012 5:37 am
by mattz on Fri Feb 17, 2012 5:37 am
Congrats mate.
I'm glad all is going well and hope you have them both home soon.
I'm glad all is going well and hope you have them both home soon.
THE ONLY DIFFERENCE BETWEEN A MAN AND A BOY IS
THE PRICE OF HIS TOYS
THE PRICE OF HIS TOYS
-

mattz - Posts: 7101
- Joined: Thu Mar 11, 2010 6:26 pm
- Location: Mornington Peninsula vic
Re: Rig Jnr's New Addition
![]() by jop on Fri Feb 17, 2012 5:51 am
by jop on Fri Feb 17, 2012 5:51 am
Nice work mate - a navi/rock packer for you in a few years
-

jop - Posts: 5293
- Joined: Tue Nov 20, 2007 3:00 pm
- Location: Redlands,Brisbane, QLD
Rig Jnr's New Addition
![]() by Brett05 on Fri Feb 17, 2012 7:19 am
by Brett05 on Fri Feb 17, 2012 7:19 am
Congrats Justin,
If I pushed a copy of myself off a cliff, because he was swearing. Could I be charged with making an obscene clone fall ?
Link to Centre Bearing Mod viewtopic.php?f=18&t=6394
CAD & PDF files Centre Bearing Mod http://www.newtriton.net/phpbb/download/file.php?id=638
Link to Centre Bearing Mod viewtopic.php?f=18&t=6394
CAD & PDF files Centre Bearing Mod http://www.newtriton.net/phpbb/download/file.php?id=638
-
Brett05 - Posts: 1597
- Joined: Wed Apr 07, 2010 5:46 am
- Location: Mackay QLD
Re: Rig Jnr's New Addition
![]() by snowman on Fri Feb 17, 2012 7:45 am
by snowman on Fri Feb 17, 2012 7:45 am
well done mate.
erh actually underdone.
erh actually underdone.
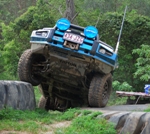
This car is like a bad drug habit. It is taking all my money and time, my family are concerned, but new mods just feel sooooooo good.
-

snowman - Platinum Subscriber
- Posts: 12031
- Joined: Sat Feb 07, 2009 10:59 pm
- Location: Toongabbie, NSW
Rig Jnr's New Addition
![]() by big_bob_thefirst on Fri Feb 17, 2012 8:49 am
by big_bob_thefirst on Fri Feb 17, 2012 8:49 am
Congrats! U realise that there goes the mod funding...
I feel sorry for people who don't drink...
When they wake up in the morning, that's the best they're going to feel all day.
When they wake up in the morning, that's the best they're going to feel all day.
-
big_bob_thefirst - Platinum Subscriber
- Posts: 995
- Joined: Thu Oct 06, 2011 9:18 pm
- Location: Adelaide, South Australia
Rig Jnr's New Updates (26 Nov 2012)
![]() by c-dale on Mon Nov 26, 2012 9:14 pm
by c-dale on Mon Nov 26, 2012 9:14 pm
It has been a while since I updated my build thread. Things have been a little slow since Bruce came home from hospital. Weekends, mornings and afternoons and sadly nights and early early morning have been busy looking after him. Worth it though as he is awesome
Ok, back on topic.
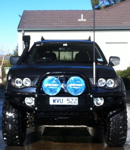
I finished the roof rack and set up the roof lights and UHF ariel were I wanted it
Roof Lights

Ariel

I had the Spot lights, roof lights, uhf and reverse camera hooked up by an auto electrician. Bought some Custom Rocker switches too and wanted them positioned in a place that was easy to get too and showed them off. After a bit of investigation I made up a switch plate under the ash tray. Also incorporates the cable for the iPhone/iPod and the UHF mic. Mild steel sheet and vinyl from Clark Rubber.
Switches

Reverse camera screen

All the lights on

Next step was to get prepared for 2 ½ weeks on Fraser. This involved sorting the dual battery, power to the tray, led lights in the canopy and a place to mount the fridge slide.
I couldn’t figure out the dual battery tray from TJM (bloody instructions made no sense to me ) so Dad helped me sort that and install the Projecta Isolator. The battery I got on special from Autobarn. Have read mixed reports on the brand but has been good thus far.

Power to the tray is in the form of a regular 12v socket and a merit plug. Have the Waeco set up to the merit plug.

Led lights are awesome, massive amount of light out of these.

Just needed something cheap and nasty to mount the fridge slide too as I left it quite late to do anything better. Also realised that as cool as it looks the Canopy is far from practical . The only way to fit the fridge in is to have it right up in the back corner so I effectively loose half the tray. So it’s a temporary measure at the moment and will need a total redesign before the cape trip in 2013 so didn’t want to put together a flashy draw system that would likely have to change.

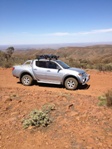
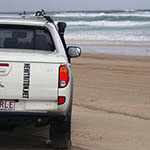
Fraser, as always was awesome!! First trip in the camper trailer, Bruce’s first camping trip and the first decent break away we have had in a loooooong time. Cant wait to get back there again but not sure on when that is going to be possible. Need to save all my leave for the Cape trip in September.
Western Side

Me and my boys, Jake and Bruce

After getting back from Fraser I spent 3 hours under the car with the hose. We went up the beach again a fortnight later just for the day and brought back half of double island point in the chassis rails !! This prompted me to book her in for some rust proofing. Decided on the chemical rather then the electric purely as its what I had on the old Hilux that saw a lot of beach time and was rust free after 15 years of faithful service. We always give the rig a good wash on our return from the beach but surface rust was popping up pretty bloody quickly. It also looks great having nothing but black under the rig.
They did an awesome job of cleaning the engine bay!!

Ok, now for a few cosmetic changes. I wanted to make the car a little more me, and a little less standard. Check out the results
Before

After


A mate gave me a hand to trim the nudge bar which was promptly sent to the powder coaters. I then took to the bumper with a grinder. Scary but liberating!
How much was removed

One side done

Final result

But what about the washer bottle I hear you ask Well I am glad you did. This was more a proof of concept idea. Just wanted to see if it would work. It does
  So will need to tidy it up in the future.
PVC Pipe and a garden hose

Positioned behind the lower part of the bumper

Hose in

Route to filler

Filler

Am super happy with the results of Rig Jnr’s nip and tuck. Could not wipe the smile of my face all day.
That’s it for the moment but have some further plans in the not too distant future. Have some bash plates from Prestige Offroad on the garage, just waiting on the mounts. And now the missus is back at work I might just celebrate by sorting out the ReKon Suspension from Monster Rides.
More to come soon (hopefully)…
Ok, back on topic.
I finished the roof rack and set up the roof lights and UHF ariel were I wanted it
Roof Lights
Ariel
I had the Spot lights, roof lights, uhf and reverse camera hooked up by an auto electrician. Bought some Custom Rocker switches too and wanted them positioned in a place that was easy to get too and showed them off. After a bit of investigation I made up a switch plate under the ash tray. Also incorporates the cable for the iPhone/iPod and the UHF mic. Mild steel sheet and vinyl from Clark Rubber.
Switches
Reverse camera screen
All the lights on
Next step was to get prepared for 2 ½ weeks on Fraser. This involved sorting the dual battery, power to the tray, led lights in the canopy and a place to mount the fridge slide.
I couldn’t figure out the dual battery tray from TJM (bloody instructions made no sense to me
Power to the tray is in the form of a regular 12v socket and a merit plug. Have the Waeco set up to the merit plug.
Led lights are awesome, massive amount of light out of these.
Just needed something cheap and nasty to mount the fridge slide too as I left it quite late to do anything better. Also realised that as cool as it looks the Canopy is far from practical
Fraser, as always was awesome!! First trip in the camper trailer, Bruce’s first camping trip and the first decent break away we have had in a loooooong time. Cant wait to get back there again but not sure on when that is going to be possible. Need to save all my leave for the Cape trip in September.
Western Side
Me and my boys, Jake and Bruce
After getting back from Fraser I spent 3 hours under the car with the hose. We went up the beach again a fortnight later just for the day and brought back half of double island point in the chassis rails
They did an awesome job of cleaning the engine bay!!
Ok, now for a few cosmetic changes. I wanted to make the car a little more me, and a little less standard. Check out the results
Before
After
A mate gave me a hand to trim the nudge bar which was promptly sent to the powder coaters. I then took to the bumper with a grinder. Scary but liberating!
How much was removed
One side done
Final result
But what about the washer bottle I hear you ask
PVC Pipe and a garden hose
Positioned behind the lower part of the bumper
Hose in
Route to filler
Filler
Am super happy with the results of Rig Jnr’s nip and tuck. Could not wipe the smile of my face all day.
That’s it for the moment but have some further plans in the not too distant future. Have some bash plates from Prestige Offroad on the garage, just waiting on the mounts. And now the missus is back at work I might just celebrate by sorting out the ReKon Suspension from Monster Rides.
More to come soon (hopefully)…
My Build Thread: http://www.newtriton.net/phpbb/viewtopic.php?f=51&t=8715
-
c-dale - Platinum Subscriber
- Posts: 1119
- Joined: Wed Dec 30, 2009 3:29 pm
- Location: Bracken Ridge, Brisbane, QLD
Re: Rig Jnr's updates and face lift - 26 Nov 2012
![]() by jop on Tue Nov 27, 2012 11:35 am
by jop on Tue Nov 27, 2012 11:35 am
G'day C-dale, rigs looking great, who did your underbody spray?
-
jop - Posts: 5293
- Joined: Tue Nov 20, 2007 3:00 pm
- Location: Redlands,Brisbane, QLD
Re: Rig Jnr's updates and face lift - 26 Nov 2012
![]() by c-dale on Tue Nov 27, 2012 12:19 pm
by c-dale on Tue Nov 27, 2012 12:19 pm
Thanks Jop
Downey Street Rust Proofing at Geebung.
Very happy with the result.
Downey Street Rust Proofing at Geebung.
Very happy with the result.
My Build Thread: http://www.newtriton.net/phpbb/viewtopic.php?f=51&t=8715
-
c-dale - Platinum Subscriber
- Posts: 1119
- Joined: Wed Dec 30, 2009 3:29 pm
- Location: Bracken Ridge, Brisbane, QLD
Re: Rig Jnr's updates and face lift - 26 Nov 2012
![]() by c-dale on Sat Dec 22, 2012 8:59 pm
by c-dale on Sat Dec 22, 2012 8:59 pm
Hello All,
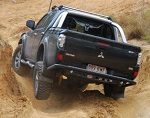
Well my wife has gone back to work after finishing her maternity leave so I celebrated by buying a ReKon Suspension kit from Matty at Monster Rides
Have had the lift in for a little over a week and Bugger Me!!!! it is awesome!!!!!!! Front struts are currently on the lowest height setting which has lifted the front up about 2 inches. I was hoping to have it a little higher but the mechanic was happy with the height and stance. Once I get the confidence up I'll lift it another inch or so. Front is currently sitting at 585mm while the rear is at 625mm. Would like the front at 600mm to balance it out a little more (all measurement taken from middle of the wheel to the bottom of the flare).


The ride is great, super planted even with no load in the tray. On Mattys advice I went with Medium rate springs, Dobinsons. To help elevate any possible shudder we put in a tail shaft space, 20mm I believe and the Dobinsons came with a 1.5 degree castor wedge. I asked the mechanic to also rotate the centre bearing. Happy to report that the shudder I do have is very minor and the ride more than makes up for it.
Matt is great to deal with. Professional, knowledgeable and super keen to help and make sure you are happy. If anyone is thinking about going the ReKon gear then what are you waiting for!
While I was at it figured I best make sure the brake lines are sorted out and are not too short so called Ultimate and Brendan sorted out some extended lines for me, red ones so the car brakes faster


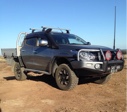
Bash plates were next on the agenda as the Fraser trip in September saw the end of my TJM plates . Mitch at Prestige sent out the Stainless Steel plates with some heavy duty mounts.

Need to say a massive thanks to Matty (Monster Rides), Brendan (Ultimate Suspension), Edgar (My mechanic) and Mitch (Prestige). The quality of the products and service these guys and their teams offer is second to none. We are a very fortunate forum to have the support of these guys.
Well what’s next? I need to get a few things sorted before the Cape Trip in September 2013. List includes.
1. New canopy and interior draws etc
2. Front locker
3. DVD Headrest
4. Winch cradle and winch
5. New Tyres.
Thankfully have the DVD Headrests (Option Audio bought for a steal of ebay) and the front locker (lokka) already, just need to get them installed. Will be measuring up the new canopy over the Christmas break.
Thanks for reading up on my build and if you have any suggestions or advice on future additions let me know
Merry Christmas!

Well my wife has gone back to work after finishing her maternity leave so I celebrated by buying a ReKon Suspension kit from Matty at Monster Rides
Have had the lift in for a little over a week and Bugger Me!!!! it is awesome!!!!!!! Front struts are currently on the lowest height setting which has lifted the front up about 2 inches. I was hoping to have it a little higher but the mechanic was happy with the height and stance. Once I get the confidence up I'll lift it another inch or so. Front is currently sitting at 585mm while the rear is at 625mm. Would like the front at 600mm to balance it out a little more (all measurement taken from middle of the wheel to the bottom of the flare).
The ride is great, super planted even with no load in the tray. On Mattys advice I went with Medium rate springs, Dobinsons. To help elevate any possible shudder we put in a tail shaft space, 20mm I believe and the Dobinsons came with a 1.5 degree castor wedge. I asked the mechanic to also rotate the centre bearing. Happy to report that the shudder I do have is very minor and the ride more than makes up for it.
Matt is great to deal with. Professional, knowledgeable and super keen to help and make sure you are happy. If anyone is thinking about going the ReKon gear then what are you waiting for!
While I was at it figured I best make sure the brake lines are sorted out and are not too short so called Ultimate and Brendan sorted out some extended lines for me, red ones so the car brakes faster
Bash plates were next on the agenda as the Fraser trip in September saw the end of my TJM plates
Need to say a massive thanks to Matty (Monster Rides), Brendan (Ultimate Suspension), Edgar (My mechanic) and Mitch (Prestige). The quality of the products and service these guys and their teams offer is second to none. We are a very fortunate forum to have the support of these guys.
Well what’s next? I need to get a few things sorted before the Cape Trip in September 2013. List includes.
1. New canopy and interior draws etc
2. Front locker
3. DVD Headrest
4. Winch cradle and winch
5. New Tyres.
Thankfully have the DVD Headrests (Option Audio bought for a steal of ebay) and the front locker (lokka) already, just need to get them installed. Will be measuring up the new canopy over the Christmas break.
Thanks for reading up on my build and if you have any suggestions or advice on future additions let me know
Merry Christmas!
My Build Thread: http://www.newtriton.net/phpbb/viewtopic.php?f=51&t=8715
-
c-dale - Platinum Subscriber
- Posts: 1119
- Joined: Wed Dec 30, 2009 3:29 pm
- Location: Bracken Ridge, Brisbane, QLD
Re: Rig Jnr's ReKon and other goodness - 22 Dec 2012
![]() by c-dale on Sun Mar 24, 2013 7:35 pm
by c-dale on Sun Mar 24, 2013 7:35 pm

Changes are happening
My Build Thread: http://www.newtriton.net/phpbb/viewtopic.php?f=51&t=8715
-
c-dale - Platinum Subscriber
- Posts: 1119
- Joined: Wed Dec 30, 2009 3:29 pm
- Location: Bracken Ridge, Brisbane, QLD
Re: Rig Jnr's ReKon and other goodness - 22 Dec 2012
![]() by wake jake on Sun Mar 24, 2013 8:01 pm
by wake jake on Sun Mar 24, 2013 8:01 pm
How's the Rekon going? Trucks coming along nicely
08 MY09 GLXR
Monster Rides
Monster Rides
-
wake jake - Posts: 677
- Joined: Tue Aug 02, 2011 12:24 pm
- Location: North Ringwood, Vic
Re: Rig Jnr's ReKon and other goodness - 22 Dec 2012
![]() by c-dale on Sun Mar 24, 2013 8:07 pm
by c-dale on Sun Mar 24, 2013 8:07 pm
ReKon's a great bit of gear. Very very happy Has been in for a few months now and has settled in with minimal height lost (5mm off the fronts, nothing on the rear) so happy about that. Just need to get out and properly use it as I have only done a beach run with it in 
Have a few plans im my head for her yet, and way too many parts in the garage but its getting there. No real rush now as the Cape trip I had planned with a mate is now off for the 2nd year in a row  will still head out somewhere with the family and my folks but not the 4wd trip I was looking forward to. Thinking maybe Ularu or the Vic High Country but the palnning starts again now. So many options
Have a few plans im my head for her yet, and way too many parts in the garage
My Build Thread: http://www.newtriton.net/phpbb/viewtopic.php?f=51&t=8715
-
c-dale - Platinum Subscriber
- Posts: 1119
- Joined: Wed Dec 30, 2009 3:29 pm
- Location: Bracken Ridge, Brisbane, QLD
Re: Rig Jnr's ReKon and other goodness - 22 Dec 2012
![]() by c-dale on Mon May 27, 2013 9:27 pm
by c-dale on Mon May 27, 2013 9:27 pm
Well, as alluded to in the last couple of updates, a new canopy has been in the cards.
I must admit I liked the old one. I designed it, taught myself to weld in order to build it then built it. As most of us do when we work on our own cars, I felt a huge sense of achievement seeing it on the rig. So why change? Well, the Waeco only fit in the back corner effectively rendering half the tub as fridge space and it leaked something shocking. I didn't consider water proofing
So onwards and upwards! I wanted something a lot more practical but that was still different and individual. So having sat down I knocked up a design and did some sketches. Dad drew it up on CAD for me so I could get the plans to a fabricator to put the frame together for me. Dad had other plans though and started to weld it together because he ‘was having trouble drawing the rear door section’. I sent him a message asking him how the drawings were going, he sent back a photo.

This section was the hardest part to figure out but from there it was pretty quick progress.

Main frame completed

Dad drew up the sheeting required and sent of the plans to have it cut and folded from 3mm alloy sheet.
Starting the sheeting.

Another day’s work and the sheeting was done.
Back / Passenger side.

Front / Passenger side

With the proud builder

Doors

Test fitting


How it sits now with the tyre.


I am super impressed with how its turned out and really need to give the old man a pat on the back. He took my ideas and sketches and turned it into the above. Really, really happy.
We have a couple of small things to tidy up and then a spray of gloss black paint to finish it off.
I must admit I liked the old one. I designed it, taught myself to weld in order to build it then built it. As most of us do when we work on our own cars, I felt a huge sense of achievement seeing it on the rig. So why change? Well, the Waeco only fit in the back corner effectively rendering half the tub as fridge space and it leaked something shocking. I didn't consider water proofing
So onwards and upwards! I wanted something a lot more practical but that was still different and individual. So having sat down I knocked up a design and did some sketches. Dad drew it up on CAD for me so I could get the plans to a fabricator to put the frame together for me. Dad had other plans though and started to weld it together because he ‘was having trouble drawing the rear door section’. I sent him a message asking him how the drawings were going, he sent back a photo.
This section was the hardest part to figure out but from there it was pretty quick progress.
Main frame completed
Dad drew up the sheeting required and sent of the plans to have it cut and folded from 3mm alloy sheet.
Starting the sheeting.
Another day’s work and the sheeting was done.
Back / Passenger side.
Front / Passenger side
With the proud builder
Doors
Test fitting
How it sits now with the tyre.
I am super impressed with how its turned out and really need to give the old man a pat on the back. He took my ideas and sketches and turned it into the above. Really, really happy.
We have a couple of small things to tidy up and then a spray of gloss black paint to finish it off.
My Build Thread: http://www.newtriton.net/phpbb/viewtopic.php?f=51&t=8715
-
c-dale - Platinum Subscriber
- Posts: 1119
- Joined: Wed Dec 30, 2009 3:29 pm
- Location: Bracken Ridge, Brisbane, QLD
Re: Rig Jnr's New Custom Canopy Test Fitting - 27 May 2013
![]() by RJTrojan on Mon May 27, 2013 10:03 pm
by RJTrojan on Mon May 27, 2013 10:03 pm
Wow, that looks amazing!
- RJTrojan
- Posts: 14
- Joined: Sat Mar 30, 2013 8:08 pm
Re: Rig Jnr's New Custom Canopy Test Fitting - 27 May 2013
![]() by Froggy on Tue May 28, 2013 5:09 am
by Froggy on Tue May 28, 2013 5:09 am
Well done!
How have you dealt with the curve of the tub?
How have you dealt with the curve of the tub?
-
Froggy - Posts: 1372
- Joined: Sun Jan 30, 2011 4:19 pm
- Location: Springfield Lakes, QLD
Re: Rig Jnr's New Custom Canopy Test Fitting - 27 May 2013
![]() by Bad Kitty on Tue May 28, 2013 6:38 am
by Bad Kitty on Tue May 28, 2013 6:38 am
Very impressive!!!
group buy!!
group buy!!
-
Bad Kitty - Posts: 2164
- Joined: Sun Sep 05, 2010 12:44 pm
- Location: Brisbane
Re: Rig Jnr's New Custom Canopy Test Fitting - 27 May 2013
![]() by c-dale on Tue May 28, 2013 7:10 am
by c-dale on Tue May 28, 2013 7:10 am
Thanks RJ
Kitty, I think your Dream'n. You should have seen dads face when I told him he could make another one for the MN tub I have out the back of his shed
Froggy, the curve is tricky as the tub not only curves down but in as well. We managed the downward curve by having the alloy sheet cut 50mm too long (this is the overall drop of the curve). Dad then did a template and cut the alloy to match the tub.
The slight inward curve we didn't worry about. Which means we have a slight misalignment but nothing that bothers me. It was a lot messier on my last canopy. Not to everyones liking though but not everyone needs to like it, just me

There is still a little tidy up to be done, trimming here and there, painting and gas struts for the door but it will get there soon enough.
Dad is an absolute legend. This has cost me no more than $450. And that was for the locks and alloy, dad donated the steel and all labour. Used it as his first retirement project. Like I said Super happy!
Kitty, I think your Dream'n. You should have seen dads face when I told him he could make another one for the MN tub I have out the back of his shed
Froggy, the curve is tricky as the tub not only curves down but in as well. We managed the downward curve by having the alloy sheet cut 50mm too long (this is the overall drop of the curve). Dad then did a template and cut the alloy to match the tub.
The slight inward curve we didn't worry about. Which means we have a slight misalignment but nothing that bothers me. It was a lot messier on my last canopy. Not to everyones liking though but not everyone needs to like it, just me
There is still a little tidy up to be done, trimming here and there, painting and gas struts for the door but it will get there soon enough.
Dad is an absolute legend. This has cost me no more than $450. And that was for the locks and alloy, dad donated the steel and all labour. Used it as his first retirement project. Like I said Super happy!
My Build Thread: http://www.newtriton.net/phpbb/viewtopic.php?f=51&t=8715
-
c-dale - Platinum Subscriber
- Posts: 1119
- Joined: Wed Dec 30, 2009 3:29 pm
- Location: Bracken Ridge, Brisbane, QLD
Re: Rig Jnr's New Custom Canopy Test Fitting - 27 May 2013
![]() by Dunga71 on Tue May 28, 2013 7:26 am
by Dunga71 on Tue May 28, 2013 7:26 am
Nice job mate suited to your needs and likes, i have done the same thing not everyones cup of tea but i like it and its original and there is that great feeling of achieving something that was only a few thoughts in your head
Believe all ya see and half what ya hear
-
Dunga71 - Posts: 1255
- Joined: Fri Jul 22, 2011 11:25 am
- Location: Sale victoria
Re: Rig Jnr's New Custom Canopy Test Fitting - 27 May 2013
![]() by jab461 on Tue May 28, 2013 9:17 am
by jab461 on Tue May 28, 2013 9:17 am
Mate if your dads retired, maybe he could have a little side business building canopys for us?
Very impressive mate, I really liked your old one and would've offered you some $ for it, but ive got an MN.
Very impressive mate, I really liked your old one and would've offered you some $ for it, but ive got an MN.
- jab461
- Posts: 330
- Joined: Mon Mar 07, 2011 7:18 pm
Re: Rig Jnr's New Custom Canopy Test Fitting - 27 May 2013
![]() by c-dale on Sat Aug 03, 2013 12:04 pm
by c-dale on Sat Aug 03, 2013 12:04 pm
New wheels and tyres
Fuel Offroad Octane 17x8 +14 with Mickey Thompson ATZ 4Ribs 265/70R17.


Drives bloody nice after 50k on unrotated Muddies. Mmmm even tyre wear, smooth ride.
Few more updates to come soon...
Fuel Offroad Octane 17x8 +14 with Mickey Thompson ATZ 4Ribs 265/70R17.
Drives bloody nice after 50k on unrotated Muddies. Mmmm even tyre wear, smooth ride.
Few more updates to come soon...
My Build Thread: http://www.newtriton.net/phpbb/viewtopic.php?f=51&t=8715
-
c-dale - Platinum Subscriber
- Posts: 1119
- Joined: Wed Dec 30, 2009 3:29 pm
- Location: Bracken Ridge, Brisbane, QLD
Re: Rig Jnr's new boots - 3 August 2013
![]() by c-dale on Sun Sep 15, 2013 12:21 pm
by c-dale on Sun Sep 15, 2013 12:21 pm
Outcast Offroad have finished the custom work I asked them to sort for me and I couldn't be happier
I have always loved the front of the Tritons with the nudge bars and have never really taken to the bull bars. Came close to getting and x-rox but even then having a full bull bar didn't sit quite right with me. Problem was I bought a winch and wanted it fitted. So, I had two options. 1. Take it like a man, suck it up and buy an x-rox or 2. Get something custom made that suits the way I want me car to look and run.
Got a couple of qoutes which made the decision easy. I did up a few drawings for Greg at Outcast but gave him free reign to add improvements as long as the main features were incorporated.
This is what I gave Greg.
To his credit he stuck to the design and had a cradle for the winch measured and mounted. When starting to add the bar work it wasn't at all good so he scrapped it and authorised the free reign I gave him. I am bloody glad he did.

I have always loved the front of the Tritons with the nudge bars and have never really taken to the bull bars. Came close to getting and x-rox but even then having a full bull bar didn't sit quite right with me. Problem was I bought a winch and wanted it fitted. So, I had two options. 1. Take it like a man, suck it up and buy an x-rox or 2. Get something custom made that suits the way I want me car to look and run.
Got a couple of qoutes which made the decision easy. I did up a few drawings for Greg at Outcast but gave him free reign to add improvements as long as the main features were incorporated.
This is what I gave Greg.
To his credit he stuck to the design and had a cradle for the winch measured and mounted. When starting to add the bar work it wasn't at all good
You do not have the required permissions to view the files attached to this post.
My Build Thread: http://www.newtriton.net/phpbb/viewtopic.php?f=51&t=8715
-
c-dale - Platinum Subscriber
- Posts: 1119
- Joined: Wed Dec 30, 2009 3:29 pm
- Location: Bracken Ridge, Brisbane, QLD
Who is online
Users browsing this forum: No registered users and 73 guests
![]()